Author Archives: Berend de Jong

Linux ls – first directories than files

If you would like to list directories first and than the files with the linux ls command you would have to execute the following ls commandGIT logo
ls -l –group-directories-first

The –group-directories-first  takes care of showing the directories first and than the files.

My favorite ls  alias is (add / change it in your .bashrc ):

ls -AlF --group-directories-first --color=auto
# -A => do not show the implied . and .. directories
# -l => use a long listing
# -F => appends an indicator to entries (a / for a directory)
Share

Setup git-http-backend on ubuntu / apache

Description

GIT

GIT

Since version 1.6.6 GIT is able to tunnel its native protocol through HTTP or HTTPS. In this post I describe how to set things up so you can use GIT over HTTP(s). As always it is best to make use of HTTPS for security reasons. In this setup we use Basic authentication so you better use HTTP

I also use virtualmin to keep my hosting business running but that should not be a problem when following along with the steps in this post.

Preparation

Ok first of all create a subdirectory in your public_html  (document root) directory. This is where we are going to store the repositories. I suggest you call this directory….git (lowercase). Change directory to your new folder.

mkdir /home/[username]/public_html/git
chown [username]:[username] /home/[username]/public_html/git
cd /home/[username]/public_html/git

Apache htaccess and htpasswd

We are going to create a couple of CGI scripts to have more control over the way the backend is executed. First create a .htaccess file with the following contents:

Options +ExecCGI
AddHandler cgi-script cgi
AuthUserFile /home/[username]/public_html/git/.htpasswd
AuthType Basic
AuthName "Git Private"
Require valid-user

This tells apache that it is ok to execute a CGI script from this folder (line 1, 2). It also tells apache to require a “valid-user”; this user can be found in the .htpasswd file (see below). Now we have to create a password file for the user authentication:

htpasswd -c .htpasswd username
New password:
Re-type password for user username

For testing purpose you could create an index.html  file and try to open that in the browser. The browser should ask your username and password now.

CGI Scripts

Now create a CGI script that will initialise a new bare repository for us to use. Create an init.cgi  script with the following contents (extend parameter checking if you wish).

init.cgi

#!/bin/bash                                                                                                   

# init.cgi
#       Initialise a new git repository. 
# Example:
#       https://[yourdomain]/git/init.cgi?reponame=mynewrepo
# Params:
#       reponame        - the name of the git repository to create
# Remarks
# - The name of the repository may only contain the letters a-z and A-Z
# - The repository should not exist already
echo 'Content-type: text/plain'
echo

source config.sh

saveIFS=$IFS
IFS='=&'
parm=($QUERY_STRING)
IFS=$saveIFS

if [ "${#parm[@]}" -ne "2" ]; then
        echo "Invalid number of parameters"
        exit 1
fi

if [ "${parm[0]}" != "reponame" ]; then
        echo "Invalid parameter name ${parm[0]}"
        exit 2
fi

if ! [[ ${parm[1]} =~ ^[a-zA-Z]*$ ]]; then
        echo "Invalid parameter value ${parm[1]}"
        exit 3
fi

if [ -d "$GIT_PROJECT_ROOT/${parm[1]}.git" ]; then
        echo "Git repository already exists"
        exit 4
fi

mkdir -p "$GIT_PROJECT_ROOT"

git init --bare "$GIT_PROJECT_ROOT/${parm[1]}.git/" 2>&1

echo "Repository created at `date` from $REMOTE_ADDR" > "$GIT_PROJECT_ROOT/${parm[1]}.git/description"
echo "`date` : \"${parm[1]}\" repository created from ip $REMOTE_ADDR" >> "$logfile"
echo >> "$logfile"

exit 0

When you execute this script via the browser (https://yourdomain/git/init.cgi?reponame=[yourreponame] ) a new bare repository is created. The actual repositories are created in the subdirectory repos below the git folder.

The next script will startup the actual GIT http backend. I have wrapped this in an additional script so I could perform some logging. Create a script called git.cgi  in your git directory with the following contents.

git.cgi

#!/bin/bash                                                                                                   

# git.cgi
#       Execute the git http-backend command
# Params
#       As handed by the git client command
# Example:
#       git clone https://[yourdomain]/git/git.cgi/myrepo.git
source config.sh

git http-backend "$@" 2>> "$logfile" || echo failed >> "$logfile"

echo "`date` : git command executed $@" >> "$logfile"

Finally you need a little configuration script, named config.sh , which sets some general parameters. Source is shown below.

config.sh

#!/bin/bash
# When not setting the variable below every repo has to have the magic file
# git-daemon-export-ok. If both are not present a message "Repository not exported"
# shows iup in the log file
export GIT_HTTP_EXPORT_ALL=1
export GIT_PROJECT_ROOT=~/public_html/git/repos
logfile=~/tmp/git_log.txt

Now you can clone a repository by sending your browser to the url

https://yourdomain/git/git.cgi/git/repos/[repo].git

Example workflow

In your browser: https://[yourdomain]/git/init.cgi?reponame=first
In your shell (local): git clone https://[yourdomain]/git/git.cgi/git/repos/first.git
Apply your changes
Add all items to the staging area: git add –all
Commit all changes in the staging area: git commit -am “My commit message”
Push the changes back to the server: git push

That’s all; happy GITing

Share

Add admin user to WordPress with SQL statements

Step 1 Add the user who is going to be an Administrator

INSERT INTO `wp_users` (`ID`, `user_login`, `user_pass`, `user_nicename`, `user_email`, `user_url`, `user_registered`, `user_activation_key`, `user_status`, `display_name`) VALUES ('4', 'demo', MD5('demo'), 'Your Name', 'test@yourdomain.com', 'http://www.test.com/','2011-06-07 00:00:00', '', '0', 'Your Name');

Step 2 Give the user the appropriate rights

INSERT INTO `wp_usermeta` (`umeta_id`, `user_id`, `meta_key`, `meta_value`) VALUES (NULL, '4','wp_capabilities', 'a:1:{s:13:"administrator";s:1:"1";}');

INSERT INTO `wp_usermeta` (`umeta_id`, `user_id`, `meta_key`, `meta_value`) VALUES (NULL, '4','wp_user_level', '10');

Share

SPF and DNS configuration

I recommend that you create a Sender Policy Framework (SPF) record for your domain. An SPF record is a type of Domain Name Service (DNS) record that identifies which mail servers are permitted to send email on behalf of your domain.SPF configuration

The purpose of an SPF record is to prevent spammers from sending messages with forged From addresses at your domain. Recipients can refer to the SPF record to determine whether a message purporting to be from your domain comes from an authorized mail server.

You can also lookup and test your SPF settings here.

So how do you add a SPF record to your domain. Well that is easy. A SPF record is nothing more than a TXT record in your DNS administration.

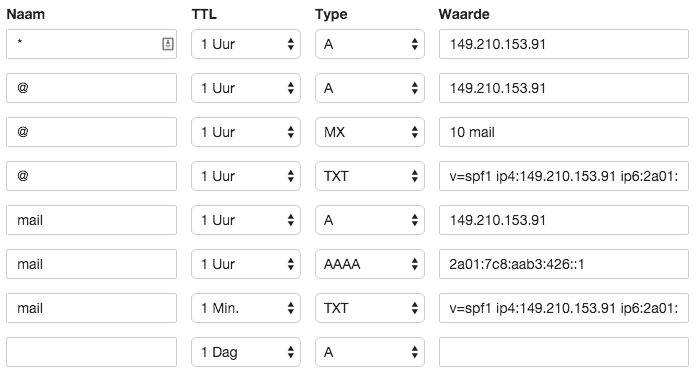
For a mail server the following DNS entries are defined:

SPF record in DNS

As you can see there is a SPF record on the subdomain mail. A mail server that is receiving email from your domain retrieves the SPF record for your domain and verifies that the sending IP is auhtorized (by the SPF record) for this action.

The headers below of an email message show a domain without a SPF record:

x-store-info:w5JOV+GpEg16Hd3Liu8PdV6w7ot2s5vN
Authentication-Results: hotmail.com; spf=none (sender IP is 149.210.153.91) smtp.mailfrom=pkn-bnn-iw@mail.bjdejong.nl; dkim=none header.d=example.nl; x-hmca=none header.id=example@example.nl
X-SID-PRA: example@example.nl
X-AUTH-Result: NONE
X-SID-Result: NONE
X-Message-Status: n:n
X-Message-Delivery: Vj0xLjE7dXM9MDtsPTA7YT0xO0Q9MjtHRD0xO1NDTD0z
X-Message-Info: /3z5fcrqMMUC9h0cjR+uvxBFbZLKdSdtWqbr6MInznDp3iFPY3dfZtYCX/McjjMtj/elcEu8E8GWPTQfME0U8yM95EcDOlBGfpGY3FVu+zhLC/YR0apj5gaojeU+XWKSFMn5xpzk3h7mi1Zrgx5MoCPw09osDoKH5afXmmKDtnxMmXlqQKv2juplilatuJpfG2/eYbQkFt2x+JC9NXiXJelaZ42f/aaw0S73pWX0oijyKeKhtLa1cA==
Received: from mail.bjdejong.nl ([149.210.153.91]) by COL004-MC4F4.hotmail.com with Microsoft SMTPSVC(7.5.7601.23143);
	 Fri, 11 Dec 2015 03:05:49 -0800
Received: by mail.bjdejong.nl (Postfix, from userid 1053)
	id 2D6A93C2F6B; Fri, 11 Dec 2015 12:05:40 +0100 (CET)
To: berendjdejong@gmail.com, berendjdejong@hotmail.com
Subject: Your subject goes here
X-PHP-Originating-Script: 1053:class-phpmailer.php
Date: Fri, 11 Dec 2015 11:05:40 +0000
From: example <example@example.nl>
Message-ID: <421364d92aacfc35ba32861d8d20d90a@pkn-bnn-iw.nl>
X-Priority: 3
X-Mailer: PHPMailer 5.2.10 (https://github.com/PHPMailer/PHPMailer/)
Reply-To: <example@example.nl>
MIME-Version: 1.0
Content-Type: text/plain; charset=UTF-8
Content-Transfer-Encoding: 8bit
Return-Path: pkn-bnn-iw@mail.bjdejong.nl
X-OriginalArrivalTime: 11 Dec 2015 11:05:49.0453 (UTC) FILETIME=[E48E43D0:01D13403]

Message contents

As you can see there is no SPF record defined. You can verify this with the host command:

host -t txt mail.bjdejong.nl

Now after adding an SPF record to the domain and sending a new message (wait a while for the changes to take effect in the global DNS systems) headers are as shown below (send to a hotmail account):

x-store-info:w5JOV+GpEg16Hd3Liu8PdV6w7ot2s5vN
Authentication-Results: hotmail.com; spf=pass (sender IP is 149.210.153.91) smtp.mailfrom=example@mail.bjdejong.nl; dkim=none header.d=example.nl; x-hmca=none header.id=example@example.nl
X-SID-PRA: example@example.nl
X-AUTH-Result: NONE
X-SID-Result: NONE
X-Message-Status: n:n
X-Message-Delivery: Vj0xLjE7dXM9MDtsPTA7YT0xO0Q9MjtHRD0xO1NDTD0z
X-Message-Info: /3z5fcrqMMUC9h0cjR+uvxBFbZLKdSdtWqbr6MInznDp3iFPY3dfZtYCX/McjjMtj/elcEu8E8GWPTQfME0U8yM95EcDOlBGfpGY3FVu+zhLC/YR0apj5gaojeU+XWKSFMn5xpzk3h7mi1Zrgx5MoCPw09osDoKH5afXmmKDtnxMmXlqQKv2juplilatuJpfG2/eYbQkFt2x+JC9NXiXJelaZ42f/aaw0S73pWX0oijyKeKhtLa1cA==
Received: from mail.bjdejong.nl ([149.210.153.91]) by COL004-MC4F4.hotmail.com with Microsoft SMTPSVC(7.5.7601.23143);
	 Fri, 11 Dec 2015 03:05:49 -0800
Received: by mail.bjdejong.nl (Postfix, from userid 1053)
	id 2D6A93C2F6B; Fri, 11 Dec 2015 12:05:40 +0100 (CET)
To: berendjdejong@gmail.com, berendjdejong@hotmail.com
Subject: Your subject goes here
X-PHP-Originating-Script: 1053:class-phpmailer.php
Date: Fri, 11 Dec 2015 11:05:40 +0000
From: example <example@example.nl>
Message-ID: <421364d92aacfc35ba32861d8d20d90a@pkn-bnn-iw.nl>
X-Priority: 3
X-Mailer: PHPMailer 5.2.10 (https://github.com/PHPMailer/PHPMailer/)
Reply-To: <example@example.nl>
MIME-Version: 1.0
Content-Type: text/plain; charset=UTF-8
Content-Transfer-Encoding: 8bit
Return-Path: example@mail.bjdejong.nl
X-OriginalArrivalTime: 11 Dec 2015 11:05:49.0453 (UTC) FILETIME=[E48E43D0:01D13403]

Message contents

The SPF check is now passed. Also the output of the host -t txt mail.bjdejong.nl command  should now give you the TXT SPF record.

Also be sure to edit your /etc/mailname  to reflect the name of your server on an Ubuntu distribution.

Share

OpenELEC installation on the Raspberry PI

A short blog post about setting up your Raspberry PI and openElec. Nothing difficult just some basic instructions to get the PI up and running.

openELec on the Pi

First download the OpenELEC Raspbian image here. Then place your SD card in your computer; unmount it with (determine the name of the SD card with the command diskutil list )

Use the raw version of the disk to speed up writing. So instead of using /dev/diskN use /dev/rdiskN

diskutil unmountDisk /dev/<disk>

Then unzip the zip file you have just downloaded and write the included img file to the SD card with the command:

sudo dd bs=1m if=path_of_your_image.img of=/dev/diskn

This takes a long while to complete. On Mac OS X you can type Ctrl+T in the terminal window where you executed the dd command to check progress.

After the image is written to the SD card place it in your PI and go ahead and fire up your Raspberry PI.

Share

Sublime and SFTP

Sublime Text

Sublime

Ever wanted to directly edit your files on your remote server. This can be done with Sublime and the SFTP plugin. Follow the steps below to setup your SFTP client with Sublime.

First install Sublime, you can find it here. After installation startup sublime and install the package manager. Follow the instructions that you can find here.

Okay, now we have sublime and its package manager installed. Next install the SFTP sublime plugin. Start the package manager in Sublime; type Cmd + Shift + P. Type Install Package and then type SFTP.

Now we have to create an account on the remote server. Setting up an account on your FTP server is not part of this post.

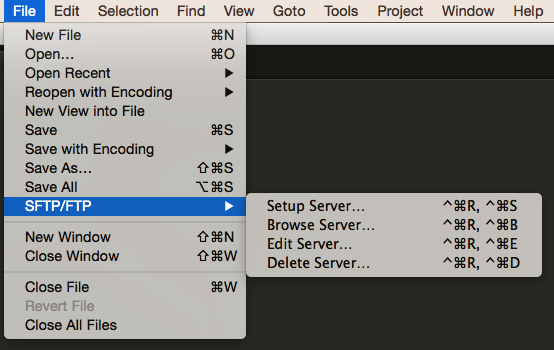
Create a new server setup by choosing File -> SFTP/FTP -> Setup server.

Change the correct items in the example shown and save this file

{
// The tab key will cycle through the settings when first created
// Visit http://wbond.net/sublime_packages/sftp/settings for help

// sftp, ftp or ftps
"type": "sftp",

"sync_down_on_open": true,
"sync_same_age": true,

"host": "example.com",
"user": "username",
//"password": "password",
//"port": "22",

"remote_path": "/example/path/",
//"file_permissions": "664",
//"dir_permissions": "775",

//"extra_list_connections": 0,

"connect_timeout": 30,
//"keepalive": 120,
//"ftp_passive_mode": true,
//"ftp_obey_passive_host": false,
//"ssh_key_file": "~/.ssh/id_rsa",
//"sftp_flags": ["-F", "/path/to/ssh_config"],

//"preserve_modification_times": false,
//"remote_time_offset_in_hours": 0,
//"remote_encoding": "utf-8",
//"remote_locale": "C",
//"allow_config_upload": false,
}

Now you can browse your server. Goto File -> SFTP/FTP -> Browse server. Choose the server you want to browse. If everything is correctly setup a list of files will appear. You can now edit these files as were they local files.

Share

ownCloud: upgrading your installation

ownCloud logo

ownCloud logo

Upgrade your ownCloud software with this step by step instruction. This post describes the procedure to upgrade the software. Follow the steps for a save and secure updating of your server. For a more verbose description of this procedure you can also check the upgrade page.


This step by step guide assumes you have a data folder outside your ownCloud installation. Check this in your ~/public_html/owncloud/config/config.php  file. The setting ‘datadirectory’  should point to a directory outside your ownCloud installation.

Check your version in the admin panel (admin -> Personal info):

Open a (ssh) shell on your linux box. Then su to the user that runs the ownCloud installation and execute the command (in the installation folder; normally this is on ~/public_html/owncloud):

php occ maintenance:mode --on

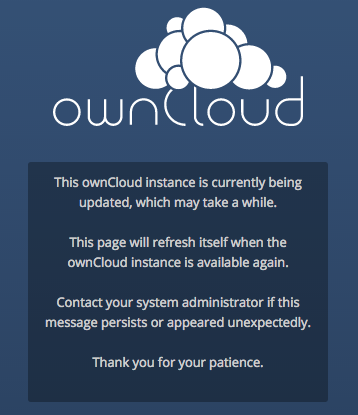
When you navigate to the site you will see the message below. It indicates that your installation is in maintenance mode:

ownCloud maintenance message

ownCloud maintenance message

Check your version with (execute in installation folder):

php occ --version

Goto the download page and copy the link; then execute the command below in your terminal session

wget https://download.owncloud.org/community/owncloud-8.0.2.tar.bz2

Stop the Apache webserver:

sudo service apache2 stop

Rename your current installation directory and unpack the archive in a new folder outside of your ownCloud directory with the command (a subdirectory ownCloud will be created by the tar command):

tar xjf owncloud-latest.tar.bz2

Copy the old configuration file to your new ownCloud folder:

cp ...../owncloud.old/config/config.php ....../owncloud/config

Also copy any apps you have installed in your ownCloud instance!

Now start the actual upgrade by executing the command below (again execute this in the installation folder):

php occ  upgrade

If everything went fine you should see something like this:

As you can see maintenance mode is automatically turned off and your server is ready to serve files again after you have re-started the Apache webserver:

sudo service apache2 start

Navigate to your site and check that things are still working as expected. In some cases you have to press the update button in your browser that appears when navigating to the site. If everything is working fine don’t forget to remove the old installation files and the archive you downloaded.

Remember: this step by step guide assumes you have a data folder outside your ownCloud installation. Check this in your ~/public_html/owncloud/config/config.php. The setting ‘datadirectory’ should point to a directory outside your ownCloud installation.

Happy ownClouding!

Share

Move to a WordPress https website from http

Wordpress https

WordPress https

Google recently announced that it has started using HTTPS as a ranking signal. So to improve your SEO results you can choose to ONLY use HTTPS for your WordPress site. For this to work you have to have a valid certificate in place (obviously).

Setting up a “SSL only” blog takes two steps.

1. Update your .htaccess file

Go to your WordPress installation folder and edit the .htaccess file in there. Below the line

RewriteEngineOn

add the following two lines:

RewriteCond %{HTTPS} !=on
RewriteRule ^/?(.*) https://%{SERVER_NAME}/$1 [R,L]

The two rules above will take care for the redirection (in case the user visited your http site) to the https site.

2. Update the WordPress blog settings

Go to the dashboard of your WordPress site and navigate to Settings -> General . Change the WordPress Address and Site Address to use the htpps URL:

Wordpress https

WordPress https

Ok that is all. Your visitors will now always be redirected to the https version of your website.

Share

Test a WCF service with SOAPUI

With help of SOAP UI you can easily test your webservices. In this pos tI’m going to test a WCF web service (yes MS WCF; not my favourite company and technology but anyway….)

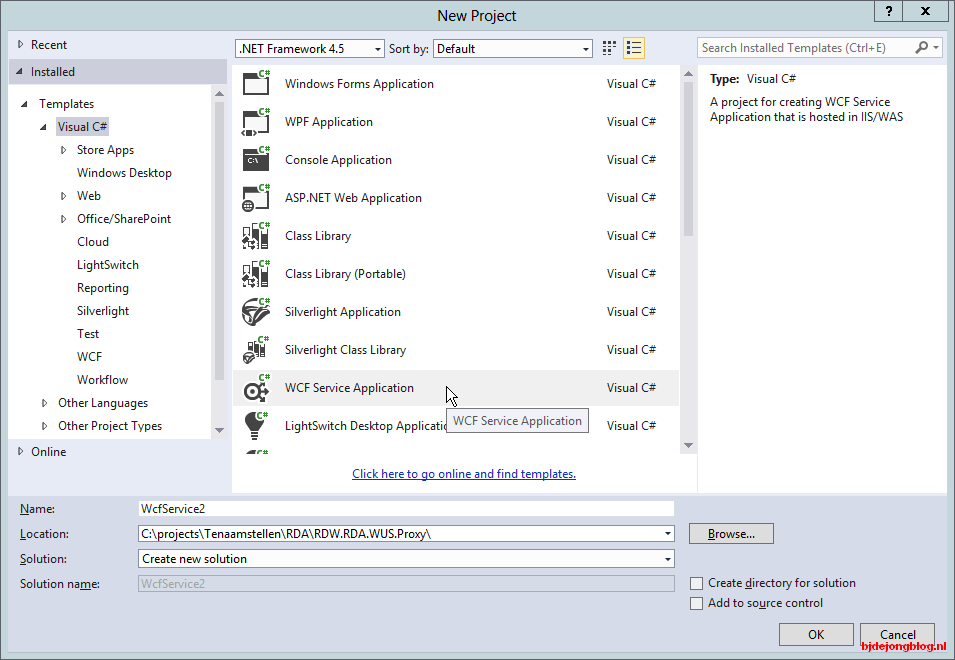
First create your webservice. Within Visual Studio goto File -> New Project . Choose Visual C# and select WCF Service Application

Create new project

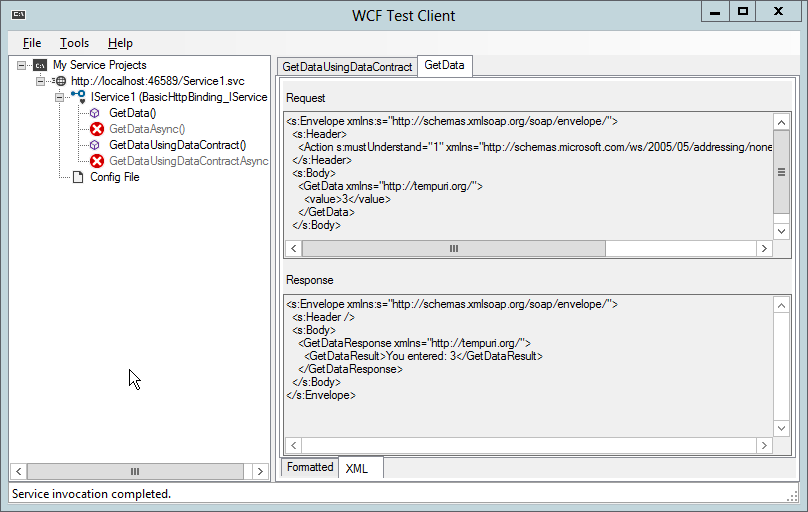
Now start your project by pressing F5; the service, together with the WCF Test Client, will start and there are two methods available on this service:

GetData and GetDataUsingDataContract

The WCF Test client

Play around with the WCF Test Client to get the idea of how this works. Next we will install SOAP UI. Download your copy here. Install SOAP UI using the default settings.

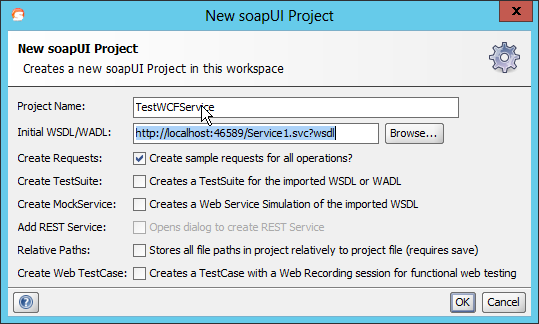
After installation start SOAP UI and create a new project. Goto File -> New soapui Project . Fill out the dialog as shown below (don’t forget to add the ?wsdl ):

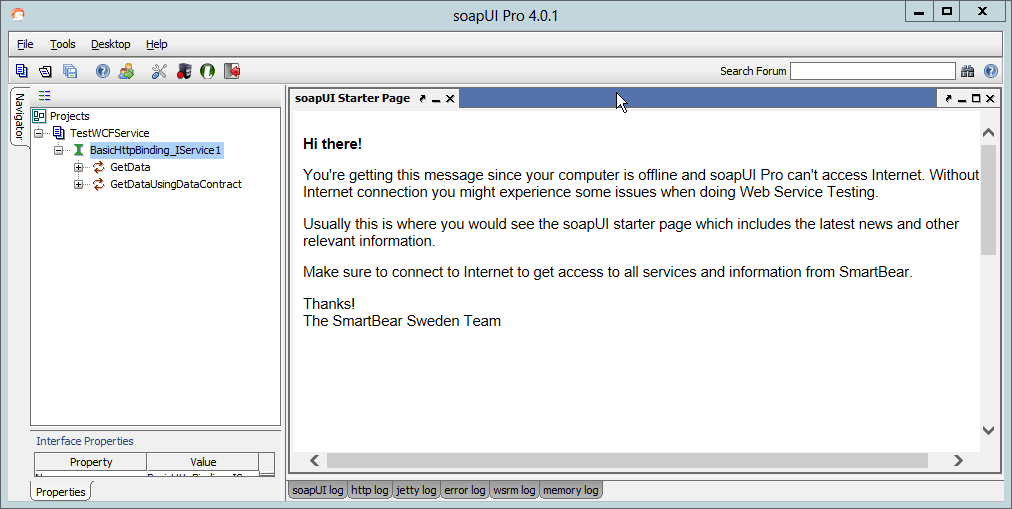
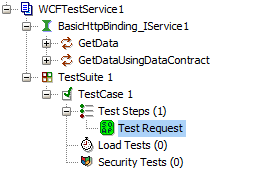
 Press Ok; a new soapui project will be created. See the image below:

Now you can execute the same request as the WCF Test Client did; but there is more; much more!

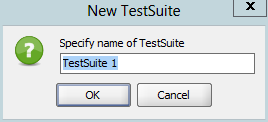
Right click on the WCFTestService1 and choose New TestSuite.

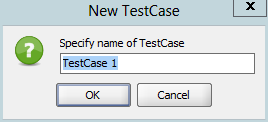
Press OK. Right click on TestSuite 1 and choose New TestCase:

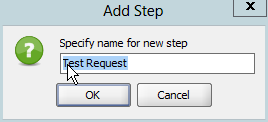
Press OK. Right click on Test Steps choose Add step and then Test request.

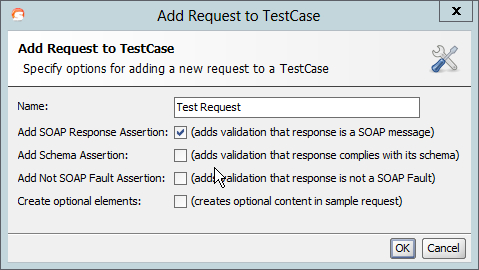
Press OK. Choose the operation you want to test:

Press OK. On the next screen leave things as suggested

Press OK. Your first test request is added to the TestCase.  By double clicking the TestCase 1 item and pressing the play button the test will be excuted. As you expected the test will succeed and a green icon is shown right before the test request entry:

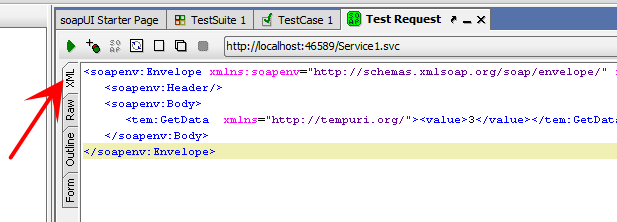
Now lets add some testdata to the request. Place the following XML in the test request XML window. First select the xml view:

Now paste the XML below into the request:

<soapenv:Envelope xmlns:soapenv="http://schemas.xmlsoap.org/soap/envelope/" xmlns:tem="http://tempuri.org/">
<soapenv:Header/>
<soapenv:Body>
<tem:GetData xmlns="http://tempuri.org/"><value>3</value></tem:GetData>
</soapenv:Body>
</soapenv:Envelope>

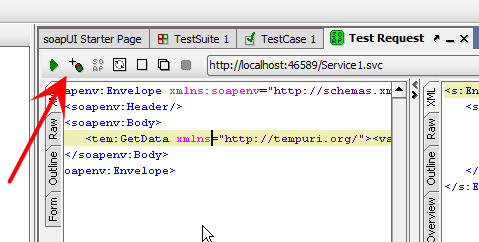
Now you can add assertions to your test script to make sure the operations works the way you want. For example lets assert that the GetDataResult field contains the text “You entered: 3”. Press the plus sign next to the play button:

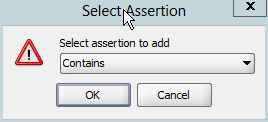
Select the SOAP response assertion:

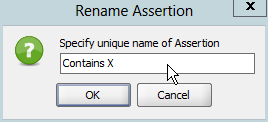
Give the assertiona unique name:

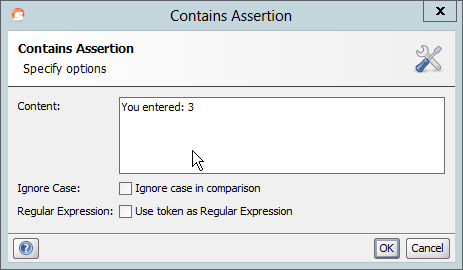
Type the text you want to look for in the response.

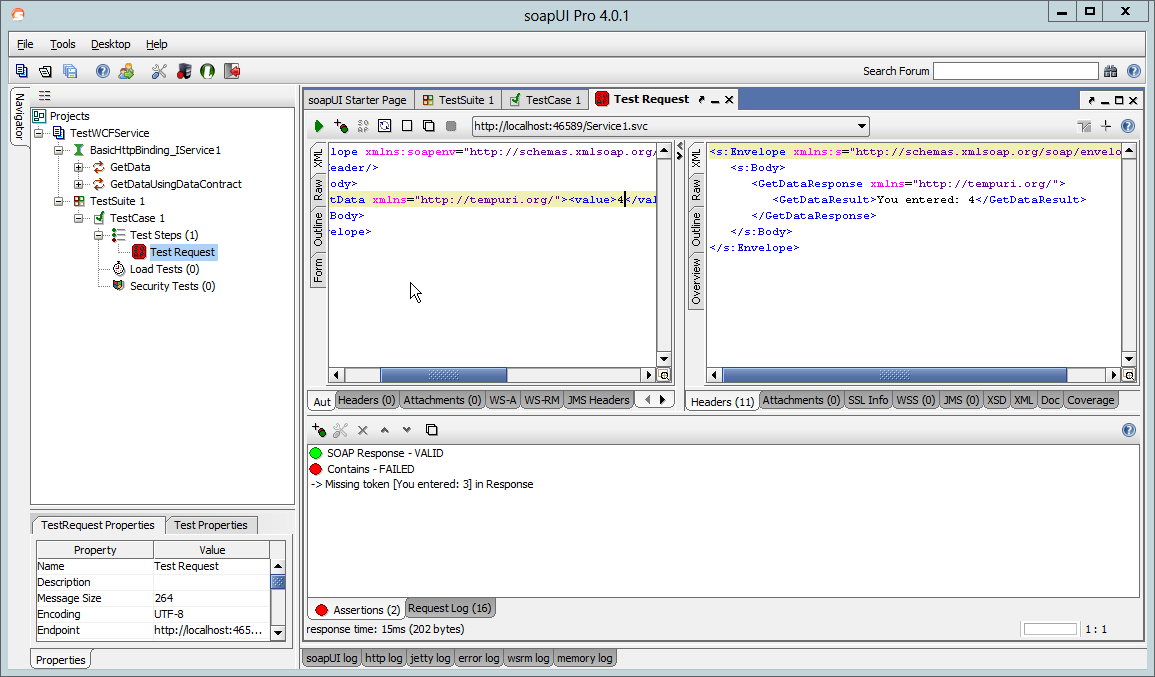
Now if you execute the request it will still succeed because the request contains the number three. Change this number to, for example 4, and you will see that the assertion fails.

Share

Get certificate information with openssl

To display certificate information of a certificate issue the command below:

openssl x509 -in certificate -text

Information about the certificate is displayed. Some important items are:

Issuer: C=GB, ST=Greater Manchester, L=Salford, O=COMODO CA Limited, CN=COMODO RSA Domain Validation Secure Server CA

The Issuer is a CA that signed this certificate.

Validity
            Not Before: Feb  6 00:00:00 2015 GMT
           Not After : Feb 26 23:59:59 2016 GMT

The validity period of the certificate. Remember to renew your certificate before it expires!

Subject: OU=Domain Control Validated, OU=PositiveSSL, CN=www.bjdejong.nl

The subject for this certificate. This certificate can be used for a website for the given CN.

Share