Author Archives: Berend de Jong

Visual Studio Tips & Tricks

Visual Studio tips and tricks.

Visual Studio
This article contains tips and tricks about Visual Studio. Tips are collected during day to day work with Visual Studio.

Searching with regular expression

Type Ctrl-F, in Find Options select Regular expression instead of “Wild card”
Type your regular expression; for example [.]isual studi[.]
The default behavior is greedy matching; to use non-greedy matching use the @ (instead of *) or
the # (instead of .)

Keyboard short-cuts

Show command window Ctrl-Alt-A
Cycle through clipboard buffer Ctrl-Shift-V
Toggle display whitespace Ctrl-R, Ctrl-W
Show options for smart-tag Ctrl-.

Various tips and tricks

To start a shell from visual studio open the command window (Crl-W,A). Type “Tools.Shell cmd”.

Share

Cryptography notes, tips and tricks

Cryptography notes.

This article is about cryptography and asymmetric encryption / decyption.
Asymmetric (public / private key pair) and symmetric (one key to encrypt and decrypt).

– distribute your public key
– keep your private key secret and private 🙂

Ask people who want to send you a secret mail to encrypt it with the public key. Only you, the owner of the private key, are able to decrypt it.

Install openSSH from http://slproweb.com/products/Win32OpenSSL.html (Visual C++ 2008 Redistributables and Win32 OpenSSL v1.0.1c).

Add the installation folder to your path and adjust the environment variable OPENSSL_CONF to point to your configuration file.

Asymmetric encryption of a file:
1. Create a private key and public key pair:
> openssl genrsa -out private.pem 1024
1a. Encrypt you private key:
> openssl rsa -in private.pem -des3 -out private-enc-key.pem
2. Extract the public key from this file (the public.pem, created below, can be freely distributed):
> openssl rsa -in private.pem -out public.pem -outform PEM -pubout
3. Encrypt a file:
> openssl rsautl -encrypt -inkey public.pem -pubin -in file.txt -out file_enc.txt
4. Decrypt the file with your private key:
> openssl rsautl -decrypt -inkey private.pem -in file_enc.txt -out decrypted.txt

Retrieve information about your private key (generated with genrsa command):
> openssl rsa -in privateKey.pem -text

NOTES

Privacy Enhanced Email (PEM)

http://users.dcc.uchile.cl/~pcamacho/tutorial/crypto/openssl/openssl_intro.html


Share
Synology

Synology DiskStation and using a custom SSL certificate

The original post can be found here. For archiving purposes and quick access I have copied this to my blog.

Prepare your Synology DiskStation

openssl synology

  • At first you should generate a temporary work folder. For example /usr/local/ssl/ and cd to this location.

The generation of SSL-certificates is always in two steps. At first you have to generate a certificate authority key. Then you generate a server certificate out of the certificate authority key. The server certificate will be used when starting the webserver. The certificate authority key has to be installed on the client pc.

Generation of the certificate authority key

  1. During the key generation you have to enter a passphrase which you need later to generate the certificates. Generate the key ca.key with the following command (openssl is pre-installed on your synology):
    openssl genrsa -des3 -out ca.key 1024
  2. Generation of the key certificate:
    openssl req -new -key ca.key -out ca.csr
  3. Generation of the final certificate authority key (valid 10 years):
    openssl x509 -days 3650 -signkey ca.key -in ca.csr -req -out ca.crt

Generation of the server-certificate

    1. Generation of the key:
      openssl genrsa -out server.key 1024
    2. |Generation of the key certificate – most important is the Common Name. It is important that it matches your DNS-Name. Example: name.dyndns.org. You can also use wildcards like *.name.dyndns.org.
      openssl req -new -key server.key -out server.csr
    3. Generation of the server certificate:
      openssl x509 -days 3650 -CA ca.crt -CAkey ca.key -set_serial 01 -in server.csr -req -out server.crt

Installing the files

      1. Change into the Synology certificate folder:
        cd /usr/syno/etc/ssl
      2. Make a backup folder for the old files:
        mkdir bak
      3. Copy the old files into the backup folder:
        cp -r ssl.crt bak
        cp -r ssl.csr bak
        cp -r ssl.key bak
      4. Move the new files to the certificate folder:
        mv /usr/local/ssl/ca.crt ssl.crt
        mv /usr/local/ssl/server.crt ssl.crt
        mv /usr/local/ssl/ca.csr ssl.csr
        mv /usr/local/ssl/server.csr ssl.csr
        mv /usr/local/ssl/ca.key ssl.key
        mv /usr/local/ssl/server.key ssl.key
      5. The ca.crt has to be installed on the client workstations. For this we copy the file into the folder public.
        cp /usr/syno/etc/ssl/ssl.crt/ca.crt /volume1/public
      6. Restart your Synology Station

Installation of the certificate on the client workstation

Finally the certificate has to installed on the client workstations as a trusted certificate authority. Copy the file ca.crt to the client pc. Install it within windows explorer with rightclick -> install certificate.

Restoring certificates

In case something goes wrong, Synology has supplied an easy way to, not restore, but create a set of new and working certificates. This should restore the certificates if importing certificates from the web manager has failed. If you need a telnet or ssh client use PuTTY.

      • Login as root, using the admin users password, to the Synology NAS drive using telnet or ssh and type the following in the command prompt:
        cd /usr/syno/etc/ssl/
        ./mkcert.sh
      • Allow the script to finish, and type reboot in the prompt.
      • In a while the NAS drive should have rebooted, and everything should be fine again.
Share
Synology

Subversion installation on your Synology DiskStation

subversionOn the SynologyWiki is an excellent article about installing Subversion on to your synology diskstation. Is is a step by step guide describing all the details for installing subversion on your diskstation.

Integrate Subversion and Visual Studio

You can also integrate SVN with your visual studio environment (almost like TFS). With the software from ankhSVN, for example, you can perfectly integrate SVN and Visual Studio (2008).

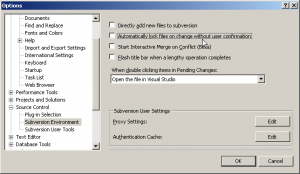
Use the Options window to configure the ankhSVN plugin:
image001
The file “app.config” is checked out; other files are also under version control

image002

View all of your pending changes.
image003

All other regular source control options, like banching and merging, labeling, shelving etcetera are all available.

Share

SoapUI Exception: Address already in use: connect

Load testing with SoapUI

soapUI_header_logoWhen load testing with SoapUI this exceptions, SOAP UI Exception: java.net.BindException: Address already in use: connect, may occur on a windows based system. It typically is thrown when testing a service with a lot of request in a short amount of time.

To prevent this exception from being thrown you can change the TcpIp parameters in the windows registry:

Navigate to HKEY_LOCAL_MACHINESYSTEMCurrentControlSetServicesTcpipParameters
Add a new DWORD key with the name “MaxUserPort” and a decimal value of 65534.

See also here

Share

Configure IIS Website with SSL

To secure your website you can use SSL and certificates. In this post I will explain in detail how to setup your site to use a certificate, including the details of installing your own Certification Authority. Finally I will show you some C# code to work with certificates.

Part 1 will show you how to install the Certificate Authority on a Windows 2003 machine, part 2 is about creating a new website,
part 3
shows how to request a webserver certificate,
part 4 shows you how to send the request to the Certification Authority,
part 5
shows you how the CA processes the request,
part 6
shows you how to download and install the certificate on the website, 
part 7
shows you how to create a virtual folder.
Part 8 shows you how to test ths site together with some coding examples in C#.

Share

Enable the ASP.NET page again

asp.net.logoSometimes your ASP.NET tab disappears in the IIS manager. To show this tab again follow the steps below.

Steps involved

  1. Stop the IIS Admin service (and any services that depend on it)
  2. Open C:WINDOWSsystem32inetsrvMetaBase.xml in notepad or your favorite XML Editor. DELETE the line that reads ‘Enable32BitAppOnWin64=”TRUE”‘
  3. Start -> Run -> iisreset
Share

SoapUI and WCF Service testing

Test with SoapUI: modify the generated web.config

soapUI_header_logoThe web.config that is create when you create a new WCF service application does not work with SoapUI. Retrieving the WSDL will work fine but when you execute a operation on the service the following message will appear:


<s:value>s:sender< s:value="">

A solution to this problem (at least for testing purposes) is to add a custom wsHttpBinding. Create a new WCF Service application C# project. Delete all text from the web.config and add replace it with the markup below.

Important to note is that we have a custom wsHttpBinding with the security mode set to “None”. This is necessary for SoapUI to work with this service!

Now you have to create a new SoapUI project. Point it to the ?wsdl for this services and the project is created with a default request for all operations. Open the first request and press the WS-A button (on the bottom of the request editor). Check “Enable WS-A addressing”, “Add default wsa:Action” and “Add default wsa:To”.

Now execute the request and you get a proper response!

Share

WCF and Messagequeue – MSMQ

WCF and Messagequeue – MSMQ

First let us understand why MSMQ (Messagequeue) came in to picture and then rest will follow. Let us take a scenario where your client needs to upload data to a central server. If everything will works fine and the server is available 24 hours to client then there are no issues. In case the server is not available, the clients will fail and the data will not be delivered. There is where MSMQ comes in to picture. It eliminates the need of persistent connection to a server. Therefore, what you do is deploy a MSMQ server and let the clients post message to this MSMQ server. When your actual server runs, it just picks up the message from the queue. In short, neither the client nor the server needs to be up and running on the same time. In WCF we have a client and service model and in real world it is very much practical possible that both the entities will not be available at one time.

1

In order to use MSMQ you need to install the Message queuing by click on Install windows component and selecting MSMQ queuing. Once that done we are all set to make our sample of MSMQ using WCF.After you installed MSMQ you setup the Visual Studio C#  solution. Create a new solution called “WCFMSMQ”. Add a new console application called “ServiceApp” and add a windows forms application called “WinClientApp”.

After this your solution should look like this:

2

Now we have to fill in the code for the projects. Start with the ServiceApp. Add a reference to the System.ServiceModel assembly.

3

Add a new class called IMSMQService and code the following interface:

1
2
3
4
5
6
7
8
9
10
11
namespace MSQMService
{
    using System.ServiceModel;
    [ServiceContract]
    public interface IMSMQService
    {
        [OperationContract(IsOneWay=true)]
        void SendMessage(string s);
    }
}

Add a new class called MSMQService and code the following implementation:

1
2
3
4
5
6
7
8
9
10
11
12
namespace MSQMService
{
    using System;
    public class MSMQService : IMSMQService
    {
        public void SendMessage(string s)
        {
            Console.WriteLine(string.Format("Received: {0}", s));
        }
    }
}

Add a new application configuration file and adjust it to look like this:

1
<!--l version="1.0" encoding="utf-8"-->

Open (the default generated) program.cs and adjust to look like this:

1
2
3
4
5
6
7
8
9
10
11
12
13
14
15
16
17
18
19
20
21
22
23
24
namespace ServiceApp
{
    using System;
    using System.Messaging;
    using System.ServiceModel;
    class Program
    {
        static void Main(string[] args)
        {
            string queueName = ".\Private$\MyQueue";
            if (!MessageQueue.Exists(queueName))
            {
                MessageQueue.Create(queueName, true);
            }
            ServiceHost host = new ServiceHost(typeof(MSMQService.MSMQService),
                new Uri("http://localhost:8000/ServiceMSMQ/service"));
            host.Open();
            Console.WriteLine("Service started.");
            Console.ReadLine();
        }
    }
}

The code above will create a Message queue (add a reference to the assembly System.Messaging) and start a new service host. The localhost url is only used for the svcutil so it can retrieve the service definition.

The service name (MSMQService.MSMQService) points to the implementing class (fully qualified name; ie namespace.class). The contract part of the endpoint (MSMQService.IMSMQService) points to the interface that defines this service.
The binding part (netMsqmBinding) points to one of the many default bindings. The bindingConfiguration (MyMsmqBindingConfig) points to the binding definition below the services section.

Ok; now the service part is ready. Try start the service and fix any errors you encounter.
Next we will start with the client. The client needs to know how to communicate with the server. It needs to know what interfaces are defined and which endpoints to use. To determine such information we can use the svcutil application. Start a command prompt and enter svcutil http://localhost:8000/ServiceMSMQ/service

This will generate two files; a “output.config” and a “MSMQService.cs” file. Rename the “output.config” to “app.config” and include these two files in the “WinClientApp” project.
Rename the “Form1.cs” to “FrmMain.cs” (optional but is best practice..).  Add a label, a textbox and a button to the form. Make it look like this:

4

Add a field to the FrmMain class:

1
MSMQServiceClient client = new MSMQServiceClient();

Add an eventhandler to the Send button and code the following:

1
2
3
4
if (!string.IsNullOrEmpty(textBox1.Text))
{
   client.SendMessage(textBox1.Text);
}

Change the startup projects for the solution so that both projects are started when you hit F5:
5

Now start the project and send messages to the server. As you can see when you hit send (with something filled in in the textbox) the service displays your message.

Stop the service; keep the client running. Again send some messages to the server; nothing happens; you will not even get an error message indicating that the server is down. This is because messages are now stored on the private queue MyQueue.

You can check this by starting Computer management (right click on computer and choose manage); then navigate to Services and applications -> Message queuing ->Private Queues –> MyQueue

6

Once you start the server again it will read all messages from the queue and process them one after each other.

Download the sourcecode for this article here.

Share