Create an ASP.NET .NET Core 6 MVC application with authentication in the application with help of the Identity framework. The application uses a MySql database for storing the identities and data.
For an explanation of releases of .NET Core have a look here.
General .NET Core project setup
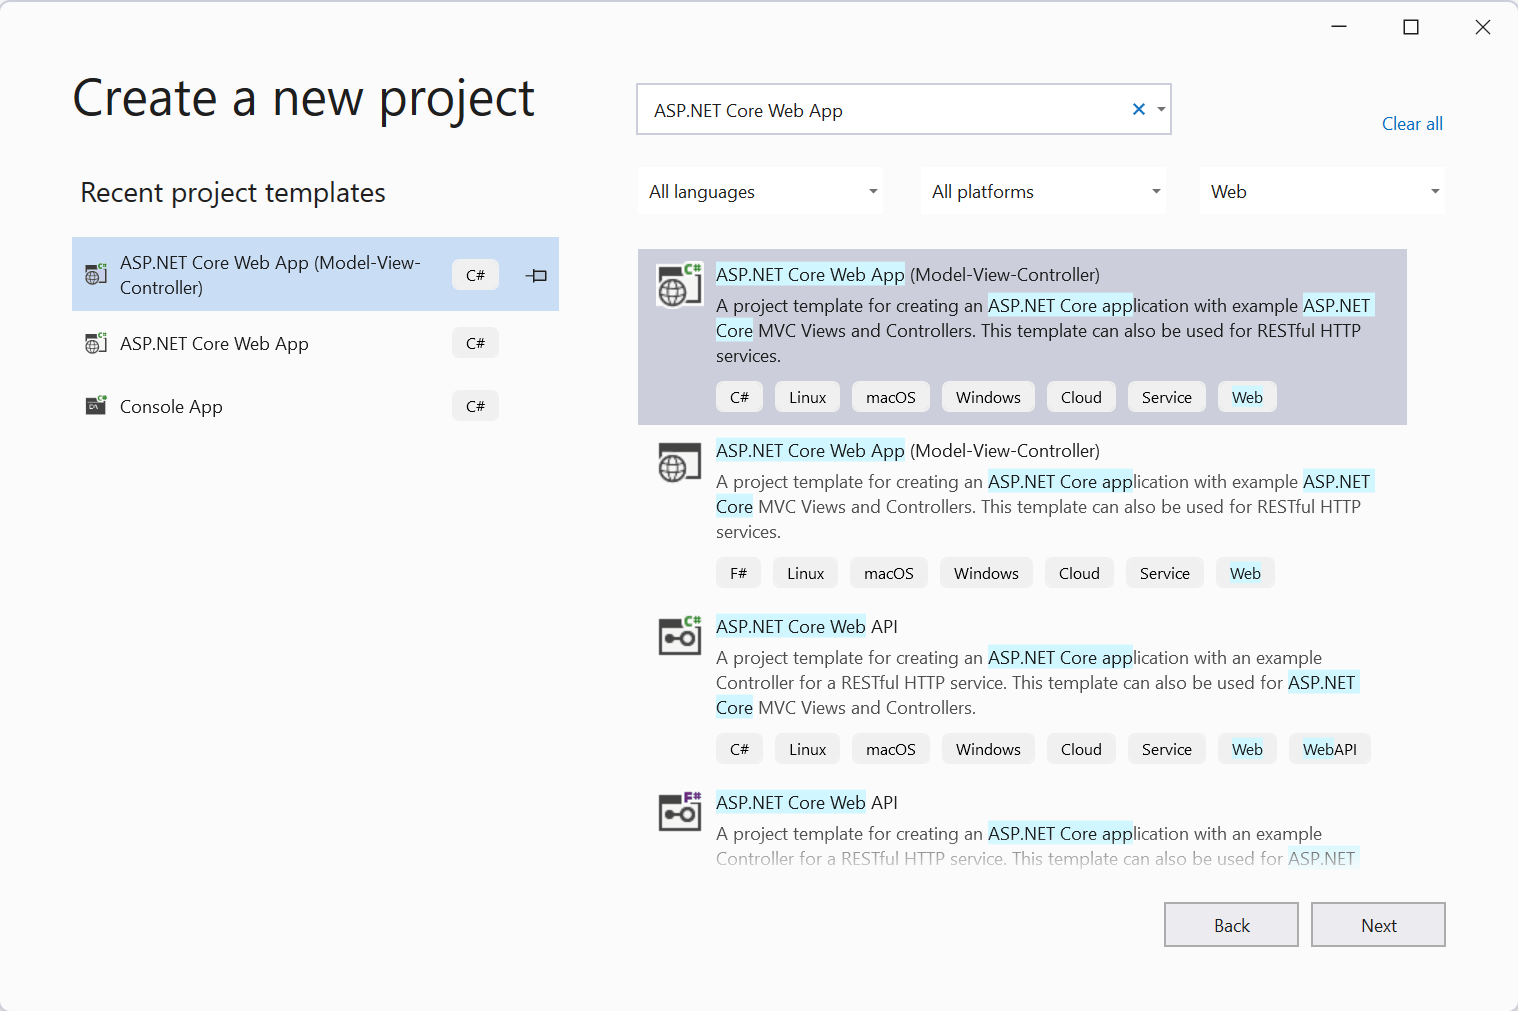
Select ASP.NET Core Web App (Model View Controller) and press Next.

Choose a name for your project, CoreMVCDemoApp for example, and press Next.
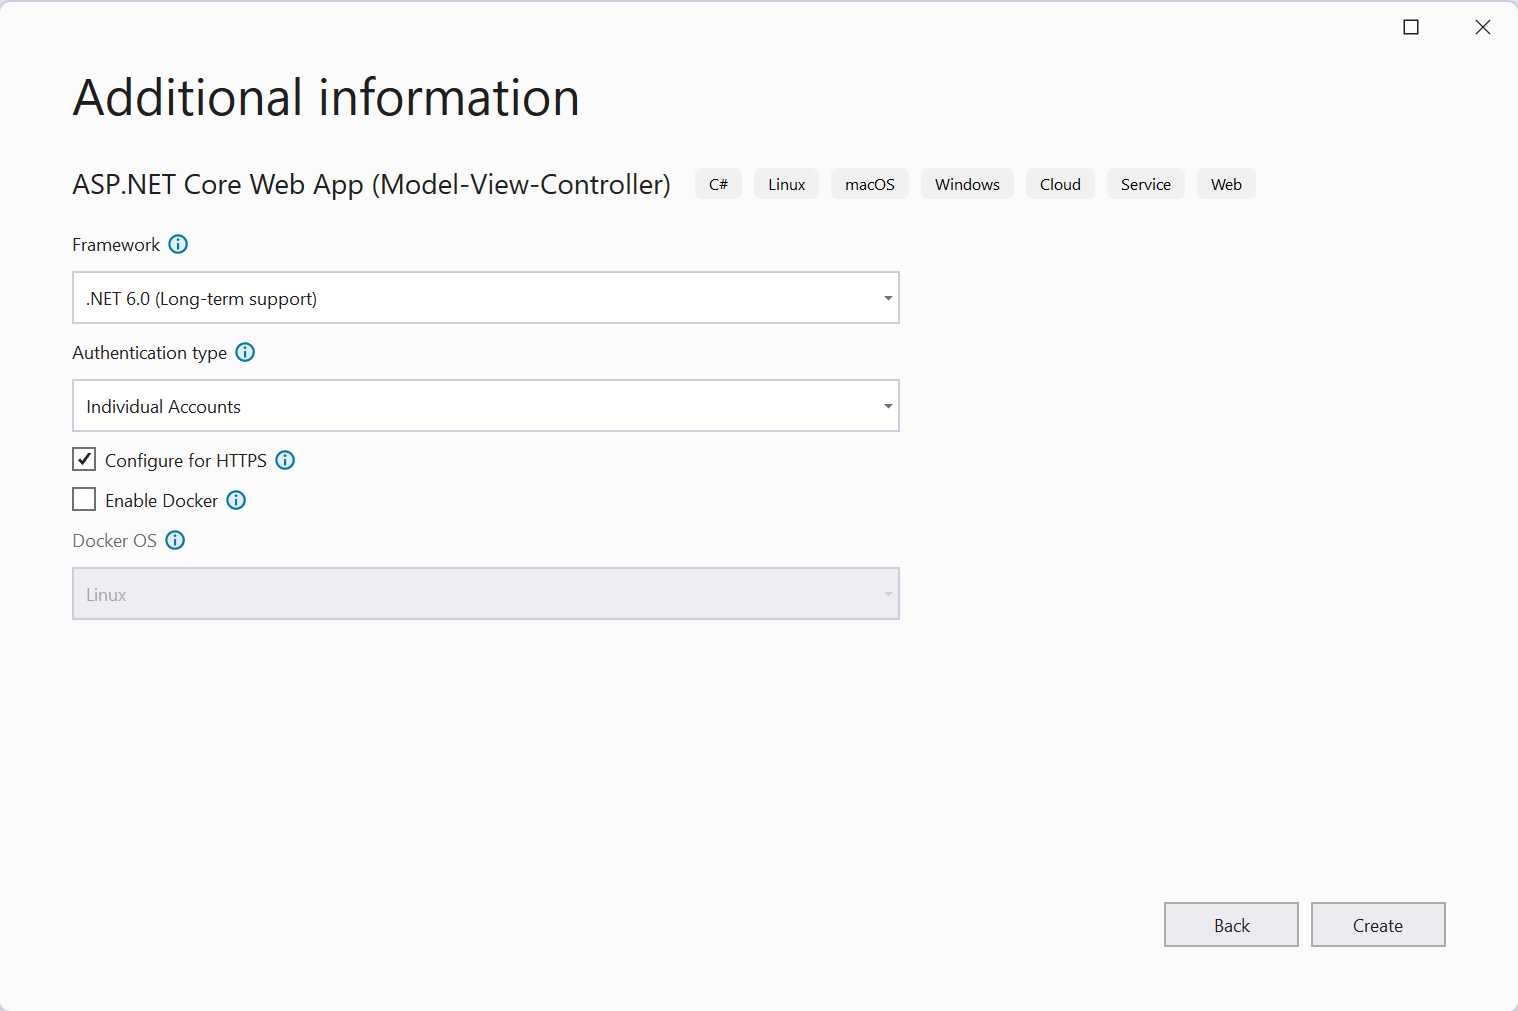
Select .NET 6.0 as your framework, choose Individual User Accounts. This will create the identity tables in your database when applying the generated migration.
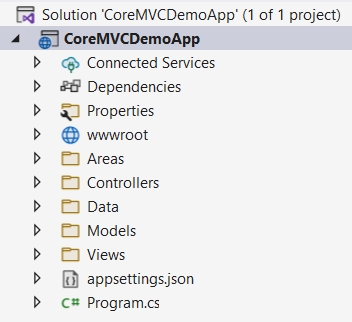
The solution is created with the MVC folder structure. As you can see the Startup.cs is not generated anymore for .NET Core 6 projects. Check this link for more information about the new templates in .NET Core 6.
Run the application and press the Login link. Try to login with some random email and password. The applications shows an error message like the one below. Do not press the Apply Migrations button at this moment.
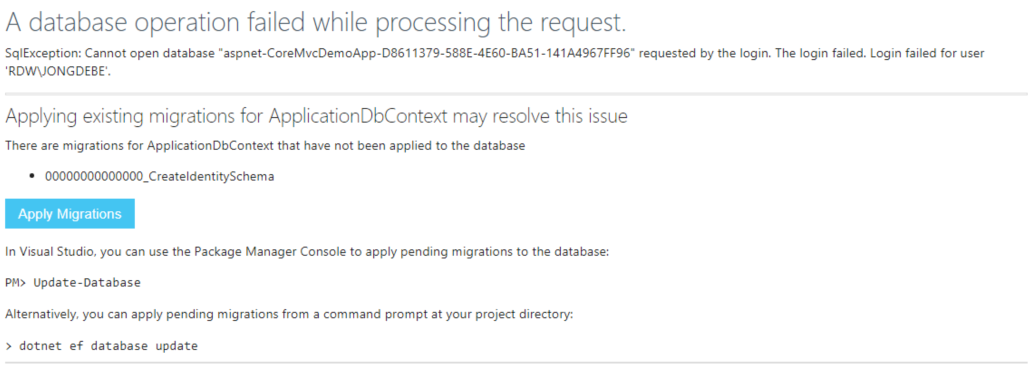
The application is created but there is no database yet. As you can see in the picture above the name of the database is a (default) generated name. First lets change that in our appsettings.json. Remove the “aspnet-” prefix and the guid from the database name.
{
  "ConnectionStrings": {
    "DefaultConnection": "Server=(localdb)\\mssqllocaldb;Database=CoreMVCDemoApp;Trusted_Connection=True;MultipleActiveResultSets=true"
  },
  "Logging": {
    "LogLevel": {
      "Default": "Information",
      "Microsoft.AspNetCore": "Warning"
    }
  },
  "AllowedHosts": "*"
}
When the project is created there is also an initial migration created. This migrations is stored under the Data folder in a folder called Migrations. Next we have to apply the migrations as is shown in the error message when you first logged in. In Visual Studio goto Tools -> NuGet Package Manager -> Package Manager Console.
Type the command Update-Database (be sure you have installed the package Microsoft.EntityFrameworkCore.Tools) in the console window and press Enter.
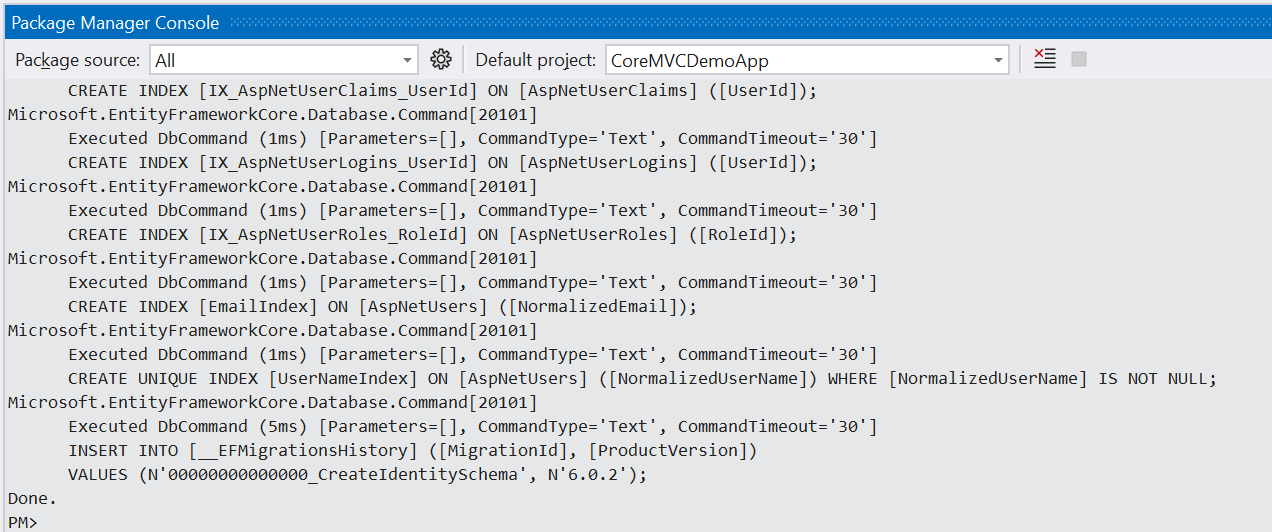
Now the database is created and you could try to login again.
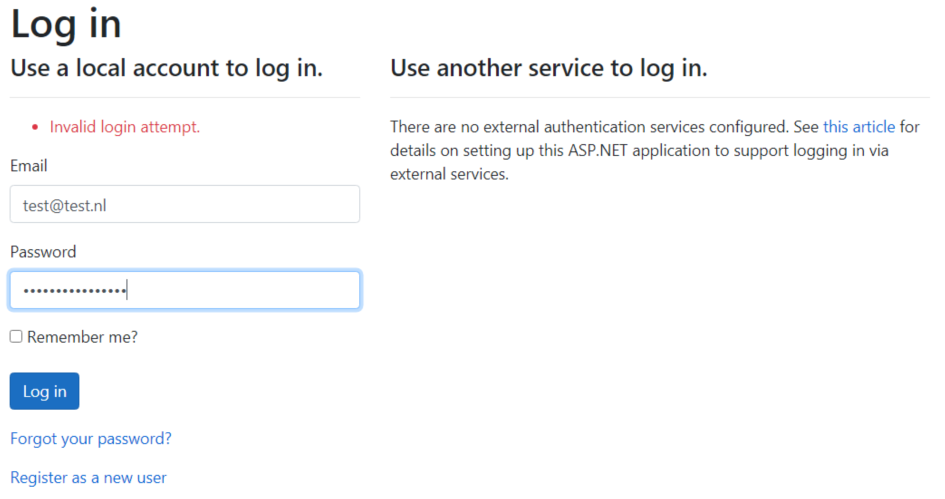
You could try to register now it should all work fine. In Visual Studio open the SQL Server Object Explort (View -> SQL Server Object Explorer) and navigate to your new database.
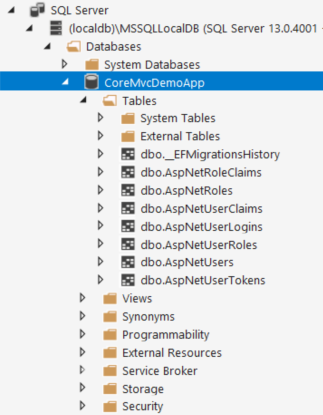
As you can see the Update-Database command created several tables for you. All of these tables (except __EFMigrationsHistory) are needed by the Identity System.
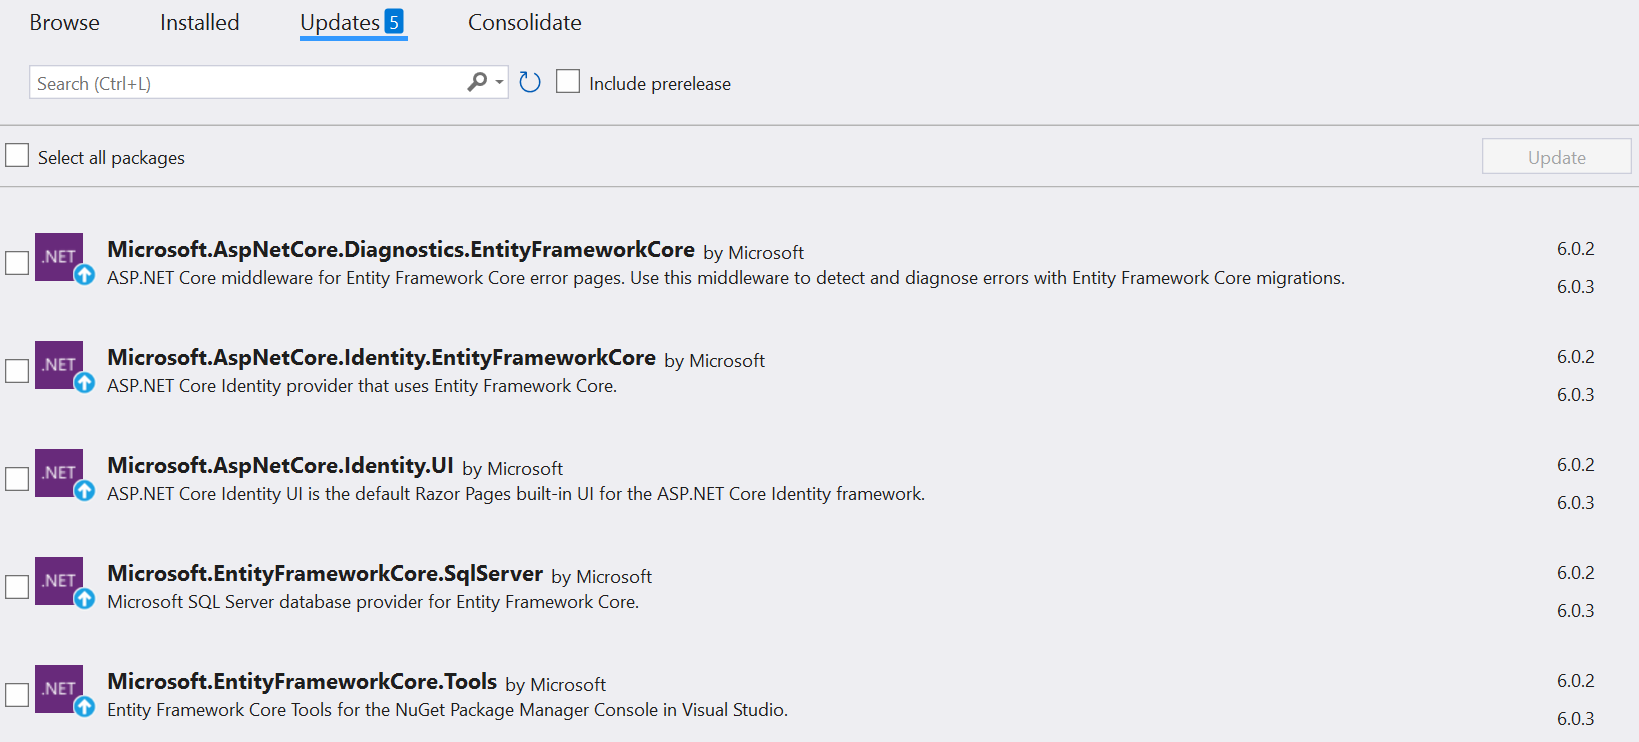
We are not going to make use of the SQL Server database, instead we are going to use MySQL as our database server. First of all we are going to update all our NuGet packages to the newest version. Right click on your solution and choose Manage NuGet packages for solution.
Go to the updates tab, select all and press Update. When you are using the .NET 5 version of the framework do not update to the 6.x.x version of the packages(!)
Accept the license agreement and after the update build and run your project to make sure it is still working.
Now we are going to instal the Pomelo MySQL Nuget package for MySQL usage. Search for Pomelo.EntityFrameworkCore.MySql in the NuGet Browse tab and install the latest version for the .NET Core version you are using.

We are going to read our configuration with the help of a configuration class. Create a new .NET Core class library project called CoreMvcDemoApp.Config.
You could create a Standard class library or a .NET Core class library. To decide which one best fits your needs consult this interactive tool from microsoft.
In the new created project create a new class called MySql with the following structure:
namespace CoreMvcDemoApp.Config
{
    public class MySql
    {
        public string? Host { get; set; }
        public string? UserID { get; set; }
        public string? Password { get; set; }
        public string? Database { get; set; }
        public string? Timezone { get; set; }
        public bool LogSQLToConsole { get; set; }
    }
}
Add the following NuGet packages to the new config project:
install-package Microsoft.Extensions.Configuration.Abstractions
install-package Microsoft.Extensions.Configuration
install-package Microsoft.Extensions.Configuration.Json
install-package Microsoft.Extensions.Configuration.UserSecrets
install-package Microsoft.Extensions.Configuration.Binder
Next add a new class with the name AppConfig with the following structure:
namespace CoreMvcDemoApp.Config
{
    using Microsoft.Extensions.Configuration;
    using System;

    public class AppConfig
    {
        public AppConfig()
        {
            IConfiguration configProvider = new ConfigurationBuilder()
                .AddJsonFile("appsettings.json", true, true)
                .AddUserSecrets<AppConfig>()
                .Build();

            configProvider.Bind(this);

            if (this.MySql == null)
            {
                throw new InvalidOperationException("MySql configuration is missing");
            }
        }

        public MySql MySql { get; set; }
    }
}
Open the Program.cs file and add the code line below right before the builder is created (add a reference to the config project and a using for the namespace):
// Create a new AppConfig object
AppConfig config = new AppConfig();
This will create a new config object with read its values from UserSecrets (see below). If a setting with the same key is also available in appsettings.json it will override the setting found in UserSecrets.
We now have to create out secrets.json file. Right click on your Config project (not the web project) and choose Manage User Secrets. A new editor window will open in which you can define your user secrets.
User secres are stored outside your project (on windows it can be found at C:\Users\[USER]\AppData\Roaming\Microsoft\UserSecrets\aspnet-[PRJNAME]-[GUID]\secrets.json.
The GUID will also appear in your project settings as UserSecretsId:
<Project Sdk="Microsoft.NET.Sdk.Web">
  <PropertyGroup>
    <TargetFramework>netcoreapp3.1</TargetFramework>
    <UserSecretsId>D8611379-588E-4E60-BA51-141A4967FF96</UserSecretsId>
  </PropertyGroup>
</Project>
Now when you start the application an exception will be thrown about the missing MySql configuration. Update the secrets.json file to add the MySql configuration (name is not case-sensitive, the casing of the name in the Json does not have to correspond with the name of the properties on the MySql object):
{
  "LogFileName" : "coremvcdemoapp..log",
  "MySql": {
    "host": "localhost",
    "database": "CoreMvcDemoApp",
    "userid": "root",
    "password": "***********"
  }
}
Now in the Program.cs file create the connection string and setup MySQL as your database provider. The complete Program.cs is shown below:
using CoreMvcDemoApp.Config;
using CoreMVCDemoApp.Data;
using Microsoft.AspNetCore.Identity;
using Microsoft.EntityFrameworkCore;
using MySqlConnector;

AppConfig config = new AppConfig();

var builder = WebApplication.CreateBuilder(args);

var connectionStringBuilder = new MySqlConnectionStringBuilder
{
    /*
     * Retrieved via the secret-manager (see also AddUserSecrets call in the Startup constructor)
     */
    Server = config.MySql.Host,
    Database = config.MySql.Database,
    UserID = config.MySql.UserID,
    Password = config.MySql.Password
};

// Add services to the container.
var connectionString = connectionStringBuilder.ConnectionString;

builder.Services.AddDbContext<ApplicationDbContext>(options =>
    options.UseMySql(connectionString, new MySqlServerVersion(new Version(8, 0, 21))));
builder.Services.AddDatabaseDeveloperPageExceptionFilter();

builder.Services.AddDefaultIdentity<IdentityUser>(options => options.SignIn.RequireConfirmedAccount = true)
    .AddEntityFrameworkStores<ApplicationDbContext>();
builder.Services.AddControllersWithViews();

var app = builder.Build();

// Configure the HTTP request pipeline.
if (app.Environment.IsDevelopment())
{
    app.UseMigrationsEndPoint();
}
else
{
    app.UseExceptionHandler("/Home/Error");
    // The default HSTS value is 30 days. You may want to change this for production scenarios, see https://aka.ms/aspnetcore-hsts.
    app.UseHsts();
}

app.UseHttpsRedirection();
app.UseStaticFiles();

app.UseRouting();

app.UseAuthentication();
app.UseAuthorization();

app.MapControllerRoute(
    name: "default",
    pattern: "{controller=Home}/{action=Index}/{id?}");
app.MapRazorPages();

app.Run();
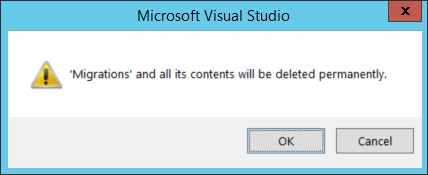
Now delete the entire migrations folder below the data folder in your solution. If you do not delete the migrations folder and you switched to the Pomelo driver AFTER creating a migrations an error will occur when updating the database. MySQL does not have a max parameter for the nvarchar datatype.
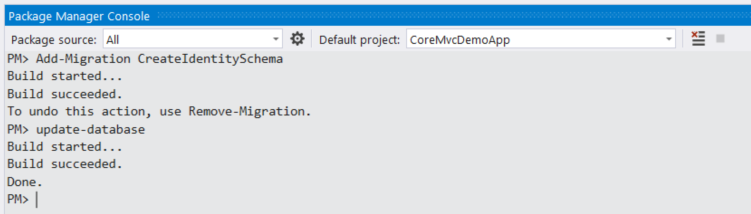
Then create a new migration, be sure to select the Web project when executing the Add-Migration command. It will now be compatible with MySql because that is your current connection from now on. To create the new migration execute Add-Migration CreateIdentitySchema in a Package Manager console. The Add-Mirgration command will recognize that your ApplicationDbContext is inheritting from IdentityDbContext. This takes care for creating the Identity tables.

Install MySql onto your development computer. Instructions for installing MySql can be found at this location.
After you have installed MySql and the migration has been created you are able to create the MySql database tables with the Update-database command. Did you specifiy the correct username (root) and password in the secrets.json file?
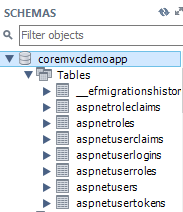
Now start the MySql Workbench and check if the database and tables are created:
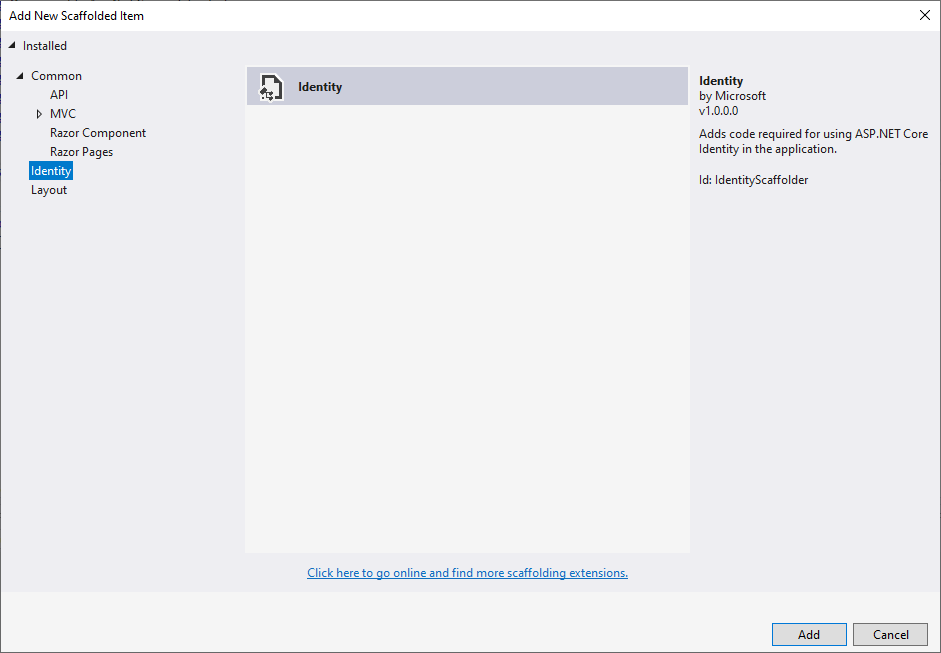
Start the web app and try to login. As you can see the login view is a general view. To make it fit your needs you’ll have to override the default view. Right click on your web project and choose Add and the New scafolded item... On the dialog that appears select the Identity tab.
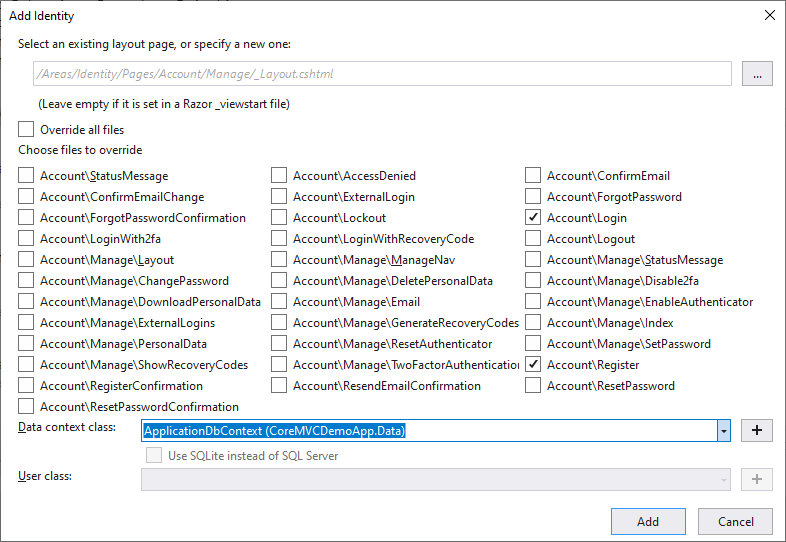
Press the Add button to choose the views you want to override. For a first setup you could choose the Login and Register views. Also select your ApplicationDbContext class and press the Add button.
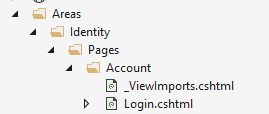
A file called ScaffoldingReadme.txt is opened. Review it and then delete it. After the scaffolding operation of the Login and Register view the views are added to the project. You can find them in the Area\Identity\Pages\Account folder.
You can now change the layout of the Login and Register view to your specific needs at this location.
Using Serilog
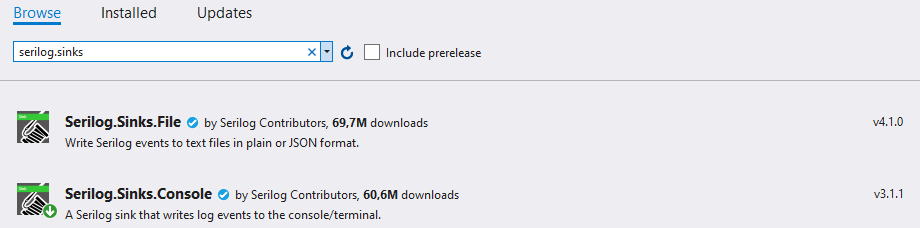
Serilog can be used for logging. First of all install the required nuget package with the nuget package manager.

Serilog uses the concept of sinks. This is a location where log information can be send to. Nothing will be logged if no sinks are attached to the logger. Install the console and file sink.
To start using the logger add the following code to the top of your Program.cs fileimmediately after the AppConfig constructor call
Log.Logger = new LoggerConfiguration()
                 .WriteTo.Console()
                 .WriteTo.File(config.LogFileName , rollingInterval: RollingInterval.Minute)
                 .CreateLogger();

Log.Information("Program initialising...");
The code above instantiates a new Logger and assigns it to the Serilog static global Log.Logger. The logger that is created wil log on the console and to a file which name begins with app and has an extension .log. The filename also contains the current time because every minute a new file will be created.
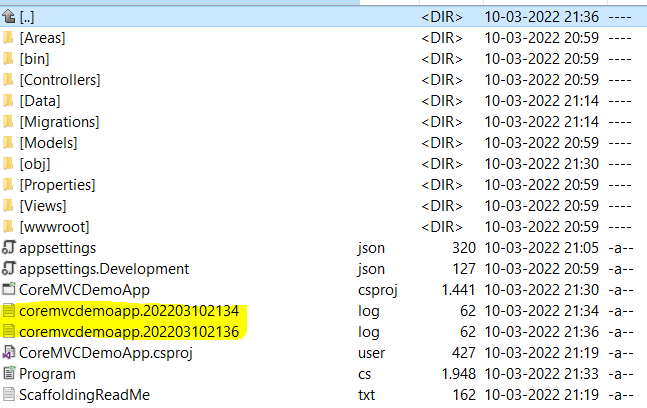
Every minute a new file will be a bit too much but a file every day seems reasonable for logging.
Add model classes
In this example we are creating a one to many relationship between an Order and the items on it. Add two classes to the Data folder in the main project with the following code:
namespace CoreMVCDemoApp.Data
{
    using System;
    using System.Collections.Generic;

    public class Order
    {
        public int Id { get; set; }
        public DateTime OrderDate { get; set; }
        List<Lineitem> Lineitems { get; set; }
    }
}
And the lineitem class
namespace CoreMVCDemoApp.Data
{
    using System.ComponentModel.DataAnnotations;
    using System.ComponentModel.DataAnnotations.Schema;

    public class Lineitem
    {
        public int Id { get; set; }
        [MaxLength(100)]
        public string Description { get; set; }
        [Column(TypeName = "decimal(10,2)")]
        public decimal Price { get; set; }
        public Order Order { get; set; }
    }
}
Now add a migration for these two new model classes with help of the Package Manager console and the Add-Migration command. After adding the migration execute the Update-Database command. The new tables are created with the following definition:
CREATE TABLE `orders` (
  `Id` int(11) NOT NULL AUTO_INCREMENT,
  `OrderDate` datetime(6) NOT NULL,
  PRIMARY KEY (`Id`)
) ENGINE=InnoDB DEFAULT CHARSET=latin1;

CREATE TABLE `lineitems` (
  `Id` int(11) NOT NULL AUTO_INCREMENT,
  `Description` varchar(100) NOT NULL,
  `Price` decimal(10,2) NOT NULL,
  `OrderId` int(11) DEFAULT NULL,
  PRIMARY KEY (`Id`),
  KEY `IX_Lineitems_OrderId` (`OrderId`),
  CONSTRAINT `FK_Lineitems_Orders_OrderId` FOREIGN KEY (`OrderId`) REFERENCES `orders` (`Id`)
) ENGINE=InnoDB DEFAULT CHARSET=latin1;
Entity framework takes care of creating the tables according to the C# classes. A couple of rules are applied here:
- The property
Idis automatically translated to the primary key of the database table - Because we added the Order property to the Lineitem class a foreign key constraint is created to the Orders table on the Id column
- The
[Required]attribute translates into aNOT NULLconstraint - The
[MaxLength(100)]defines avarchar(100)column instead of alongtextcolumn - The
[Column(TypeName = "decimal(10,2)")]specifies a custom type for a column
Adding pagination with CloudScribe
For pagination we are using CloudScribe. Install the nuget package cloudscribe.Web.Pagination (at the time of this writing the latest version is 3.1.0). Documentation for this pagination taghelper can be found here.
Add the cloud pagination services to the IServiceCollection in Startup.cs:
public void ConfigureServices(IServiceCollection services)
{
   services.AddCloudscribePagination();
   services.AddControllersWithViews();
}
Add a reference to the taghelper in _ViewImports.cshtml
@addTagHelper *, cloudscribe.Web.Pagination
Now add the taghelper to the view where you want the pagination controls to appear
<cs-pager cs-paging-pagenumber="1"
          cs-paging-totalitems="100"
          cs-paging-pagesize="10"
          cs-pagenumber-param="pagenumber"
          asp-controller="Home"
          asp-action="Index"
          cs-pager-li-current-class="page-item active"
          cs-pager-li-other-class="page-item"
          cs-pager-li-non-active-class="page-item disabled"
          cs-pager-link-current-class="page-link"
          cs-pager-link-other-class="page-link">
</cs-pager>
The last 5 lines of the tag are used to override the default bootstrap 3 classes with the bootstrap 4 classes.
Now to pass parameters between the view and the controller install another cloudscribe nuget package: cloudscribe.Pagination.Models
Now add a using to the controller class for the cloudscribe.Pagination.Models namespace.
Change the index method to return a view with a PagedResult of Person with the list of Persons stored in the Data property. Also pass in the pagenumber, pagesize, totalsize.
public IActionResult Index(int pageNumber = 1, int pageSize = 10)
{
   int ExcludeRecords = (pageNumber * pageSize) - pageSize;
   List<Person> persons = DB.GetPersons()
          .Skip(ExcludeRecords).Take(pageSize).ToList();

    PagedResult<Person> result = new PagedResult<Person>()
    {
        Data = persons,
        TotalItems = DB.GetPersons().Count,
        PageNumber = pageNumber,
        PageSize = pageSize
    };

    return View(result);
}
Also change the type of model the view receives to cloudscribe.Pagination.Models.PagedResult<Person>
To reuse the pagination taghelper on all your views make it a partial view. Pass the asp-controller and asp-action through the ViewData. In the view add the properties to the ViewData object:
@{
    ViewData["Title"] = "Home Page";
    ViewData["Controller"] = "Home";
    ViewData["Action"] = "Index";
}
Create the partial view in the Shared folder
<cs-pager cs-paging-pagenumber="@Model.PageNumber"
          cs-paging-totalitems="@Model.TotalItems"
          cs-paging-pagesize="@Model.PageSize"
          cs-pagenumber-param="pagenumber"
          asp-controller="@ViewData["Controller"]"
          asp-action="@ViewData["Action"]"
          cs-pager-li-current-class="page-item active"
          cs-pager-li-other-class="page-item"
          cs-pager-li-non-active-class="page-item disabled"
          cs-pager-link-current-class="page-link"
          cs-pager-link-other-class="page-link">
</cs-pager>
Next we are going to add sorting and filtering to our index views
