Category Archives: Linux

Howto’s, scripts and tips for Linux

LetsEncrypt request certificate error

Invalid host in redirect target “subdomain.domain.io.well-known”

When you get this error while requesting a new certificate you probably have a wrong redirect statement in your apache configuration.

The “redirect permanent” in the port 80 section should end with a / (or remove this entry while requesting a new certificate)

Share

VirtualMin error regarding can_use_gcloud_storage_creds 

After a fresh install of Ubuntu 22.04 and VirtualMin I tried to restore some WordPress sites to my new server. Created a backup on the old server. Next logged into the new server and in VirtualMin navigated to VirtualMin -> Backup and Restore -> Restore Virtual Servers. On this page I got the error as shown below.

HTTP/1.0 500 Perl execution failed Server: MiniServ/2.021 Date: Fri, 21 Apr 2023 07:11:21 GMT Content-type: text/html; Charset=utf-8 Connection: close

ERROR — PERL EXECUTION FAILED
Undefined subroutine &virtual_server::can_use_gcloud_storage_creds called at /usr/share/webmin/virtual-server/cloud-lib.pl line 304.

Not sure what causes this but it has something to do with the google cloud sdk not being installed on the server i suspect. I do not need this so I opend the cloud-lib.pl file in folder /usr/share/webmin/virtual-server/ and modified the perl code as a work around. Replace the function cloud_google_get_state with the definition below:

sub cloud_google_get_state
{
   return { 'ok' => 0 };
}

Next wait for a fix from VirtualMin.

Share

Linux ls – first directories than files

If you would like to list directories first and than the files with the linux ls command you would have to execute the following ls commandGIT logo
ls -l –group-directories-first

The –group-directories-first  takes care of showing the directories first and than the files.

My favorite ls  alias is (add / change it in your .bashrc ):

ls -AlF --group-directories-first --color=auto
# -A => do not show the implied . and .. directories
# -l => use a long listing
# -F => appends an indicator to entries (a / for a directory)
Share

SPF and DNS configuration

I recommend that you create a Sender Policy Framework (SPF) record for your domain. An SPF record is a type of Domain Name Service (DNS) record that identifies which mail servers are permitted to send email on behalf of your domain.SPF configuration

The purpose of an SPF record is to prevent spammers from sending messages with forged From addresses at your domain. Recipients can refer to the SPF record to determine whether a message purporting to be from your domain comes from an authorized mail server.

You can also lookup and test your SPF settings here.

So how do you add a SPF record to your domain. Well that is easy. A SPF record is nothing more than a TXT record in your DNS administration.

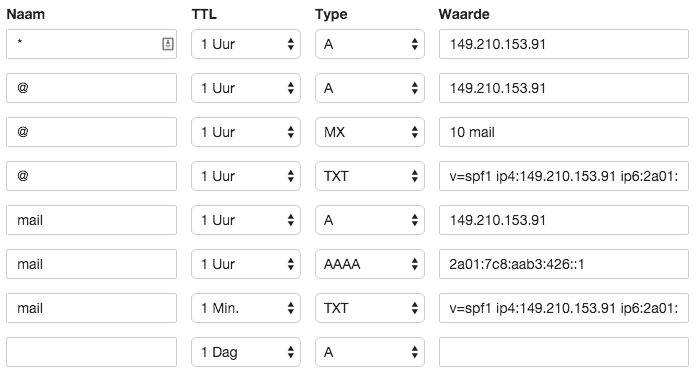
For a mail server the following DNS entries are defined:

SPF record in DNS

As you can see there is a SPF record on the subdomain mail. A mail server that is receiving email from your domain retrieves the SPF record for your domain and verifies that the sending IP is auhtorized (by the SPF record) for this action.

The headers below of an email message show a domain without a SPF record:

x-store-info:w5JOV+GpEg16Hd3Liu8PdV6w7ot2s5vN
Authentication-Results: hotmail.com; spf=none (sender IP is 149.210.153.91) smtp.mailfrom=pkn-bnn-iw@mail.bjdejong.nl; dkim=none header.d=example.nl; x-hmca=none header.id=example@example.nl
X-SID-PRA: example@example.nl
X-AUTH-Result: NONE
X-SID-Result: NONE
X-Message-Status: n:n
X-Message-Delivery: Vj0xLjE7dXM9MDtsPTA7YT0xO0Q9MjtHRD0xO1NDTD0z
X-Message-Info: /3z5fcrqMMUC9h0cjR+uvxBFbZLKdSdtWqbr6MInznDp3iFPY3dfZtYCX/McjjMtj/elcEu8E8GWPTQfME0U8yM95EcDOlBGfpGY3FVu+zhLC/YR0apj5gaojeU+XWKSFMn5xpzk3h7mi1Zrgx5MoCPw09osDoKH5afXmmKDtnxMmXlqQKv2juplilatuJpfG2/eYbQkFt2x+JC9NXiXJelaZ42f/aaw0S73pWX0oijyKeKhtLa1cA==
Received: from mail.bjdejong.nl ([149.210.153.91]) by COL004-MC4F4.hotmail.com with Microsoft SMTPSVC(7.5.7601.23143);
	 Fri, 11 Dec 2015 03:05:49 -0800
Received: by mail.bjdejong.nl (Postfix, from userid 1053)
	id 2D6A93C2F6B; Fri, 11 Dec 2015 12:05:40 +0100 (CET)
To: berendjdejong@gmail.com, berendjdejong@hotmail.com
Subject: Your subject goes here
X-PHP-Originating-Script: 1053:class-phpmailer.php
Date: Fri, 11 Dec 2015 11:05:40 +0000
From: example <example@example.nl>
Message-ID: <421364d92aacfc35ba32861d8d20d90a@pkn-bnn-iw.nl>
X-Priority: 3
X-Mailer: PHPMailer 5.2.10 (https://github.com/PHPMailer/PHPMailer/)
Reply-To: <example@example.nl>
MIME-Version: 1.0
Content-Type: text/plain; charset=UTF-8
Content-Transfer-Encoding: 8bit
Return-Path: pkn-bnn-iw@mail.bjdejong.nl
X-OriginalArrivalTime: 11 Dec 2015 11:05:49.0453 (UTC) FILETIME=[E48E43D0:01D13403]

Message contents

As you can see there is no SPF record defined. You can verify this with the host command:

host -t txt mail.bjdejong.nl

Now after adding an SPF record to the domain and sending a new message (wait a while for the changes to take effect in the global DNS systems) headers are as shown below (send to a hotmail account):

x-store-info:w5JOV+GpEg16Hd3Liu8PdV6w7ot2s5vN
Authentication-Results: hotmail.com; spf=pass (sender IP is 149.210.153.91) smtp.mailfrom=example@mail.bjdejong.nl; dkim=none header.d=example.nl; x-hmca=none header.id=example@example.nl
X-SID-PRA: example@example.nl
X-AUTH-Result: NONE
X-SID-Result: NONE
X-Message-Status: n:n
X-Message-Delivery: Vj0xLjE7dXM9MDtsPTA7YT0xO0Q9MjtHRD0xO1NDTD0z
X-Message-Info: /3z5fcrqMMUC9h0cjR+uvxBFbZLKdSdtWqbr6MInznDp3iFPY3dfZtYCX/McjjMtj/elcEu8E8GWPTQfME0U8yM95EcDOlBGfpGY3FVu+zhLC/YR0apj5gaojeU+XWKSFMn5xpzk3h7mi1Zrgx5MoCPw09osDoKH5afXmmKDtnxMmXlqQKv2juplilatuJpfG2/eYbQkFt2x+JC9NXiXJelaZ42f/aaw0S73pWX0oijyKeKhtLa1cA==
Received: from mail.bjdejong.nl ([149.210.153.91]) by COL004-MC4F4.hotmail.com with Microsoft SMTPSVC(7.5.7601.23143);
	 Fri, 11 Dec 2015 03:05:49 -0800
Received: by mail.bjdejong.nl (Postfix, from userid 1053)
	id 2D6A93C2F6B; Fri, 11 Dec 2015 12:05:40 +0100 (CET)
To: berendjdejong@gmail.com, berendjdejong@hotmail.com
Subject: Your subject goes here
X-PHP-Originating-Script: 1053:class-phpmailer.php
Date: Fri, 11 Dec 2015 11:05:40 +0000
From: example <example@example.nl>
Message-ID: <421364d92aacfc35ba32861d8d20d90a@pkn-bnn-iw.nl>
X-Priority: 3
X-Mailer: PHPMailer 5.2.10 (https://github.com/PHPMailer/PHPMailer/)
Reply-To: <example@example.nl>
MIME-Version: 1.0
Content-Type: text/plain; charset=UTF-8
Content-Transfer-Encoding: 8bit
Return-Path: example@mail.bjdejong.nl
X-OriginalArrivalTime: 11 Dec 2015 11:05:49.0453 (UTC) FILETIME=[E48E43D0:01D13403]

Message contents

The SPF check is now passed. Also the output of the host -t txt mail.bjdejong.nl command  should now give you the TXT SPF record.

Also be sure to edit your /etc/mailname  to reflect the name of your server on an Ubuntu distribution.

Share

OpenELEC installation on the Raspberry PI

A short blog post about setting up your Raspberry PI and openElec. Nothing difficult just some basic instructions to get the PI up and running.

openELec on the Pi

First download the OpenELEC Raspbian image here. Then place your SD card in your computer; unmount it with (determine the name of the SD card with the command diskutil list )

Use the raw version of the disk to speed up writing. So instead of using /dev/diskN use /dev/rdiskN

diskutil unmountDisk /dev/<disk>

Then unzip the zip file you have just downloaded and write the included img file to the SD card with the command:

sudo dd bs=1m if=path_of_your_image.img of=/dev/diskn

This takes a long while to complete. On Mac OS X you can type Ctrl+T in the terminal window where you executed the dd command to check progress.

After the image is written to the SD card place it in your PI and go ahead and fire up your Raspberry PI.

Share

Setup SSH backup on Ubuntu with VirtualMin

Imagine the scenario in which you want to ssh backup your (VirtualMin) server to another (VirtualMin) server. This post describes in detail the steps to take.

First create your backup user on the server where you want to store the backup; lets name it remotebackup for example:

adduser remotebackup

Give a strong password to this user (although we will be using public / private  key authentication).

Then move to the server that creates the backups and create a RSA private / public key pair for the root user:

sudo ssh-keygen

Do not specify a passphrase (as the backup will run without user intervention). Leave the default filename for private and public key (id_rsa  and id_rsa.pub).

Now copy the public key (contents of id_rsa.pub) id to the user on the server where the backups have to be stored:

ssh-copy-id remotebackup@yourserver.net

If the copy fails because public key authentication is required over ssh you have to disable this first. To do this edit your /etc/ssh/sshd_config file and set the value for passwordauthentication to yes. Now execute the ssh-copy-id again and reset the value for passwordauthentication.

After the ssh-copy-id  has succeeded a new directory and file is created on the backup server. The directory is in the home folder of the remotebackup user and is called .ssh . In this directory a file is created, authorized_keys , which contains the public key from the root user of the server that wants to store the backups on this server.

To make things more secure it is advisable to make use of the rssh  shell for the remotebackup user. The rssh  shell is a restricted ssh shell. Only the commands that you specify are allowed in a rssh shell. To install it execute the following command on the backup server:

sudo apt-get install rssh

After rssh is installed successfully edit the file /etc/rssh.config . Uncomment the line containing the text allowscp  (VirtualMin executes backups with the scp  command).

Now edit the password file stored at /etc/passwd . Search for the line containing your backup user (remotebackup) at the start of the line and change the shell to /usr/bin/rssh.

Now if you try to login interactively over ssh you get a message saying that it is not allowed:

This account is restricted by rssh.

Allowed commands: scp

If you believe this is in error, please contact your system administrator.

Connection to bjdejong.nl closed.

Okay; this is good; VirtualMin only executes scp commands over your ssh connection.

Now goto your VirtualMin interface on the server that creates the backups and add the required backup schedules.

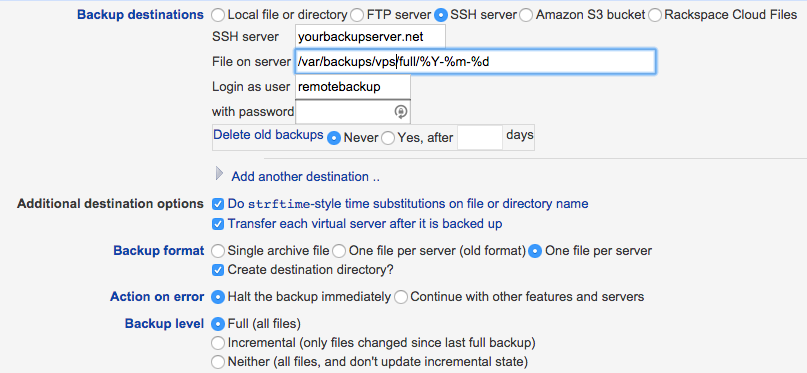
Create a full backup that runs every first of the month and create an incremental backup that runs every day.

Settings for the full backup. Mind the File on server setting which stores the files in a subfolder full .
Setup ssh backup to external server


Setup ssh backup to external server

The incremental backup uses the same settings except for the Backup level which you have to set to, guess what, Incremental.

There is one extra consideration if you create a backup user like this and that is User Disk Quota. When a user is created in a VirtualMin installation with quotas enabled the default maximum quota is 2Gb. That probably is not enough for your backup user. To change this goto your VirtualMin interface and adjust the quota:

VirtualMin -> System -> Disk Quotas; select Groups and select your backupuser.

Screen Shot 2015-02-21 at 15.13.29

Because VirtualMin cannot delete backups on the remote machine in this setup (only scp command is allowed for the remotebackup user) you can make use of the crontab to cleanup old backups. First create a script called cleanup.sh in your remotebackup home folder, place the following contents in it:

#!/bin/bash
# Script is executed via the crontab. All files older than 1 year
# are removed from the backup folder
find /var/backups/vps -mtime +365 -exec rm {} \;

Next edit the crontab for the remotebackup user and execute this script, lets say, every day at 0300:

sudo crontab -u remotebackup -e

Add this line to the crontab of the user and save it:

MAILTO="yourmail@yourserver.net"
0 3 * * * /home/remotebackup/cleanup.sh

Thats all there is to it. Your backups are save now!

Share

Protect your server from the POODLE attack

You can protect your server from the POODLE attack, as described here, by disabling the SSLv3 protocol on your (Ubuntu) Apache webserver. This is easily done by changing a single configuration file. Edit the file /etc/apache2/apache2.conf  and search for the line containing SSLProtocol. Change this line from

SSLProtocol all -SSLv2

to

SSLProtocol all -SSLv2 -SSLv3

This disables SSLv3 connections to your server. Restart your apache webserver

sudo service apache2 restart

and then test if the changes were successfull:

1. Try to open a SSLv2 connection; this should give you an error:

openssl s_client -ssl2 -connect bjdejong.nl:443

CONNECTED(00000003)1255:error:1407F0E5:SSL routines:SSL2_WRITE:ssl handshake failure:/SourceCache/OpenSSL098/OpenSSL098-52.10.1/src/ssl/s2_pkt.c:427:

2. Try to open a SSLv3 connection; this should give you an error:

openssl s_client -ssl3 -connect bjdejong.nl:443

CONNECTED(00000003)
1256:error:14094410:SSL routines:SSL3_READ_BYTES:sslv3 alert handshake failure:/SourceCache/OpenSSL098/OpenSSL098-52.10.1/src/ssl/s3_pkt.c:1143:SSL alert number 40
1256:error:1409E0E5:SSL routines:SSL3_WRITE_BYTES:ssl handshake failure:/SourceCache/OpenSSL098/OpenSSL098-52.10.1/src/ssl/s3_pkt.c:564:

3. Try to open a TLS connection; this should give you no error:

openssl s_client -tls1 -connect bjdejong.nl:443

CONNECTED(00000003)
depth=0 /O=Landing page bjdejong.NL/CN=*.landingpage.nl/emailAddress=bjdejong@bjdejong.nl
verify error:num=18:self signed certificate
verify return:1
depth=0 /O=Landing page bjdejong.NL/CN=*.landingpage.nl/emailAddress=bjdejong@bjdejong.nl
verify return:1
---
Certificate chain
0 s:/O=Landing page
bjdejong.NL/CN=*.landingpage.nl/emailAddress=berendjdejong@gmail.com
i:/O=Landing page bjdejong.NL/CN=*.landingpage.nl/emailAddress=berendjdejong@gmail.com
---
Server certificate
-----BEGIN CERTIFICATE----
MIIDnzCCAoegAwIBAgIJAJl1fA2nG/6eMA0GCSqGSIb3DQEBBQUAMGYxITAfBgNV
......

If everything went ok you are protected against the POODLE attack.

Share

Use logwatch on Ubuntu

GIT logoLogwatch is an application that helps with simple log management by daily analysing and reporting a short digest from activities taking place on your machine. In this post a short manual for installing logwatch on your ubuntu box.

Install logwatch

sudo apt-get install logwatch

Configure logwatch

Edit the configuration file to suit your needs. Especially have a look at the “MailTo”, “MailFrom” and “Detail”.

/usr/share/logwatch/default.conf/logwatch.conf

After logwatch processes the file above at default.conf the file /usr/share/logwatch/dist.conf/logwatch.conf  is being processed. Settings in here will override the settings in default.conf! You most likely want to comment out the line that reads

MailFrom = root

After installation an entry is added to /etc/crond.daily/00logwatch

To execute logwatch from the commandline execute:

/usr/sbin/logwatch --output mail

Mail from logwatch not reaching you? Check your spam folder 🙂

Share

VirtualMin backup fails

virtualminHaving problems backing up your virtual hosts with virtualmin after the upgraded to 4.13 (available around january the seventh 2015)?

The source of the problem is that mysqldumps are now executed under the domain account (for security reasons). As is obvious this does not always work correct. For this moment there is a quick fix thanks to the great support folks at virtualmin.com.

Check here for the quickfix (the restart of the virtualmin server is mandatory :-)).

Share