Imagine the scenario in which you want to ssh backup your (VirtualMin) server to another (VirtualMin) server. This post describes in detail the steps to take.
First create your backup user on the server where you want to store the backup; lets name it remotebackup for example:
adduser remotebackup
Give a strong password to this user (although we will be using public / private key authentication).
Then move to the server that creates the backups and create a RSA private / public key pair for the root user:
sudo ssh-keygen
Do not specify a passphrase (as the backup will run without user intervention). Leave the default filename for private and public key (id_rsa and id_rsa.pub).
Now copy the public key (contents of id_rsa.pub) id to the user on the server where the backups have to be stored:
ssh-copy-id remotebackup@yourserver.net
If the copy fails because public key authentication is required over ssh you have to disable this first. To do this edit your /etc/ssh/sshd_config file and set the value for passwordauthentication to yes. Now execute the ssh-copy-id again and reset the value for passwordauthentication.
After the ssh-copy-id has succeeded a new directory and file is created on the backup server. The directory is in the home folder of the remotebackup user and is called .ssh . In this directory a file is created, authorized_keys , which contains the public key from the root user of the server that wants to store the backups on this server.
To make things more secure it is advisable to make use of the rssh shell for the remotebackup user. The rssh shell is a restricted ssh shell. Only the commands that you specify are allowed in a rssh shell. To install it execute the following command on the backup server:
sudo apt-get install rssh
After rssh is installed successfully edit the file /etc/rssh.config . Uncomment the line containing the text allowscp (VirtualMin executes backups with the scp command).
Now edit the password file stored at /etc/passwd . Search for the line containing your backup user (remotebackup) at the start of the line and change the shell to /usr/bin/rssh.
Now if you try to login interactively over ssh you get a message saying that it is not allowed:
This account is restricted by rssh.

Allowed commands: scp

If you believe this is in error, please contact your system administrator.

Connection to bjdejong.nl closed.
Okay; this is good; VirtualMin only executes scp commands over your ssh connection.
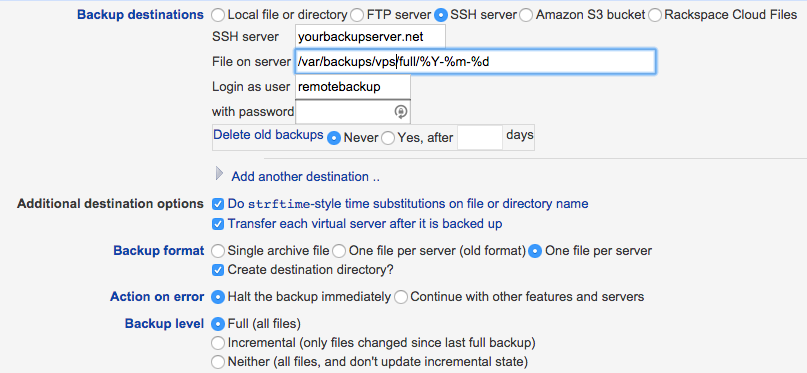
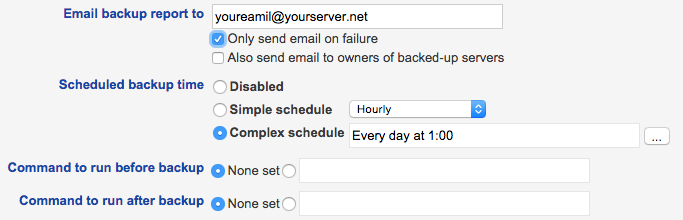
Now goto your VirtualMin interface on the server that creates the backups and add the required backup schedules.
Create a full backup that runs every first of the month and create an incremental backup that runs every day.
Settings for the full backup. Mind the File on server setting which stores the files in a subfolder full .
The incremental backup uses the same settings except for the Backup level which you have to set to, guess what, Incremental.
There is one extra consideration if you create a backup user like this and that is User Disk Quota. When a user is created in a VirtualMin installation with quotas enabled the default maximum quota is 2Gb. That probably is not enough for your backup user. To change this goto your VirtualMin interface and adjust the quota:
VirtualMin -> System -> Disk Quotas; select Groups and select your backupuser.

Because VirtualMin cannot delete backups on the remote machine in this setup (only scp command is allowed for the remotebackup user) you can make use of the crontab to cleanup old backups. First create a script called cleanup.sh in your remotebackup home folder, place the following contents in it:
#!/bin/bash
# Script is executed via the crontab. All files older than 1 year
# are removed from the backup folder
find /var/backups/vps -mtime +365 -exec rm {} \;
Next edit the crontab for the remotebackup user and execute this script, lets say, every day at 0300:
sudo crontab -u remotebackup -e
Add this line to the crontab of the user and save it:
MAILTO="yourmail@yourserver.net"
0 3 * * * /home/remotebackup/cleanup.sh
Thats all there is to it. Your backups are save now!
