Category Archives: C#

SoapUI and WCF Service testing

Test with SoapUI: modify the generated web.config

soapUI_header_logoThe web.config that is create when you create a new WCF service application does not work with SoapUI. Retrieving the WSDL will work fine but when you execute a operation on the service the following message will appear:


<s:value>s:sender< s:value="">

A solution to this problem (at least for testing purposes) is to add a custom wsHttpBinding. Create a new WCF Service application C# project. Delete all text from the web.config and add replace it with the markup below.

Important to note is that we have a custom wsHttpBinding with the security mode set to “None”. This is necessary for SoapUI to work with this service!

Now you have to create a new SoapUI project. Point it to the ?wsdl for this services and the project is created with a default request for all operations. Open the first request and press the WS-A button (on the bottom of the request editor). Check “Enable WS-A addressing”, “Add default wsa:Action” and “Add default wsa:To”.

Now execute the request and you get a proper response!

Share

How to Retrieve image from Windows Live Album

namespace WindowsFormsApplication1
{
    using System;
    using System.ComponentModel;
    using System.Net;
    using System.Windows.Forms;

    public partial class Form1 : Form
    {
        public Form1()
        {
            InitializeComponent();
        }

        private void button1_Click(object sender, EventArgs e)
        {
            string url =  http://public.blu.livefilestore.com/xyz/012.jpg&quot;;
            WebClient client = new WebClient();
            client.Proxy.Credentials =  new NetworkCredential(&quot;uname&quot;, &quot;upwd&quot;, &quot;udomain&quot;);
            client.DownloadFileCompleted += 
               new AsyncCompletedEventHandler(client_DownloadFileCompleted);
            client.DownloadFile(new Uri(url), @&quot;c:localfile.jpg&quot;);
        }

        void client_DownloadFileCompleted(object sender, AsyncCompletedEventArgs e)
        {
            MessageBox.Show(&quot;Download completed&quot;);
        }
    }
} 
Share

Using MSMQ with C#

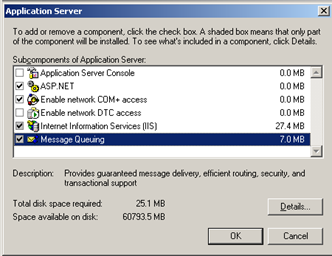
First add the MSMQ component to your windows installation. Go to Add Remove programs; Add Windows Components; Select Aplication Server; press Details and check Message Queuing

Press Ok; press Finish

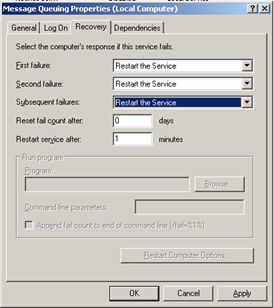
Configure the Message and Queing service to restart when errors occur.

  1. Go to “Start -> Administrative tools -> Computer Management”.
  2. Expand “Services and Applications”.
  3. Sselect “Services”.
  4. Select “Message Queuing”; right click and select “Properties”.
  5. Select the “Recovery tab”.
  6. Select “Restart the Service” for first, second and subsequent failures.


Create a new C# Forms project / solution with Visual Studio 2008. Add a reference to the System.Messaging .NET dll.

Add two Forms to the project. Place in the constructor of Form1 the following code:

//Q Creation 

if(MessageQueue.Exists(@&quot;.Private$MyQueue&quot;)) 
    mq = new System.Messaging.MessageQueue(@&quot;.Private$MyQueue&quot;); 
else 
    mq = MessageQueue.Create(@&quot;.Private$MyQueue&quot;);
Queue2 q2 = new Queue2();
q2.Show(); 
Share

Executing WSS in .NET 3.5 mode

By default WSS 3.0 runs under the .NET 2.0 framework. To change this to use the .NET 3.5 framework execute the following steps:

  1. Open the web.config for your site
  2. Add the following assemblies below the tag:
    &lt;add assembly=&quot;Microsoft.SharePoint, Version=12.0.0.0, 
    	Culture=neutral, PublicKeyToken=71e9bce111e9429c&quot; /&gt; 
    &lt;add assembly=&quot;System.Core, Version=3.5.0.0, 
    	Culture=neutral, PublicKeyToken=B77A5C561934E089&quot; /&gt; 
    &lt;add assembly=&quot;System.Xml.Linq, Version=3.5.0.0, 
    	Culture=neutral, PublicKeyToken=B77A5C561934E089&quot; /&gt; 
    
  3. Then add the following to right before (for example) the tag
    &lt;system.codedom&gt; 
      &lt;compilers&gt; 
        &lt;compiler language=&quot;c#;cs;csharp&quot; extension=&quot;.cs&quot; warningLevel=&quot;4&quot; 
          type=&quot;Microsoft.CSharp.CSharpCodeProvider, System, Version=2.0.0.0, 
          Culture=neutral, PublicKeyToken=b77a5c561934e089&quot;&gt; 
          &lt;providerOption name=&quot;CompilerVersion&quot; value=&quot;v3.5&quot; /&gt; 
          &lt;providerOption name=&quot;WarnAsError&quot; value=&quot;false&quot; /&gt; 
        &lt;/compiler&gt; 
      &lt;/compilers&gt; 
    &lt;/system.codedom&gt;
    
  4. Your site now runs under the .NET Framework 3.5!
Share

Use extension methods on your ASPX page

  1. Create a Webapplication project
  2. Edit the Default.aspx to look like this:
    &lt;%@ Page Language=&quot;C#&quot; AutoEventWireup=&quot;true&quot; CodeBehind=&quot;Default.aspx.cs&quot; Inherits=&quot;WebApplication2._Default&quot; %&gt; 
    &lt;%@ Import Namespace=&quot;Berend.PageExtensions&quot; %&gt; 
    &lt;!DOCTYPE html PUBLIC &quot;-//W3C//DTD XHTML 1.0 Transitional//EN&quot; &quot;http://www.w3.org/TR/xhtml1/DTD/xhtml1-transitional.dtd&quot;&gt; 
    
    &lt;html xmlns=http://www.w3.org/1999/xhtml&gt; 
      &lt;head runat=&quot;server&quot;&gt; 
        &lt;title&gt;&lt;/title&gt; 
      &lt;/head&gt; 
      &lt;body&gt; 
       &lt;form id=&quot;form1&quot; runat=&quot;server&quot;&gt; 
          &lt;div&gt; 
            &lt;h1&gt; 
              &lt;%=this.MyPageExtensionMethod()%&gt; 
            &lt;/h1&gt; 
          &lt;/div&gt; 
        &lt;/form&gt; 
      &lt;/body&gt; 
    &lt;/html&gt;
    
  3. Remember to add the namespace (which contains your extension method) to your aspx
  4. Add a class library to your project and code the following class:
    namespace Berend.PageExtensions 
    { 
        public static class Class1 
        { 
            public static string MyPageExtensionMethod(this Page p) 
            { 
                return &quot;Extension method executed!&quot;; 
            } 
        } 
    } 
    
  5. This class Class1 contains the extension method (remember to make the class and the method static)
  6. Press F5 and your extension method gets executed.

When you want to use this technique with SharePoint 2007 you have to follow the steps in this post to run WSS under the .NET 3.5 framework!

Share

SQL Injection

In the Page_load of a ASP.NET page called inject.aspx:

SqlConnection con = 
   new SqlConnection(@&quot;data source=(local)TEST;user id=sa;password=sa;database=Northwind&quot;);
con.Open();
string sqlstring = String.Format(&quot;INSERT INTO Categories (CategoryName, Description, Picture)  VALUES ('naam', '{0}', null)&quot;, 
Request.QueryString[&quot;desc&quot;]);
Response.Write(sqlstring);
SqlCommand cmd = new SqlCommand(sqlstring, con);
cmd.ExecuteNonQuery();
con.Close();

Direct your browser to “……/…../inject.aspx?test=x’,null); drop table test; –” and your table Test is gone with the (North)wind.

See also this link for more information.

Share

Multiple host-headers and WCF services

When IIS is configured with multiple host-headers your WCF web.config has to be adjusted to use the correct prefix. Add the following sections to your system.serviceModel section:

&lt;serviceHostingEnvironment&gt;   
    &lt;baseAddressPrefixFilters&gt;   
        &lt;add prefix=&quot;http://localhost:1122/&quot;/&gt;   
    &lt;/baseAddressPrefixFilters&gt;   
&lt;/serviceHostingEnvironment&gt;
Share

Encrypting / decrypting web.config sections

  1. Determine the identity of your ASP.NET application. In most situations this will be the “NT AUTHORITYNETWORK SERVICE” account.
  2. Grant the account determined in step 1 access to the machine-level RSA key container:
    aspnet_regiis -pa "NetFrameworkConfigurationKey" "NT AUTHORITYNETWORK SERVICE"
  3. To encrypt your appSettings section execute the following command:
    aspnet_regiis -pe "appSettings" -app "/Site"
    appSettings is casesensitive and /Site point to the virtual folder where your web.config is stored.
  4. To decrypt the web.config section execute the following command:
    aspnet_regiis–pd "appSettings" –app "/Site"
  5. Retrieving your encrypted settings can be done with the ConfigurationManager:
    string username = ConfigurationManager.AppSettings[&quot;username&quot;].ToString();
    
Share