Category Archives: Windows

Certificates / IIS / Visual Studio 2017

Introduction

This post will guide you through the process of creating a selfsigned certificate. I will also show you how to configure IIS and create a Visual Studio solution that uses Local IIS with the self signed certificate.

Several tips and tricks are include to help you better understand the use of certificates and solving problems you run into.

In this post I also refer to a somewhat old technique but still used in a lot of M2M communication: WCF.

Install HTTP Activation

HTTP Activation is not needed for regular ASP.NET sites but for WCF (and bindings as tcp) it should be installed at this point.

Go to “Control Panel”-> “Add Remove Programs” -> “Turn Windows Features on or off”.
Under “.NET Framework 3.5 (includes .NET 2.0 and 3.0)” check “Windows Communication Foundation “HTTP Activation”.
Under “.NET Framework 4.8 Advanced Services” -> “WCF Services” check “HTTP Activation”.

Install World Wide Web service and tools

Under “Internet Information Services” check “World Wide Web Services” and also check “Web Management Tools”.
Under “Internet Information Services” -> “World Wide Web Services” -> “Security” check “Basic”, “Digest” and “Windows” authentication.

Configure Website

In inetmgr goto your website and under the IIS category select “Authentication”, then enable the authorisation schemes you will need.

Create selfsigned certificate

Create certificate in administrator Power Shell prompt (dnsname option is important to set correctly, use output of hostname command):

$cert = New-SelfSignedCertificate -certstorelocation cert:\localmachine\my -dnsname [YOUR PC HOSTNAME]

Use OpenSSL

You could also use OpenSSL to create your certificate, key and pfx file. You need to use the configuration file shown below to create a valid certificate.

The configuration specifies a subjectAltName which is needed for Chrome (and others) to accept the certificate as a valid certificate.

You will get an error message (This server could not prove that it is desktop-b1170c1; its security certificate does not specify Subject Alternative Names) if this configuration file is not used when creating the certificate.

[req]
distinguished_name = req_distinguished_name
x509_extensions = v3_req
prompt = no
[req_distinguished_name]
C = NL
ST = Groningen
L = Boerakker
O = bdejong.NL
OU = ICT
CN = desktop-b1170c1
[v3_req]
keyUsage = critical, digitalSignature, keyAgreement
extendedKeyUsage = serverAuth
subjectAltName = @alt_names
[alt_names]
DNS.1 = desktop-b1170c1

To create the certificate and the private key execute this command:

openssl req -x509 -nodes -days 365 -newkey rsa:2048 -keyout cert.key -out cert.pem -config .\openssl.cnf -sha256

Next create a pfx file, which can be used to import into your certificate store, with the command below

openssl pkcs12 -export -out key.pfx -inkey cert.key -in cert.pem

When using the OpenSSL commands you have to manually add the certificate (the pfx) to your certificate store.

Add to Trusted Root CA

Start MMC and open the “Certificates” snap in for [Local Computer]. Browse to Console Root -> Certificates (Local Computer) -> Personal -> Certificates. Here you will find the certificate you have just created.

As you can see both certificates in the store have a private key in it. Only certificates with a private key can be used for https communication.

Add this certificate to the [Trusted Root Certification Authorities] by exporting it from [Local Computer]\Personal\Certtificates and importing it into [Trusted Root Certification Authorities].
Do not copy it into [Trusted Root Certification Authorities], it will not work!

You do not need to export the private key. Use the the DER encode format. Save the certificate to disk, Now go to Console Root -> Certificates (Local computer) -> Trusted Root Certification Authorities -> Certificates. Right click and import the certificate.

Double click the certificate in the personal store, it should now be valid (including the Certification Path).

Create WCF project

Now create a new WCF project (yes I know it is old stuff but a lot of companies still use and develop WCF services). In case you are using Visual Studio 2017 or above you need to install the WCF project template. This can be done when creating a new project, scroll all the way down and select “Install more tools and features”.

Choose WCF Service application as your project template (not WCF Service).

Leave everything default and press Create.

As start page choose your svc file (in case of a WCF service) any other page otherwise.
In the project options of your wcf / web project on the web tab set the server to “Local IIS”.

Set the url of your project to: “https://[YOUR HOST NAME]/WcfService1” and press create Virtual Directory (you have to be administrator to do that so start Visual Studio as Administrator).

If the site is not reachable add the hostname to “\windows\drivers\etc\hostname”:

# localhost name resolution is handled within DNS itself.
#	127.0.0.1       localhost
#	::1             localhost
127.0.0.1			DESKTOP-B1170C1

Next change the binding of your https site in IIS. Start the inetmgr (via Windows+R) and select the default website. On the far right select “Bindings…”.

Then select the https entry and press Edit. Here you can change the SSL certificate to the one you have created before.

Now back to Visual Studio and start your WCF service. As you can see the certificate is valid for this service.

Usefull links

How to: Create Temporary Certificates for Use During Development
WCF: Common security scenarios

Share

XAMPP: Installing and using it on Windows 2012 R2

What is XAMPP

XAMPP stands for Cross-Platform (X), Apache (A), MariaDB (M), PHP (P) and Perl (P). It is a simple, lightweight Apache distribution that makes it extremely easy for developers to create a local web server for testing and deployment purposes.

XAMPP Installation

Download your XAMPP installation here. After installation start the XAMPP Control panel (right click on tray icon for XAMPP and choose show/hide).

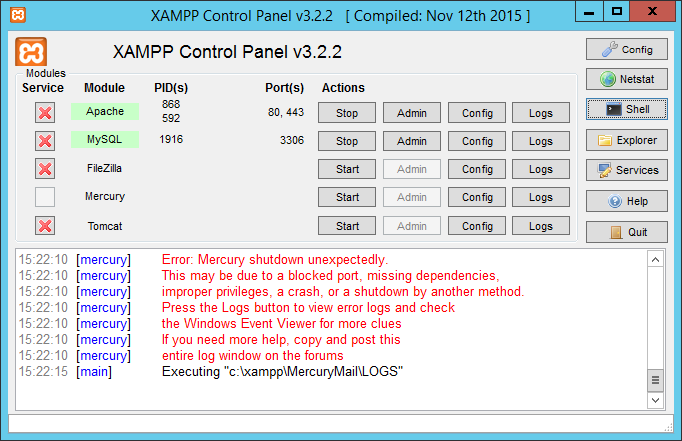
XAMPP Control Panel

XAMPP Control Panel

Start the Apache and MySQL service. PID(s) and Port(s) should show a number now indicating the services are listening at the ports shown.

Apache

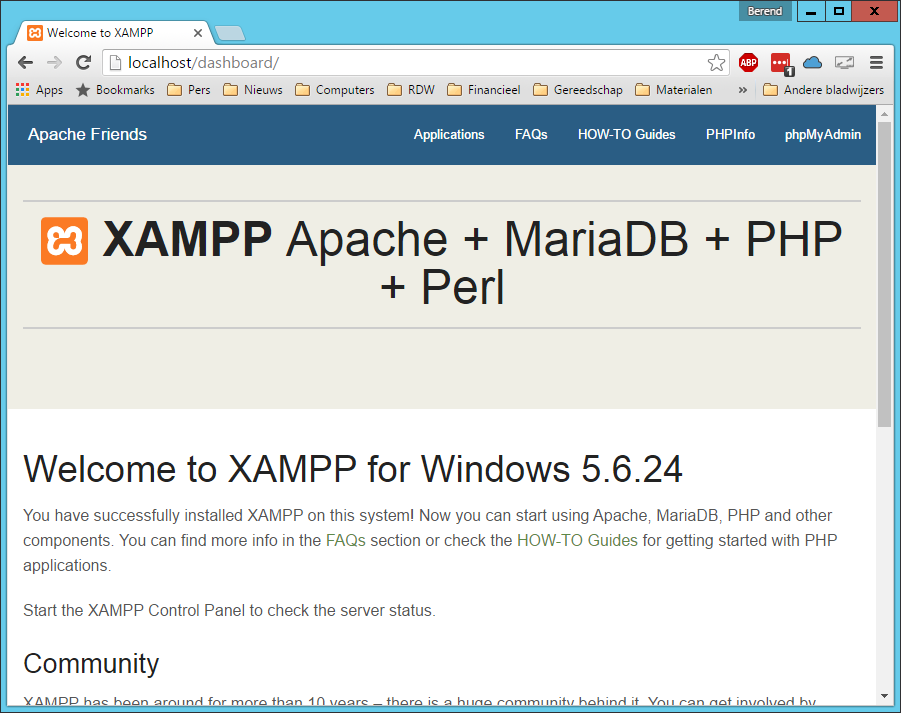
After installation navigate to http://localhost . If Apache is started the XAMPP dashboard is shown in your browser.

MySQL (MariaDB)

To check if MySQL is up and running choose the phpMyAdmin link on the dashboard; if everything is ok the phpMyAdmin dashboard shows up. First thing todo is change your root password for the MySQL instance. Change directory to c:\xampp\mysql\bin and execute the command:

mysqladmin.exe –user=root password “<newpwd>”

To change the MySQL password execute the command:

mysqladmin.exe –user=root –password=<oldpwd> password newpwd

Now phpMyAdmin will stop working because you just changed the root password. To solve this open the phpMyadmin configuration file at c:\xampp\phpMyAdmin\config.inc.php . Change the blowfish_secret to some random value not being xampp. Next set a value of “cookie” for auth_type. Next time you navigate to the phpMyadmin site phpMyAdmin will ask for a username and password.

Setup your first Apache web-site

If both Apache and MySQL are running you can go ahead and setup your first site. In XAMPP sites are stored at c:\xampp\htdocs . Create a directory called xamp.test.tld . Inside this directroy create a document index.php with the following contents:

<?php
phpinfo();

Ok; now on to the Apache configuration. Open the file c:\xampp\apache\conf\extra\httpd-vhosts.conf  and add the following text to the bottom of this file:

<VirtualHost *:80> 
DocumentRoot C:/xampp/htdocs/ 
ServerName localhost 
</VirtualHost> 

<VirtualHost *:80>
   DocumentRoot C:/xampp/htdocs/xampp.test.tld
   ServerName xampp.test.tld
   <Directory "C:/xampp/htdocs/xampp.test.tld">
      Require all granted
      AllowOverride All
   </Directory>
</VirtualHost>

The first virtualhost is the primary or default virtualhost. Hosts that have an unknown ServerName (ie there is no virtualhost definition with this ServerName attribute) are served from this virtual host. In out setup this is also localhost.

That’s all for the Apache configuration. One more thing left to configure and that is the windows host file at c:\windows\system32\drivers\etc\hosts . Add the following line to this file:

127.0.0.1   xampp.test.tld

Your configuration is now complete. Restart your apache server and send your browser to http://xamp.test.tld . The phpinfo page should appear.

Create SSL Website

Open SSL logo

Open SSL

For a site to use SSL we have to create a certificate first which has to be referenced in our Apache virtual host definition. To create your own certificates check this great tutorial. It will guide you step by step through creating a root CA, intermediate CA, certificates and revocation lists. For future reference a short transcript can be found here.

The root certificate you create has to be installed in the Trusted root user certificate store.

After you have create and installed the root CA you can start using the new certificates in your Apache configuration. Lets create a new SSL website for  xampp.test.tld . Open the file c:\xampp\apache\conf\extra\httpd-vhosts.conf  and add the following lines to the end of this file:

<VirtualHost *:443>
DocumentRoot C:/xampp/htdocs/xampp.test.tld
ServerName xampp.test.tld
SSLEngine on
SSLCertificateFile "conf/mycerts/ca/intermediate/certs/xampp.test.tld.cert.pem"
SSLCertificateKeyFile "conf/mycerts/ca/intermediate/private/xampp.test.tld.key.pem"
SSLCertificateChainFile "conf/mycerts/ca/intermediate/certs/ca-chain.cert.pem"
</VirtualHost>

This virtual host defines the SSL site. As you can see there are references to the certificates you created before with OpenSSL.

Now send your browser to https://xampp.test.tld  (mind the s in https) and you should see the PHP information page.

Share

Windows GIT and SSH keys

gitTo use SSH keys on your windows system follow the steps below:

Install the git extensions for windows. This will (among other things) install the Git Bash shell. Execute a git bash shell. Now create your private/public key pair with the ssh-keygen command (or copy an existing key). Add a passphrase for additonal security.

On windows the ssh files are store in c:\Users\Administrator\.ssh\

Copy the public part to your git server with the ssh-copy-id command.

In Git bash edit your .profile (or create one) and add the coding snippet below:

SSH_ENV=$HOME/.ssh/environment

function start_agent
{
   echo "Initialising new SSH agent..."
   /usr/bin/ssh-agent | sed 's/^echo/#echo/' > ${SSH_ENV}
   echo succeeded
   chmod 600 ${SSH_ENV}
   . ${SSH_ENV} > /dev/null
   /usr/bin/ssh-add;
}

if [ -f "${SSH_ENV}" ]; then
   . ${SSH_ENV} > /dev/null
   ps -ef | grep ${SSH_AGENT_PID} | grep ssh-agent$ > /dev/null || {
      start_agent;
   }
else
   start_agent;
fi

If you have multiple keys you should also create a config file in the .ssh folder. In this file you specifiy which key should be used for what host; like this:

Host yourhost.nl
 IdentityFile ~/.ssh/your_key_for_this_host
Share

Create eventlog on commandline

With the command below you can easily create a new windows eventlog. The command creates an informational event in the specified source; automatically creating the source if it does not exist.

EventCreate /L Application /T Information /ID 900 /SO "Your.Eventlog" /D "With a description"

EventLogCreate
/L The eventlog to create an event inEvent
/T Information
/ID The event ID for the event
/SO The source for the event
/D is description

Share

Scanning an image with C#

This post shows an example of scanning an image with C#. First of all start Visual Studio and create a new console application.scanning software c#

In this example I make use of the standard WIA scanning functionality in Windows 7. Reference the WIA dll in your new project. The dll can be found in the folder “c:\windows\system32\wiaaut.dll”.

The code below scans an image (A4 size) at the default 300 DPI and stores it as an uncompressed TIFF image.

namespace Scanner
{
   using System;
   sing System.Runtime.InteropServices;

   class Program
   {
      const string WIA_DEVICE_PROPERTY_PAGES_ID = "3096";
      const string WIA_DEVICE_PROPERTY_PAGES_ID = "3096";
      const string WIA_HORIZONTAL_SCAN_RESOLUTION_DPI = "6147";
      const string WIA_VERTICAL_SCAN_RESOLUTION_DPI = "6148";
      const string WIA_HORIZONTAL_SCAN_START_PIXEL = "6149";
      const string WIA_VERTICAL_SCAN_START_PIXEL = "6150";
      const string WIA_HORIZONTAL_SCAN_SIZE_PIXELS = "6151";
      const string WIA_VERTICAL_SCAN_SIZE_PIXELS = "6152";
      const string WIA_SCAN_BRIGHTNESS_PERCENTS = "6154";
      const string WIA_SCAN_CONTRAST_PERCENTS = "6155";
      const int widthA4at300dpi = 2480;
      const int heightA4at300dpi = 3508;

      static void Main(string[] args)
      {
         WIA.CommonDialogClass commonDialogClass = new WIA.CommonDialogClass();
         WIA.Device scannerDevice = null;

         try
         {
             scannerDevice = 
                commonDialogClass.ShowSelectDevice(
                   WIA.WiaDeviceType.ScannerDeviceType,
                   false, 
                   false);

             SetWIAProperty(scannerDevice.Properties, WIA_DEVICE_PROPERTY_PAGES_ID, 1);
             WIA.Item scannnerItem = scannerDevice.Items[1];

             SetA4(scannnerItem.Properties, 300);

             WIA.ImageFile scanResult = 
                commonDialogClass.ShowTransfer(
                   scannnerItem, 
                   WIA.FormatID.wiaFormatTIFF, 
                   false);

             scanResult.SaveFile("output.tiff");
         }
         catch (COMException ex)
         {
            if ((uint)ex.ErrorCode == 0x80210015)
            {
               Console.WriteLine("No scanner attached");
            }
            else
            {
               Console.WriteLine("Unknown error: {0}", (uint)ex.ErrorCode);
            }
         }
      }

      private static void SetA4(WIA.IProperties properties, int dpi)
      {
            int width = (int)((widthA4at300dpi / 300.0) * dpi);
            int height = (int)((heightA4at300dpi / 300.0) * dpi);

            SetWIAProperty(properties, WIA_HORIZONTAL_SCAN_RESOLUTION_DPI, dpi);
            SetWIAProperty(properties, WIA_VERTICAL_SCAN_RESOLUTION_DPI, dpi);
            SetWIAProperty(properties, WIA_HORIZONTAL_SCAN_START_PIXEL, 0);
            SetWIAProperty(properties, WIA_VERTICAL_SCAN_START_PIXEL, 0);
            SetWIAProperty(properties, WIA_HORIZONTAL_SCAN_SIZE_PIXELS, width);
            SetWIAProperty(properties, WIA_VERTICAL_SCAN_SIZE_PIXELS, height);
       }

       private static void SetWIAProperty(WIA.IProperties properties, 
              object propName, object propValue)
       {
          WIA.Property prop = properties.get_Item(ref propName);
          prop.set_Value(ref propValue);
       }
    }
}


Share