Category Archives: Ubuntu

Howto’s, scripts and tips for Ubuntu

LetsEncrypt certificate renewal behind proxy

When deploying a .NET Core website on your domain, you likely utilize a reverse proxy to route traffic from ports 443 and 80 to your Kestrel web server. The configuration for this in Apache is as follows.

The line ProxyPass /.well-known/acme-challenge ! is included to ensure that Let’s Encrypt can successfully renew the certificate.

The other ProxyPass lines are for blazor to connect to the server.

ProxyRequests On
ProxyPreserveHost On
ProxyPass /.well-known/acme-challenge !
ProxyPassMatch ^/_blazor/(.*) http://0.0.0.0:5003/_blazor/$1
ProxyPass /_blazor ws://localhost:5003/_blazor
ProxyPass / http://0.0.0.0:5001/
ProxyPassReverse / http://0.0.0.0:5001/

Share

Ubuntu journalctl

If you want to view the log for a systemd service you can use the journalctl command. Basic Log Viewing: To view the logs for your prog-app service, you can use the following command:

sudo journalctl -u service-app

Tail Logs: If you want to follow the log in real-time, as new entries are added, use the -f flag:

sudo journalctl -fu service-app

Filter by Time: If you’re interested in logs from a specific time period, you can use --since and --until options. For example:

sudo journalctl -u service-app --since "2023-11-27" --until "2023-11-28"

Viewing the Most Recent Entries: To see the most recent entries, you can combine journalctl with other commands like tail. For example:

sudo journalctl -u service-app | tail -n 20
Share

VirtualMin error regarding can_use_gcloud_storage_creds 

After a fresh install of Ubuntu 22.04 and VirtualMin I tried to restore some WordPress sites to my new server. Created a backup on the old server. Next logged into the new server and in VirtualMin navigated to VirtualMin -> Backup and Restore -> Restore Virtual Servers. On this page I got the error as shown below.

HTTP/1.0 500 Perl execution failed Server: MiniServ/2.021 Date: Fri, 21 Apr 2023 07:11:21 GMT Content-type: text/html; Charset=utf-8 Connection: close

ERROR — PERL EXECUTION FAILED
Undefined subroutine &virtual_server::can_use_gcloud_storage_creds called at /usr/share/webmin/virtual-server/cloud-lib.pl line 304.

Not sure what causes this but it has something to do with the google cloud sdk not being installed on the server i suspect. I do not need this so I opend the cloud-lib.pl file in folder /usr/share/webmin/virtual-server/ and modified the perl code as a work around. Replace the function cloud_google_get_state with the definition below:

sub cloud_google_get_state
{
   return { 'ok' => 0 };
}

Next wait for a fix from VirtualMin.

Share

Setup shared folder for Ubuntu guest

First of all install VirtualBox guest additions (goto “Devices” -> “Insert Guest Additions CD Image…”) and reboot your machine. In VirtualBox goto “Devices” -> “Shared Folders” -> “Shared folder settings..”. Press the “plus” button to the right of the (empty) folder list. Choose your path and type a folder name (select auto mount and make permanent for convenience). Press OK

Now the shared folder is created but not active yet in your guest. Reboot your guest machine and go to the folder /media/sf_Sharename  (virtualbox creates a folder in /media with the name of your share with a sf_ prefix.

When you cd into this directory you probable get an access denied error.
To solve this add your account to the vboxsf group with this command:
sudo usermod -aG vboxsf [username] 

To mount the shared folder with specific gid  (change gid to your desired value):

sudo mount -t vboxsf Downloads /mnt/shared -o umask=0022,gid=999

When you get the infamous “protocol error” double check your shared folder name.
Be sure to use the uid and gid assigned to your account (check /etc/passwd and /etc/groups for your uid and gid). If you do not use uid and gid the shared folder may have the wrong access rights.

Share

Setup wget proxy on ubuntu

Setup wget to use proxy

When you are behind a proxy server you have to tell wget to use that proxy server. To do this create a .wgetrc  file in your home directory with the contents below (of course change username, password and proxy url).

use_proxy = on
http_proxy = http://username:password@proxy.location.tld:80/
https_proxy = http://username:password@proxy.location.tld:80/

If you want to disable certificate checking add the line below to your .wgetrc

check_certificate = off


Share

SPF and DNS configuration

I recommend that you create a Sender Policy Framework (SPF) record for your domain. An SPF record is a type of Domain Name Service (DNS) record that identifies which mail servers are permitted to send email on behalf of your domain.SPF configuration

The purpose of an SPF record is to prevent spammers from sending messages with forged From addresses at your domain. Recipients can refer to the SPF record to determine whether a message purporting to be from your domain comes from an authorized mail server.

You can also lookup and test your SPF settings here.

So how do you add a SPF record to your domain. Well that is easy. A SPF record is nothing more than a TXT record in your DNS administration.

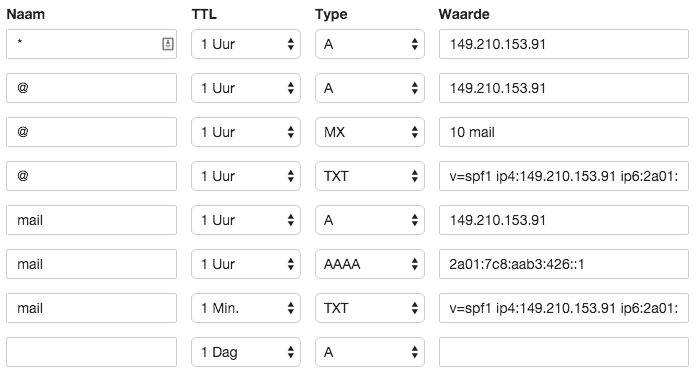
For a mail server the following DNS entries are defined:

SPF record in DNS

As you can see there is a SPF record on the subdomain mail. A mail server that is receiving email from your domain retrieves the SPF record for your domain and verifies that the sending IP is auhtorized (by the SPF record) for this action.

The headers below of an email message show a domain without a SPF record:

x-store-info:w5JOV+GpEg16Hd3Liu8PdV6w7ot2s5vN
Authentication-Results: hotmail.com; spf=none (sender IP is 149.210.153.91) smtp.mailfrom=pkn-bnn-iw@mail.bjdejong.nl; dkim=none header.d=example.nl; x-hmca=none header.id=example@example.nl
X-SID-PRA: example@example.nl
X-AUTH-Result: NONE
X-SID-Result: NONE
X-Message-Status: n:n
X-Message-Delivery: Vj0xLjE7dXM9MDtsPTA7YT0xO0Q9MjtHRD0xO1NDTD0z
X-Message-Info: /3z5fcrqMMUC9h0cjR+uvxBFbZLKdSdtWqbr6MInznDp3iFPY3dfZtYCX/McjjMtj/elcEu8E8GWPTQfME0U8yM95EcDOlBGfpGY3FVu+zhLC/YR0apj5gaojeU+XWKSFMn5xpzk3h7mi1Zrgx5MoCPw09osDoKH5afXmmKDtnxMmXlqQKv2juplilatuJpfG2/eYbQkFt2x+JC9NXiXJelaZ42f/aaw0S73pWX0oijyKeKhtLa1cA==
Received: from mail.bjdejong.nl ([149.210.153.91]) by COL004-MC4F4.hotmail.com with Microsoft SMTPSVC(7.5.7601.23143);
	 Fri, 11 Dec 2015 03:05:49 -0800
Received: by mail.bjdejong.nl (Postfix, from userid 1053)
	id 2D6A93C2F6B; Fri, 11 Dec 2015 12:05:40 +0100 (CET)
To: berendjdejong@gmail.com, berendjdejong@hotmail.com
Subject: Your subject goes here
X-PHP-Originating-Script: 1053:class-phpmailer.php
Date: Fri, 11 Dec 2015 11:05:40 +0000
From: example <example@example.nl>
Message-ID: <421364d92aacfc35ba32861d8d20d90a@pkn-bnn-iw.nl>
X-Priority: 3
X-Mailer: PHPMailer 5.2.10 (https://github.com/PHPMailer/PHPMailer/)
Reply-To: <example@example.nl>
MIME-Version: 1.0
Content-Type: text/plain; charset=UTF-8
Content-Transfer-Encoding: 8bit
Return-Path: pkn-bnn-iw@mail.bjdejong.nl
X-OriginalArrivalTime: 11 Dec 2015 11:05:49.0453 (UTC) FILETIME=[E48E43D0:01D13403]

Message contents

As you can see there is no SPF record defined. You can verify this with the host command:

host -t txt mail.bjdejong.nl

Now after adding an SPF record to the domain and sending a new message (wait a while for the changes to take effect in the global DNS systems) headers are as shown below (send to a hotmail account):

x-store-info:w5JOV+GpEg16Hd3Liu8PdV6w7ot2s5vN
Authentication-Results: hotmail.com; spf=pass (sender IP is 149.210.153.91) smtp.mailfrom=example@mail.bjdejong.nl; dkim=none header.d=example.nl; x-hmca=none header.id=example@example.nl
X-SID-PRA: example@example.nl
X-AUTH-Result: NONE
X-SID-Result: NONE
X-Message-Status: n:n
X-Message-Delivery: Vj0xLjE7dXM9MDtsPTA7YT0xO0Q9MjtHRD0xO1NDTD0z
X-Message-Info: /3z5fcrqMMUC9h0cjR+uvxBFbZLKdSdtWqbr6MInznDp3iFPY3dfZtYCX/McjjMtj/elcEu8E8GWPTQfME0U8yM95EcDOlBGfpGY3FVu+zhLC/YR0apj5gaojeU+XWKSFMn5xpzk3h7mi1Zrgx5MoCPw09osDoKH5afXmmKDtnxMmXlqQKv2juplilatuJpfG2/eYbQkFt2x+JC9NXiXJelaZ42f/aaw0S73pWX0oijyKeKhtLa1cA==
Received: from mail.bjdejong.nl ([149.210.153.91]) by COL004-MC4F4.hotmail.com with Microsoft SMTPSVC(7.5.7601.23143);
	 Fri, 11 Dec 2015 03:05:49 -0800
Received: by mail.bjdejong.nl (Postfix, from userid 1053)
	id 2D6A93C2F6B; Fri, 11 Dec 2015 12:05:40 +0100 (CET)
To: berendjdejong@gmail.com, berendjdejong@hotmail.com
Subject: Your subject goes here
X-PHP-Originating-Script: 1053:class-phpmailer.php
Date: Fri, 11 Dec 2015 11:05:40 +0000
From: example <example@example.nl>
Message-ID: <421364d92aacfc35ba32861d8d20d90a@pkn-bnn-iw.nl>
X-Priority: 3
X-Mailer: PHPMailer 5.2.10 (https://github.com/PHPMailer/PHPMailer/)
Reply-To: <example@example.nl>
MIME-Version: 1.0
Content-Type: text/plain; charset=UTF-8
Content-Transfer-Encoding: 8bit
Return-Path: example@mail.bjdejong.nl
X-OriginalArrivalTime: 11 Dec 2015 11:05:49.0453 (UTC) FILETIME=[E48E43D0:01D13403]

Message contents

The SPF check is now passed. Also the output of the host -t txt mail.bjdejong.nl command  should now give you the TXT SPF record.

Also be sure to edit your /etc/mailname  to reflect the name of your server on an Ubuntu distribution.

Share

Setup SSH backup on Ubuntu with VirtualMin

Imagine the scenario in which you want to ssh backup your (VirtualMin) server to another (VirtualMin) server. This post describes in detail the steps to take.

First create your backup user on the server where you want to store the backup; lets name it remotebackup for example:

adduser remotebackup

Give a strong password to this user (although we will be using public / private  key authentication).

Then move to the server that creates the backups and create a RSA private / public key pair for the root user:

sudo ssh-keygen

Do not specify a passphrase (as the backup will run without user intervention). Leave the default filename for private and public key (id_rsa  and id_rsa.pub).

Now copy the public key (contents of id_rsa.pub) id to the user on the server where the backups have to be stored:

ssh-copy-id remotebackup@yourserver.net

If the copy fails because public key authentication is required over ssh you have to disable this first. To do this edit your /etc/ssh/sshd_config file and set the value for passwordauthentication to yes. Now execute the ssh-copy-id again and reset the value for passwordauthentication.

After the ssh-copy-id  has succeeded a new directory and file is created on the backup server. The directory is in the home folder of the remotebackup user and is called .ssh . In this directory a file is created, authorized_keys , which contains the public key from the root user of the server that wants to store the backups on this server.

To make things more secure it is advisable to make use of the rssh  shell for the remotebackup user. The rssh  shell is a restricted ssh shell. Only the commands that you specify are allowed in a rssh shell. To install it execute the following command on the backup server:

sudo apt-get install rssh

After rssh is installed successfully edit the file /etc/rssh.config . Uncomment the line containing the text allowscp  (VirtualMin executes backups with the scp  command).

Now edit the password file stored at /etc/passwd . Search for the line containing your backup user (remotebackup) at the start of the line and change the shell to /usr/bin/rssh.

Now if you try to login interactively over ssh you get a message saying that it is not allowed:

This account is restricted by rssh.

Allowed commands: scp

If you believe this is in error, please contact your system administrator.

Connection to bjdejong.nl closed.

Okay; this is good; VirtualMin only executes scp commands over your ssh connection.

Now goto your VirtualMin interface on the server that creates the backups and add the required backup schedules.

Create a full backup that runs every first of the month and create an incremental backup that runs every day.

Settings for the full backup. Mind the File on server setting which stores the files in a subfolder full .
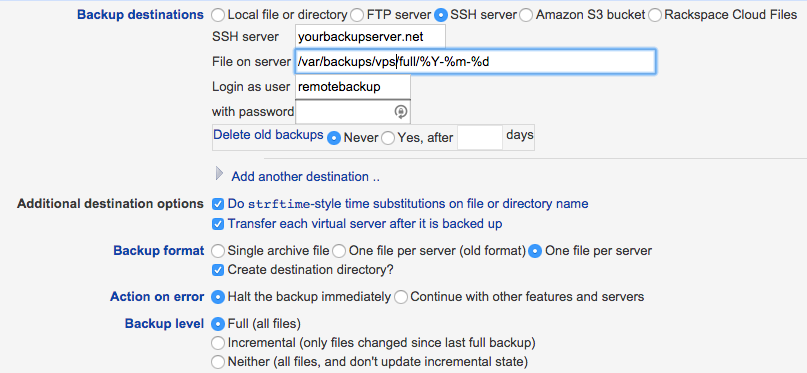
Setup ssh backup to external server


Setup ssh backup to external server

The incremental backup uses the same settings except for the Backup level which you have to set to, guess what, Incremental.

There is one extra consideration if you create a backup user like this and that is User Disk Quota. When a user is created in a VirtualMin installation with quotas enabled the default maximum quota is 2Gb. That probably is not enough for your backup user. To change this goto your VirtualMin interface and adjust the quota:

VirtualMin -> System -> Disk Quotas; select Groups and select your backupuser.

Screen Shot 2015-02-21 at 15.13.29

Because VirtualMin cannot delete backups on the remote machine in this setup (only scp command is allowed for the remotebackup user) you can make use of the crontab to cleanup old backups. First create a script called cleanup.sh in your remotebackup home folder, place the following contents in it:

#!/bin/bash
# Script is executed via the crontab. All files older than 1 year
# are removed from the backup folder
find /var/backups/vps -mtime +365 -exec rm {} \;

Next edit the crontab for the remotebackup user and execute this script, lets say, every day at 0300:

sudo crontab -u remotebackup -e

Add this line to the crontab of the user and save it:

MAILTO="yourmail@yourserver.net"
0 3 * * * /home/remotebackup/cleanup.sh

Thats all there is to it. Your backups are save now!

Share

Protect your server from the POODLE attack

You can protect your server from the POODLE attack, as described here, by disabling the SSLv3 protocol on your (Ubuntu) Apache webserver. This is easily done by changing a single configuration file. Edit the file /etc/apache2/apache2.conf  and search for the line containing SSLProtocol. Change this line from

SSLProtocol all -SSLv2

to

SSLProtocol all -SSLv2 -SSLv3

This disables SSLv3 connections to your server. Restart your apache webserver

sudo service apache2 restart

and then test if the changes were successfull:

1. Try to open a SSLv2 connection; this should give you an error:

openssl s_client -ssl2 -connect bjdejong.nl:443

CONNECTED(00000003)1255:error:1407F0E5:SSL routines:SSL2_WRITE:ssl handshake failure:/SourceCache/OpenSSL098/OpenSSL098-52.10.1/src/ssl/s2_pkt.c:427:

2. Try to open a SSLv3 connection; this should give you an error:

openssl s_client -ssl3 -connect bjdejong.nl:443

CONNECTED(00000003)
1256:error:14094410:SSL routines:SSL3_READ_BYTES:sslv3 alert handshake failure:/SourceCache/OpenSSL098/OpenSSL098-52.10.1/src/ssl/s3_pkt.c:1143:SSL alert number 40
1256:error:1409E0E5:SSL routines:SSL3_WRITE_BYTES:ssl handshake failure:/SourceCache/OpenSSL098/OpenSSL098-52.10.1/src/ssl/s3_pkt.c:564:

3. Try to open a TLS connection; this should give you no error:

openssl s_client -tls1 -connect bjdejong.nl:443

CONNECTED(00000003)
depth=0 /O=Landing page bjdejong.NL/CN=*.landingpage.nl/emailAddress=bjdejong@bjdejong.nl
verify error:num=18:self signed certificate
verify return:1
depth=0 /O=Landing page bjdejong.NL/CN=*.landingpage.nl/emailAddress=bjdejong@bjdejong.nl
verify return:1
---
Certificate chain
0 s:/O=Landing page
bjdejong.NL/CN=*.landingpage.nl/emailAddress=berendjdejong@gmail.com
i:/O=Landing page bjdejong.NL/CN=*.landingpage.nl/emailAddress=berendjdejong@gmail.com
---
Server certificate
-----BEGIN CERTIFICATE----
MIIDnzCCAoegAwIBAgIJAJl1fA2nG/6eMA0GCSqGSIb3DQEBBQUAMGYxITAfBgNV
......

If everything went ok you are protected against the POODLE attack.

Share

Ubuntu iptables redirect

computer-firewalliptables redirect

Having trouble ssh-ing on port 22?  Then try to use another port with help of your iptables firewall. With iptables it is possible (among other things) to redirect traffic on an incoming port to another port of your choice.

To save your current firewall setup you could choose to save your configuration with:

sudo iptables-save > ipfw.conf

Restoring your old configurations is as easy as:

sudo iptables-restore < ipfw.conf

Execute the following command to redirect traffic on port 443 to port 22:

sudo iptables -t nat -A PREROUTING -p tcp –dport 443 -j REDIRECT –to-ports 22

Now to create socks a tunnel on the 443 port execute the following command (add the -vvv option to get debugging info from ssh):

# -p443  Port to connect to on the remote host
# -D8080 Specifies a local "dynamic" application-level port forwarding.
# -C     Request compression of all data
# -N     Do not execute a remote command (useful for port forwarding)
# -i ... Identity file to use
sudo ssh -p443 -D8080 -N uid@hostname -C -i /home/uid/.ssh/identity

To use this connection in the browser tell the browser to use a socks proxy on port 8080 or use the tsocks  command to “socksify a tool” for example an ssh session to other servers.

tsocks ssh uid@hostname


Share

Use logwatch on Ubuntu

GIT logoLogwatch is an application that helps with simple log management by daily analysing and reporting a short digest from activities taking place on your machine. In this post a short manual for installing logwatch on your ubuntu box.

Install logwatch

sudo apt-get install logwatch

Configure logwatch

Edit the configuration file to suit your needs. Especially have a look at the “MailTo”, “MailFrom” and “Detail”.

/usr/share/logwatch/default.conf/logwatch.conf

After logwatch processes the file above at default.conf the file /usr/share/logwatch/dist.conf/logwatch.conf  is being processed. Settings in here will override the settings in default.conf! You most likely want to comment out the line that reads

MailFrom = root

After installation an entry is added to /etc/crond.daily/00logwatch

To execute logwatch from the commandline execute:

/usr/sbin/logwatch --output mail

Mail from logwatch not reaching you? Check your spam folder 🙂

Share