Category Archives: Ubuntu

Howto’s, scripts and tips for Ubuntu

VirtualMin backup fails

virtualminHaving problems backing up your virtual hosts with virtualmin after the upgraded to 4.13 (available around january the seventh 2015)?

The source of the problem is that mysqldumps are now executed under the domain account (for security reasons). As is obvious this does not always work correct. For this moment there is a quick fix thanks to the great support folks at virtualmin.com.

Check here for the quickfix (the restart of the virtualmin server is mandatory :-)).

Share

OwnCloud 7 installation on Ubuntu / VirtualMin

owncloud_logoOwnCloud 7

Store your files, folders, contacts, photo galleries, calendars and more on a server of your choosing. Access them from your mobile device, your desktop, or a web browser. Access your data wherever you are, whenever you need it.

Download the OwnCloud 7 software

Download the OwnCloud 7 software at this location (copy link address of the bz2 file). Use curl to download the file directly to your Ubuntu server:

wget https://download.owncloud.org/community/owncloud-x.y.tar.bz2

Extract the files in your document folder (an OwnCloud directory will be created) with the command:

tar -xjf owncloud-?.?.?.tar.bz2

Now an OwnCloud directory is created. You have to set the ownership of the files manually; do this with the following command:

chown -R [user]:[group] owncloud

After that you have to set the permission a bit more secure by executing the command:

find [owncloud_path] -type d -exec chmod 750 {} \;
find [owncloud_path] -type f -exec chmod 640 {} \;

Use the crontab for scheduled tasks

For better performance and more reliable operation use the system cron tab for OwnCloud scheduled tasks. Add an entry to the OwnCloud user crontab:

crontab -u [owncloud_user] -e

If this is your first crontab edit session choose your favorite editor (mine is vi). Add a line to the end of the crontab temporary file:

*/15  *  *  *  * php -f ~/public_html/owncloud/cron.php

Adding the line above to your crontab takes care for executing the cron.php file every 15 minutes on your system (even when no users visit your site as is the case with the AJAX configuration).

Create the MySQL database

OwnCloud 7 does not store the uploaded files in the MySQL database. It uses the database for user administration. We have to create a MySQL database for the OwnCloud installation. Go to your VirtualMin interface (easiest way to accomplish this). Goto Webmin -> Servers -> MySQL database server  (start MySQL server if needed).

Select Create a new database. Assign the database a name and press Create .
Select “User permissions” and select Create new user . Type a username and password. Type localhost  in the Host field. Select no permissions and press Create .
Return to the database list and choose Database permissions . Choose Create new database permission . Select the database you just created. Type in the Username field the exact same name you typed in the previous step. Type in the Hosts field localhost . Select all permissions and press Create .

Now the database is setup; in the browser navigate to your OwnCloud 7 installation. Fill out the form that appears; press Finish  and you are ready to use OwnCloud 7.

Download a client for your OwnCloud 7 installation. In the example below I use the Mac OS X version.

OwnCloud not in the webroot?

If you don’t install the OwnCloud software in the webroot (ie ~/public_html) then you have to overwrite the webroot. Edit the OwnCloud configuration file at ~/public_html/owncloud/config/config.php. Add an antry to the CONFIG array:

‘overwritewebroot’ => ‘/owncloud’

Increase upload size

Login to your admin account on owncloud. Go to the Admin page. Below File handling specify the new upload size. This setting has to be equal or less than the PHP setting. In virtualmin go to your domain configuration. Select Services -> PHP 5 Configuration -> Resource limits. Increase both the values for “Maximum file upload size” and “Maximum HTTP POST size” to the same value as you have set in the owncloud admin panel.

Add your existing files locally

You can copy your files directly to the owncloud data directory [owncloud_data_directory]/[user]/files/[folder]

After you have copied the files you have to let owncloud know you did this without using the owncloud interface. Owncloud has to rescan his files structure; use this command:

sudo -u [ownclouduser] php /home/[user]/public_html/owncloud/occ files:scan --all

Enable DropBox external storage

With OwnCloud 7 you can enable external storage. With external storage you can access, for example you dropbox files, as if they were part of your OwnCloud. Enable the “External storage app” through the admin interface (Apps).

First you have to tell DropBox about your OwnCloud app. Go to the DropBox developers page. Select the App Console on the left. Configure this page as shown below:
OwnCloud 7


Select “Create App”.

Enter the OAuth redirect URI as follows:

https://<ownCloud instance>/index.php/settings/personal
https://<ownCloud instance>/index.php/settings/admin

Take note of the AppKey and the App Secret; you have to use this in your OwnCloud configuration:

OwnCloud 7
Select Grant access  and the DropBox screen appears for granting your application access. Press Allow and your configuration is complete; a green light will appear next to the foldername in OwnCloud to indicate correct configuration.

Share

sudo without password on Ubuntu

GIT logoFor some commands in unix you need elevated priviliges. For this the sudo command is invented. It is very inconvenient to enter the password every time you execute the sudo command (especially if you have logged in with your ssh keys in the first place).

To prevent sudo from asking your password you should edit the file /etc/sudoers . First check which groups you are in (preferable use the “username” group; the one in which you are the only memeber). Start editing the sudoers file with the command: sudo visudo

below the lines

# Allow members of group sudo to execute any command
%sudo   ALL=(ALL:ALL) ALL

Add one extra line:

%yourgroup ALL=(ALL) NOPASSWD:ALL

Restart the sudo service with

sudo service sudo restart

Logoff and logon; execute a sudo command; no password asked…

Share

Virtualbox USB support: missing USB devices

Virtualbox_logoIn case VirtualBox does not recognize your USB devices on a *nix system you can solve this by adding your username to the vboxusers  group. Do this by executing the command:

# replace username with your, gues what, username
sudo usermod -G vboxusers -a username

Logoff and logon, start virtualbox and you should be able to access your USB devices. To access an USB device on a guest be sure to add it to the “USB Device Filters” (right click guest; choose Settings -> USB tab).

Also be sure to install the right extension pack for your virtualbox installation.

Share

ProFTPD TLS protocol setup and configuration

Use the ProFTPD TLS protocol

proftpd logoIn this post I will describe how to configure the ProFTPD server to use the TLS protocol. Out of the box the ProFTPD configuration uses plain FTP on a Virtualmin installation; this is not secure. Configure your ProFTPD server to use the ProFTPD TLS protocol for better security.
To configure ProFTDP to use the TLS protocol for communication follow the steps below.

Log in to your Virtualmin admin site and goto Servers -> ProFTPD server . Select Edit config files (be sure that the file /etc/proftpd/proftpd.conf is selected). Make the following changes to the file.

  1. Change the setting PassivePorts to 65000 65500  (these ports wil be opened in your firewall later on).
  2. Go to the section with the header This is used for FTPS connections  and uncomment the include statement for /etc/proftpd/tls.conf .

Save this configuration files and select “Edit config files” again (now the new included file will appear in the dropdown list “Edit directives in file”). Select the file “/etc/proftpd/tls.conf” and press the Edit button.

In the file “/etc/proftpd/tls.conf” add the lines below immediately after the “<IfModule mod_tls.c>”. Adding these lines will enforce TLS connections:

TLSEngine on
TLSRequired on
TLSRSACertificateFile /home/username/proftpd.pem
TLSRSACertificateKeyFile /home/username/proftpd.pem
TLSCipherSuite ALL :!ADH:!DES
TLSOptions NoCertRequest
TLSVerifyClient off
TLSRenegotiate ctrl 3600 data 512000 required off timeout 300
TLSLog /var/log/proftpd/tls.log

To prevent users from leaving there home directory when browsing with the FTP client you have to change the setting “Limit users to” Directory “Home directory”. In VirtualMin goto “Servers -> ProFTPD Server -> Files and Directories”.

Next step is to generate a certificate file for our TLS connection. As you can see above in the TLS configuration this file has to be stored at /home/username (you could ofcourse choose a different location…).

Lets create a certificate for the TLS connection at the appropriate location; give the new certificate file restricted permissions:

cd /home/username
openssl req -x509 -nodes -days 365 -newkey rsa:1024 -keyout proftpd.pem -out proftpd.pem
chmod 600 proftpd.pem

Now restart your ProFTPD  server. Either via the Virtualmin interface or with:

service proftpd restart

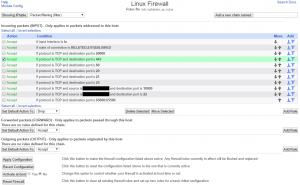
The ProFTPD server is up and running now but it is not yet accessible because you have to open the firewall ports specified on the PassivePorts setting. Execute the commands below on your server (assuming you are going to TLS over port 21 and passive ports are in the range 65000 – 65500):

sudo iptables -A INPUT -p tcp --dport 21 -j ACCEPT
sudo iptables -A INPUT -p tcp --dport 65000:65100 -j ACCEPT
sudo iptables -A PREROUTING -t nat -p tcp --dport 65000:65500 -i eth0 -j DNAT --to xxx.xxx.xxx.xxx

After this your firewall settings should something like this:

Firewall settings

Firewall settings

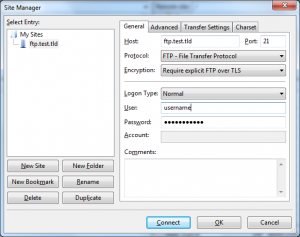
Now to test this setup install FileZilla (or any other FTP client like WinSCP) and create a new connection; follow the steps below

Download the FileZilla FTP client and start the FTP client; create a new site as described below.

ftp-settingsType Ctrl+S (Site Manager)
Press the New Site button
Host: the name of your FTP host (domain name in most cases)
Port: 21
Protocol: FTP – File Transfer Protocol
Encryption: Require explicit FTP over TLS
Logon type: Normal
User: your username
Password: your password
On the “Transfer settings” tab select “Passive” for the transfer mode.

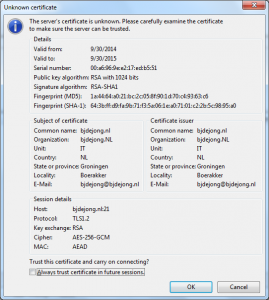
When you click connect a warning will appear about a unknown certificate (if not your configuration is not correct and you have to double check your settings). The warning looks something like this:
ftp-unknown-cert
Select Ok and now you should see the FileZilla file browser; on the left your local files and on the right your remote files.

Share

Change gnome XTerm colors

To change the gnome XTerm background color (and text color) follow the instructions below.

First of all install the gconf-editor tool

sudo apt-get install gconf-editor

Start the gconf-editor tool and go to apps -> gnome-terminal -> profiles -> Default and change the foreground_color to #FFFFFFFFDDDD  and the background_color to #000000000000 .

Go to an open XTerm window and open the Edit menu and select Profile Preferences. On the colors tab uncheck “Use colors from system theme”.

That’s all; your XTerm terminals now have a black background with a white text color.

Share

Mount NAS CIFS share on Ubuntu

Follow the instructions below to attach your NAS storage to your Ubuntu machine.

First of all install the cifs-utils  package:

sudo apt-get install cifs-utils

Then edit your /etc/fstab  file and add an entry like the one below (adjust directory names for your situation):

//diskstation.local/ShareName /mnt/ShareName cifs auto,iocharset=utf8,uid=1000,gid=1000,credentials=/home/username/.cifspwd 0 0

Then create a new folder (as root) in the /mnt  folder with the same name as specified in the line above (for the example it would be ShareName ).

Next create a file .cifspwd  in your home directory with the following lines:

username=uname
password=pwd

That’s all; your folder on your NAS will be mounted next time you boot. To mount the new folder immediately issue the command:

sudo mount -all

Have fun!

Share