Author Archives: Berend de Jong

ProFTPD TLS protocol setup and configuration

Use the ProFTPD TLS protocol

proftpd logoIn this post I will describe how to configure the ProFTPD server to use the TLS protocol. Out of the box the ProFTPD configuration uses plain FTP on a Virtualmin installation; this is not secure. Configure your ProFTPD server to use the ProFTPD TLS protocol for better security.

To configure ProFTDP to use the TLS protocol for communication follow the steps below.

Log in to your Virtualmin admin site and goto Servers -> ProFTPD server . Select Edit config files (be sure that the file /etc/proftpd/proftpd.conf is selected). Make the following changes to the file.

  1. Change the setting PassivePorts to 65000 65500  (these ports wil be opened in your firewall later on).
  2. Go to the section with the header This is used for FTPS connections  and uncomment the include statement for /etc/proftpd/tls.conf .

Save this configuration files and select “Edit config files” again (now the new included file will appear in the dropdown list “Edit directives in file”). Select the file “/etc/proftpd/tls.conf” and press the Edit button.

In the file “/etc/proftpd/tls.conf” add the lines below immediately after the “<IfModule mod_tls.c>”. Adding these lines will enforce TLS connections:

TLSEngine on
TLSRequired on
TLSRSACertificateFile /home/username/proftpd.pem
TLSRSACertificateKeyFile /home/username/proftpd.pem
TLSCipherSuite ALL :!ADH:!DES
TLSOptions NoCertRequest
TLSVerifyClient off
TLSRenegotiate ctrl 3600 data 512000 required off timeout 300
TLSLog /var/log/proftpd/tls.log

To prevent users from leaving there home directory when browsing with the FTP client you have to change the setting “Limit users to” Directory “Home directory”. In VirtualMin goto “Servers -> ProFTPD Server -> Files and Directories”.

Next step is to generate a certificate file for our TLS connection. As you can see above in the TLS configuration this file has to be stored at /home/username (you could ofcourse choose a different location…).

Lets create a certificate for the TLS connection at the appropriate location; give the new certificate file restricted permissions:

cd /home/username
openssl req -x509 -nodes -days 365 -newkey rsa:1024 -keyout proftpd.pem -out proftpd.pem
chmod 600 proftpd.pem

Now restart your ProFTPD  server. Either via the Virtualmin interface or with:

service proftpd restart

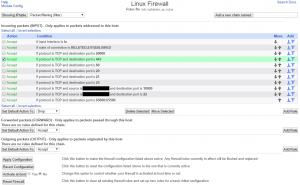
The ProFTPD server is up and running now but it is not yet accessible because you have to open the firewall ports specified on the PassivePorts setting. Execute the commands below on your server (assuming you are going to TLS over port 21 and passive ports are in the range 65000 – 65500):

sudo iptables -A INPUT -p tcp --dport 21 -j ACCEPT
sudo iptables -A INPUT -p tcp --dport 65000:65100 -j ACCEPT
sudo iptables -A PREROUTING -t nat -p tcp --dport 65000:65500 -i eth0 -j DNAT --to xxx.xxx.xxx.xxx

After this your firewall settings should something like this:

Firewall settings

Firewall settings

Now to test this setup install FileZilla (or any other FTP client like WinSCP) and create a new connection; follow the steps below

Download the FileZilla FTP client and start the FTP client; create a new site as described below.
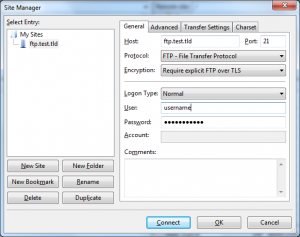
ftp-settingsType Ctrl+S (Site Manager)
Press the New Site button
Host: the name of your FTP host (domain name in most cases)
Port: 21
Protocol: FTP – File Transfer Protocol
Encryption: Require explicit FTP over TLS
Logon type: Normal
User: your username
Password: your password
On the “Transfer settings” tab select “Passive” for the transfer mode.

When you click connect a warning will appear about a unknown certificate (if not your configuration is not correct and you have to double check your settings). The warning looks something like this:
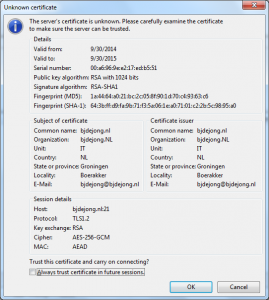
ftp-unknown-cert
Select Ok and now you should see the FileZilla file browser; on the left your local files and on the right your remote files.
Share

Working with Visual Studio 2010 and github on Synology

gitInstall the “GIT server”  package on your Synology Disk Station. Goto the package center and search for the “Git Server” package. Download and install it.

Install GitExtensions on your dev box.

Install the latest msysgit on your dev box.

Install the “Git Source Control Provider”  Visual Studio 2010 extension on your dev box. In Visual Studio goto Tools -> Extensions and search for “Git Source Control Provider” in the online gallery.

Now SSH to your Synology (either with putty or with a Linux terminal) and execute the following commands:

cd /volume1/
mkdir git
cd git
mkdir repo1.git
cd repo1.git
git --bare init
cd ..
chown -R johndoe:users repo1.git

This will create a so called “bare git” repository. A bare git repository can be used as a central repository to which you push your local repositories.

Ok; now there is a GIT repository created on your Synology. Next create a new Visual Studio solution. Right click the solution name and select “Create Git Repository”. This will add an .git folder to your solution directory and now your solution is in a local Git repository.

Next commit your new solution to the Git repository.Select all files; type your comment and hit “Commit”.

Now push your local repository to the central bare git repository you created earlier. Right click the solution name; choose Git (master) -> Push. The checklist for Git settings will show up if not all settings are valid. For now just click Ok. The Push dialog appears. Specify the remote name; for example: ssh://johndoe@10.0.0.1/volume1/repo1.git

Some useful GIT commands
In Visual Studio goto GIT -> GIT bash; a Bash command prompt will start.
Show available tags:

git tag

Create a tag in the GIT bash:

git tag -a v1.0.2 -m "The new version"

Commit your changes with a message:

git commit -m "Your message / comment"

Push the tag information:

git push --tag

Delete a tag:

git tag -d name_of_the_tag

GIT Use Case

Create bare repo on diskstation

git init --bare repo.git

On a client clone (initialise) a repository from the dskstation:

git clone ssh://git@diskstation.local/volume1/git/repo.git

[Remote “origin”] can be found in .git/config file; you could add an alias for convenience. A directory repo will be created that contains your files. Add files to your repo directory

Add them to the local stage:

git add file.txt

Commit them to the local repo:

git commit -m "Your comment"

Push them to the server repo:

git push origin master

A new branch master will be created. From now on you can use git push (without the origin master)

Share

XDebug NetBeans Apache configuration

So you want to debug your PHP website code with xdebug netbeans? In this post I will explain how to configure XDebug / Apache and NetBeans to start a debug session for your website.

First of all install the necessary components:

apt-get install apache2
apt-get install mysql-server
apt-get install php5-mysql
apt-get install php5-xdebug

Restart the apache webservice and check for any errors:

service apache2 restart

Create a new website configuration in /etc/apache2/sites-available  :

<VirtualHost *:80>
   ServerName www.xdebugger.tst
   ServerAdmin webmaster@xdebugger.tst
   DocumentRoot /var/www/xdebugger/www
   <Directory / >
      Options FollowSymLinks
      AllowOverride None
   </Directory>
   <Directory /var/www/xdebugger/www">
      Options Indexes FollowSymLinks MultiViews
      AllowOverride All
      Order allow,deny
      allow from all
   </Directory>
   ErrorLog ${APACHE_LOG_DIR}/error.log
   CustomLog ${APACHE_LOG_DIR}/access.log combined
</VirtualHost>

Update your hosts file so you can easily test this new site .Add the following line to the file /etc/hosts :

127.0.0.1           www.xdebugger.tst

Next enable remote debugging with XDebug. Although you just installed XDebug it will be disabled by default.

Create a script index.php  to see your changes to the apache / php configuration in the directory /var/www/xdebugger/www :

<?php
phpinfo();
?>

Navigate to http://www.xdebugger.tst

xdebugoff

As you can see in the picture above XDebug is not enabled. To enable the XDdebug feature add the following lines (if not already there) to the file /etc/php5/apache2/conf.d/20-xdebug.ini :

zend_extension=xdebug.so
xdebug.remote_enable=on

Now restart your apache service once more; execute the script and check the xdebug.remote_enable  setting:

Execute

sudo service apache2 restart

Navigate to http://www.xdebugger.tst

xdebugon


Now goto your netbeans IDE and create a new project:

File -> New project
Category: PHP
Projects: PHP Application with Existing Source
Press Next
Sources Folder: /var/www/xdebugger/www
Project Name: xdebugger
Press Next
Project URL: http://www.xdebugger.tst (same value as the one you added to /etc/hosts!)
Press Finish

Set the main project to the newly created project:

Goto Run -> Set Main Project -> xdebugger

Next start your first debugging session!

Goto Debug -> Debug Main project

Additonal information about configuring NetBenas can be found here

Share

Change gnome XTerm colors

To change the gnome XTerm background color (and text color) follow the instructions below.

First of all install the gconf-editor tool

sudo apt-get install gconf-editor

Start the gconf-editor tool and go to apps -> gnome-terminal -> profiles -> Default and change the foreground_color to #FFFFFFFFDDDD  and the background_color to #000000000000 .

Go to an open XTerm window and open the Edit menu and select Profile Preferences. On the colors tab uncheck “Use colors from system theme”.

That’s all; your XTerm terminals now have a black background with a white text color.

Share

Mount NAS CIFS share on Ubuntu

Follow the instructions below to attach your NAS storage to your Ubuntu machine.

First of all install the cifs-utils  package:

sudo apt-get install cifs-utils

Then edit your /etc/fstab  file and add an entry like the one below (adjust directory names for your situation):

//diskstation.local/ShareName /mnt/ShareName cifs auto,iocharset=utf8,uid=1000,gid=1000,credentials=/home/username/.cifspwd 0 0

Then create a new folder (as root) in the /mnt  folder with the same name as specified in the line above (for the example it would be ShareName ).

Next create a file .cifspwd  in your home directory with the following lines:

username=uname
password=pwd

That’s all; your folder on your NAS will be mounted next time you boot. To mount the new folder immediately issue the command:

sudo mount -all

Have fun!

Share

Scanning an image with C#

This post shows an example of scanning an image with C#. First of all start Visual Studio and create a new console application.scanning software c#

In this example I make use of the standard WIA scanning functionality in Windows 7. Reference the WIA dll in your new project. The dll can be found in the folder “c:\windows\system32\wiaaut.dll”.

The code below scans an image (A4 size) at the default 300 DPI and stores it as an uncompressed TIFF image.

namespace Scanner
{
   using System;
   sing System.Runtime.InteropServices;

   class Program
   {
      const string WIA_DEVICE_PROPERTY_PAGES_ID = "3096";
      const string WIA_DEVICE_PROPERTY_PAGES_ID = "3096";
      const string WIA_HORIZONTAL_SCAN_RESOLUTION_DPI = "6147";
      const string WIA_VERTICAL_SCAN_RESOLUTION_DPI = "6148";
      const string WIA_HORIZONTAL_SCAN_START_PIXEL = "6149";
      const string WIA_VERTICAL_SCAN_START_PIXEL = "6150";
      const string WIA_HORIZONTAL_SCAN_SIZE_PIXELS = "6151";
      const string WIA_VERTICAL_SCAN_SIZE_PIXELS = "6152";
      const string WIA_SCAN_BRIGHTNESS_PERCENTS = "6154";
      const string WIA_SCAN_CONTRAST_PERCENTS = "6155";
      const int widthA4at300dpi = 2480;
      const int heightA4at300dpi = 3508;

      static void Main(string[] args)
      {
         WIA.CommonDialogClass commonDialogClass = new WIA.CommonDialogClass();
         WIA.Device scannerDevice = null;

         try
         {
             scannerDevice = 
                commonDialogClass.ShowSelectDevice(
                   WIA.WiaDeviceType.ScannerDeviceType,
                   false, 
                   false);

             SetWIAProperty(scannerDevice.Properties, WIA_DEVICE_PROPERTY_PAGES_ID, 1);
             WIA.Item scannnerItem = scannerDevice.Items[1];

             SetA4(scannnerItem.Properties, 300);

             WIA.ImageFile scanResult = 
                commonDialogClass.ShowTransfer(
                   scannnerItem, 
                   WIA.FormatID.wiaFormatTIFF, 
                   false);

             scanResult.SaveFile("output.tiff");
         }
         catch (COMException ex)
         {
            if ((uint)ex.ErrorCode == 0x80210015)
            {
               Console.WriteLine("No scanner attached");
            }
            else
            {
               Console.WriteLine("Unknown error: {0}", (uint)ex.ErrorCode);
            }
         }
      }

      private static void SetA4(WIA.IProperties properties, int dpi)
      {
            int width = (int)((widthA4at300dpi / 300.0) * dpi);
            int height = (int)((heightA4at300dpi / 300.0) * dpi);

            SetWIAProperty(properties, WIA_HORIZONTAL_SCAN_RESOLUTION_DPI, dpi);
            SetWIAProperty(properties, WIA_VERTICAL_SCAN_RESOLUTION_DPI, dpi);
            SetWIAProperty(properties, WIA_HORIZONTAL_SCAN_START_PIXEL, 0);
            SetWIAProperty(properties, WIA_VERTICAL_SCAN_START_PIXEL, 0);
            SetWIAProperty(properties, WIA_HORIZONTAL_SCAN_SIZE_PIXELS, width);
            SetWIAProperty(properties, WIA_VERTICAL_SCAN_SIZE_PIXELS, height);
       }

       private static void SetWIAProperty(WIA.IProperties properties, 
              object propName, object propValue)
       {
          WIA.Property prop = properties.get_Item(ref propName);
          prop.set_Value(ref propValue);
       }
    }
}


Share

Gnome tips: add minimize and maximize buttons

Gnome tips: add minimize and maximize buttonsEver missed the minimize and maximize buttons on your Ubuntu gnome installation? In this post I show you how you can easily add them to your Gnome installation. All you need is the dconf-editor (use apt-get install to install it if you have not already done so):

Open the dconf-editor and navigate to “org -> gnome -> shell -> override”. Select the button layout item and change its value from “:close” to “menu,:close,minimize,maximize”.

The menu is placed left and the items to the right of the column are positioned right on the window bar.

The GUI is immediately updated with your changes.

Share

FTP with curlftpfs

You can easily use curlftpfs to FTP your files. The command below FTP’s a complete directory structure to your local machine. The advantage over the wget command is that the curlftpfs command preserves your file and directory permissions.

Mount an FTP folder with the following command:

curlftpfs ftp.srv.nl /tmp/ftp/ -o user=[username]:[password],allow_other

This will mount the remote (FTP) directory on /tmp/ftp


Share

FTP a folder with wget

You can easily use wget to FTP your files. The command below FTP’s a complete directory structure to your local machine.

wget -r -nH ==cut-dirs=4 ftp://[username]:[password]ftp.svr.nl/webspace/httpdocs/site1.nl


The above command retrieves all files with the folder webspace/httpdocs/site1.nl . The -nH  options makes sure that there is no folder ftp.svr.nl is created. The –cut-dirs=3  options removes 3 (webspace, httpdocs and site1.nl) folders from the remote directory structure and re-creates the structure local (excluding the 3 levels) local.

Share