Amount including VAT equals € 1074,00
VAT percentage equals 21%
VAT = € 1074 / (100 + 0.21 * 100) * (0.21 * 100) = € 186,40
Mount a shared folder with Ubuntu guest (and Mac OS host):
# Downloads == Name of the share in Virtualbox shared folder
# /mnt/Downloads == Directory on Ubuntu guest
# uid=1000,gid=1000 == Execute the 'id' command to get these values
sudo mount -t vboxsf Downloads /mnt/Downloads -o uid=1000,gid=1000
In a dual boot configuration with NTFS it is sometimes necessary to mount a partition as read only (for example when you have Windows 2008 quick start enabled; see also this link). The command below lets you do this:
# mount ntfs read only
sudo mount -t "ntfs" -o "uhelper=udisk2,nosuid,uid=1000,gid=1000,dmask=0077;fmask=0177",ro "/dev/sdb5" "/media//Data"
 For some commands in unix you need elevated priviliges. For this the sudo command is invented. It is very inconvenient to enter the password every time you execute the sudo command (especially if you have logged in with your ssh keys in the first place).
To prevent sudo from asking your password you should edit the file /etc/sudoers . First check which groups you are in (preferable use the “username” group; the one in which you are the only memeber). Start editing the sudoers file with the command: sudo visudo
below the lines
# Allow members of group sudo to execute any command
%sudo   ALL=(ALL:ALL) ALL
Add one extra line:
%yourgroup ALL=(ALL) NOPASSWD:ALL
Restart the sudo service with
sudo service sudo restart
Logoff and logon; execute a sudo command; no password asked…
 To use SSH keys on your windows system follow the steps below:
Install the git extensions for windows. This will (among other things) install the Git Bash shell. Execute a git bash shell. Now create your private/public key pair with the ssh-keygen command (or copy an existing key). Add a passphrase for additonal security.
On windows the ssh files are store in c:\Users\Administrator\.ssh\
Copy the public part to your git server with the ssh-copy-id command.
In Git bash edit your .profile (or create one) and add the coding snippet below:
SSH_ENV=$HOME/.ssh/environment

function start_agent
{
   echo "Initialising new SSH agent..."
   /usr/bin/ssh-agent | sed 's/^echo/#echo/' > ${SSH_ENV}
   echo succeeded
   chmod 600 ${SSH_ENV}
   . ${SSH_ENV} > /dev/null
   /usr/bin/ssh-add;
}

if [ -f "${SSH_ENV}" ]; then
   . ${SSH_ENV} > /dev/null
   ps -ef | grep ${SSH_AGENT_PID} | grep ssh-agent$ > /dev/null || {
      start_agent;
   }
else
   start_agent;
fi
If you have multiple keys you should also create a config file in the .ssh folder. In this file you specifiy which key should be used for what host; like this:
Host yourhost.nl
 IdentityFile ~/.ssh/your_key_for_this_host
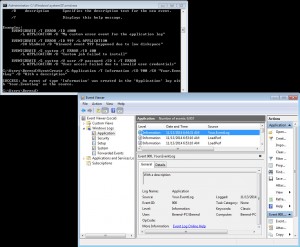
With the command below you can easily create a new windows eventlog. The command creates an informational event in the specified source; automatically creating the source if it does not exist.
EventCreate /L Application /T Information /ID 900 /SO "Your.Eventlog" /D "With a description"

/L The eventlog to create an event inEvent
/T Information
/ID The event ID for the event
/SO The source for the event
/D is description
 This post shows you how to connect to a ProFTPD server which requires a TLS connection. TLS is an extra layer of security over the standard FTP protocol used by ProFTPD.
First of all install a copy of…..FileZilla and start it up. Next go to the Site Manager (File -> Site Manager… or type Ctrl+S).
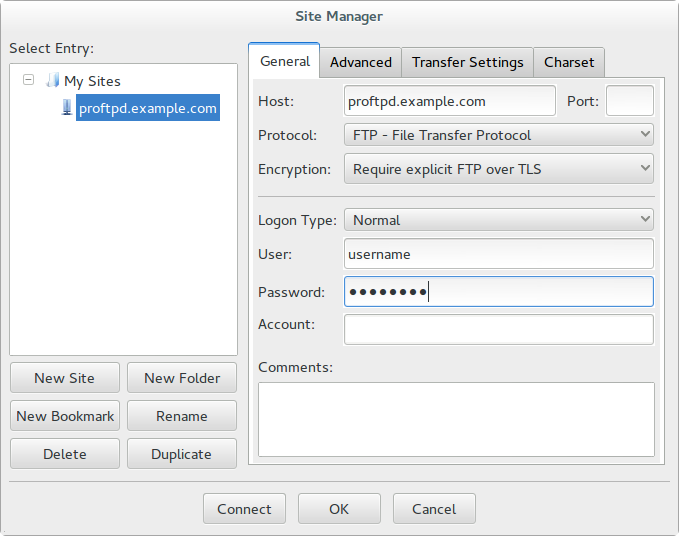
Press the New Site button and give your site a logical name; proftpd.example.com for example. Next fill out the dialog as shown below; adjust values where appropriate (host and portname for example).

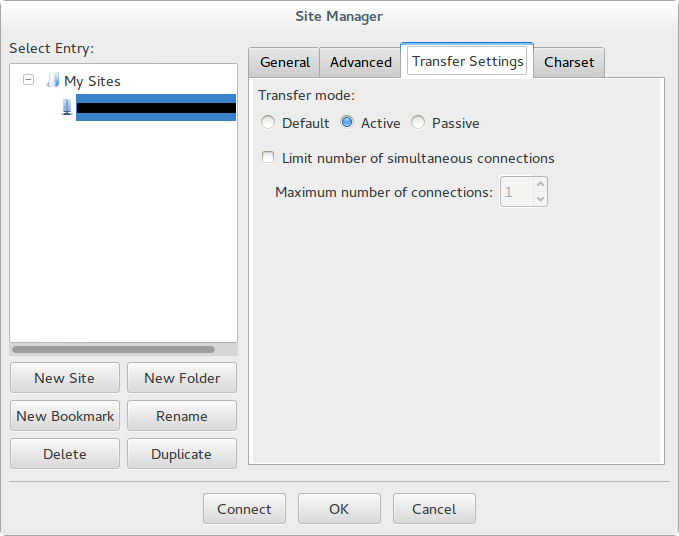
Next go to the tab Transfer Settings and choose for the Transfer mode the value Active . See also the picture below.

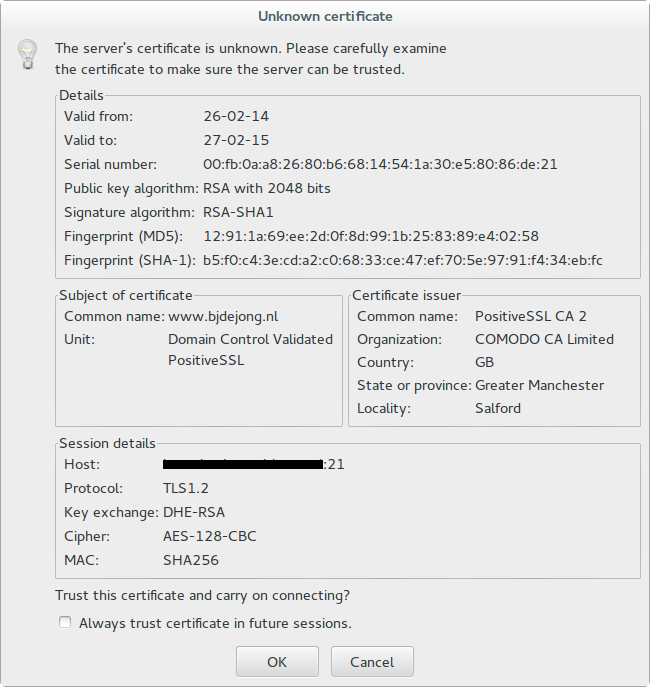
Allright that’s all for your FileZilla configuration. Press the Connect button to make a connection with this ProFTPD instance. If you have never visitied this FTP server before in this FileZilla session a window will, probably (not if the FTP server uses a known certificate), popup which says Unknown certificate . See the dialog below.

Check the Subject and the Issuer of the certificate; are they familiar? Yes, continue choose no otherwise. Check also the session details. The host should be the same as the one you are trying to connect to. If everything is fine you could choose to always trust this site but that is up to you.
HTH
 In case VirtualBox does not recognize your USB devices on a *nix system you can solve this by adding your username to the vboxusers group. Do this by executing the command:
# replace username with your, gues what, username
sudo usermod -G vboxusers -a username
Logoff and logon, start virtualbox and you should be able to access your USB devices. To access an USB device on a guest be sure to add it to the “USB Device Filters” (right click guest; choose Settings -> USB tab).
Also be sure to install the right extension pack for your virtualbox installation.

For easy and fast unlocking your Nexus devive use the Nexus Rootkit Tool at www.wugfresh.com/nrt