Author Archives: Berend de Jong

Using MSMQ with C#

First add the MSMQ component to your windows installation. Go to Add Remove programs; Add Windows Components; Select Aplication Server; press Details and check Message Queuing
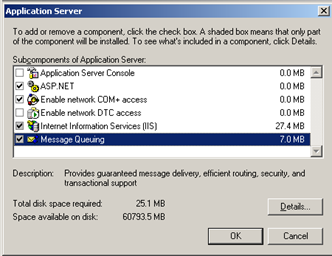
Press Ok; press Finish

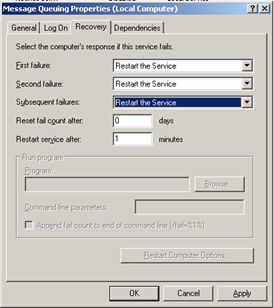
Configure the Message and Queing service to restart when errors occur.

  1. Go to “Start -> Administrative tools -> Computer Management”.
  2. Expand “Services and Applications”.
  3. Sselect “Services”.
  4. Select “Message Queuing”; right click and select “Properties”.
  5. Select the “Recovery tab”.
  6. Select “Restart the Service” for first, second and subsequent failures.

Create a new C# Forms project / solution with Visual Studio 2008. Add a reference to the System.Messaging .NET dll.

Add two Forms to the project. Place in the constructor of Form1 the following code:

//Q Creation 

if(MessageQueue.Exists(@".Private$MyQueue")) 
    mq = new System.Messaging.MessageQueue(@".Private$MyQueue"); 
else 
    mq = MessageQueue.Create(@".Private$MyQueue");
Queue2 q2 = new Queue2();
q2.Show(); 
Share

SharePoint stuff, tips & tricks

General

  1. Enable the Windows SharePoint Services Administration to be able to schedule retracting jobs in the Central Admin
  2. Download the newest WSPBuilder bits
  3. Remember to remove the default bin of VS2008 and store the dll’s in 80bin (dll’s in the default bin are going to be deployed to the GAC!)
  4. Add solution to the solution store:

    %STSADMPRG% -o addsolution -filename “..Solution1.wsp”

    (No files available in the 12 hive yet)

  5. Deploy a solution:

    %STSADMPRG% -o deploysolution -name “Solution1” -immediate -force -allowCasPolicies -allowGacDeployment

    (Now you can see the files are added to the 12 hive; features are installed NOT activated)

  6. Activate the feature:

    %STSADMPRG% -o deactivatefeature -filename Feature1feature.xml -url http://ServerName

  7. To enable intellisense with your xml definitions within sharepoint install CAML.IntelliSense.msi
  8. Be sure that the “Windows SharePoint Services Administration” service is running for deploying WSP solutions
Share

Create a GUID macro for Visual Studio 200[5][8]

  1. Load Visual Studio 2008 and goto the Macro Explorer (press Alt+F8)
  2. Right-click on “Macros” then select New Macro Project
  3. Name your project (eg. GUIDGenerator) and choose a location to save it (note no space allowed in Project Name)
  4. This should give you a new project with a “Module1″ sitting underneath it. Right-click on “Module1″ and select “Rename” to give it a more meaningful name (eg. GUIDGenModule).
  5. Double-click on the newly renamed module and you should be shown the Visual Studio Macro IDE.
  6. Enter the following code (the “D” in ToString can be customised):
        Sub Create_GUID()
           DTE.ActiveDocument.Selection.Text = System.Guid.NewGuid().ToString("D").ToUpper()
        End Sub
    	
  7. Save and close the Macro IDE.
  8. Back in the main Visual Studio window goto Tools –> Options
  9. Goto the “Keyboard” option under the “Environment” tab.
  10. In the “Show Commands Containing” text box type in “Create_GUID”
  11. Select the Macro sub that you just created from the list (it should be the only one)
  12. Click inside the “Press Shortcut Keys” textbox then press your desired keyboard shortcut for inserting a GUID (eg. Alt+G makes a lot of sense).
  13. Ensure the “Use Shortcut in” option is “Global” and click on “Assign”
  14. Close the options window and you should be able to start using your keyboard shortcut to quickly insert GUIDs into text!
  15. If you have any other Visual Studio windows open at the time you will need to close them and reload for the macro for the macro to be loaded (or you can goto the Macro Explorer window and manually load your Macro project)
Share

Code Access Security

There are three kinds of permissions, each with a specific purpose:

  1. Code access permissions, which represent access to a protected resource or the ability to perform a protected operation.
  2. Identity permissions, which indicate that code has credentials that support a particular kind of identity.
  3. Role-based security permissions, which provide a mechanism for discovering whether a user (or the agent acting on the user’s behalf) has a particular identity or is a member of a specified role.

PrincipalPermission is the only role-based security permission.

Applications that receive less than full trust by the runtime code access security system are not allowed to call shared managed libraries unless the library writer specifically allows them to through the use of the AllowPartiallyTrustedCallersAttribute Class.

AllowPartiallyTrustedCallersAttribute is only effective when applied by a strong-named assembly at the assembly level.

By default code executing from “Local Intranet” and “Internet” zone is partially trusted!

There is no programmatic way for partially trusted code to call a library that does not have the AllowPartiallyTrustedCallersAttribute attribute.

To view the list of fully trusted assemblies, use the following command:
caspol -listfulltrus

If u want to turn it off, u should be the administrator. By using this command u can turn it off.
caspol -s off

Reset security settings:
caspol -reset

XML files for storing configuration:
C:WINDOWSMicrosoft.NETFrameworkv2.0.50727CONFIGsecurity.config

Share

Executing WSS in .NET 3.5 mode

By default WSS 3.0 runs under the .NET 2.0 framework. To change this to use the .NET 3.5 framework execute the following steps:

  1. Open the web.config for your site
  2. Add the following assemblies below the tag:
    <add assembly="Microsoft.SharePoint, Version=12.0.0.0, 
    	Culture=neutral, PublicKeyToken=71e9bce111e9429c" /> 
    <add assembly="System.Core, Version=3.5.0.0, 
    	Culture=neutral, PublicKeyToken=B77A5C561934E089" /> 
    <add assembly="System.Xml.Linq, Version=3.5.0.0, 
    	Culture=neutral, PublicKeyToken=B77A5C561934E089" /> 
    
  3. Then add the following to right before (for example) the tag
    <system.codedom> 
      <compilers> 
        <compiler language="c#;cs;csharp" extension=".cs" warningLevel="4" 
          type="Microsoft.CSharp.CSharpCodeProvider, System, Version=2.0.0.0, 
          Culture=neutral, PublicKeyToken=b77a5c561934e089"> 
          <providerOption name="CompilerVersion" value="v3.5" /> 
          <providerOption name="WarnAsError" value="false" /> 
        </compiler> 
      </compilers> 
    </system.codedom>
    
  4. Your site now runs under the .NET Framework 3.5!
Share

Use extension methods on your ASPX page

  1. Create a Webapplication project
  2. Edit the Default.aspx to look like this:
    <%@ Page Language="C#" AutoEventWireup="true" CodeBehind="Default.aspx.cs" Inherits="WebApplication2._Default" %> 
    <%@ Import Namespace="Berend.PageExtensions" %> 
    <!DOCTYPE html PUBLIC "-//W3C//DTD XHTML 1.0 Transitional//EN" "http://www.w3.org/TR/xhtml1/DTD/xhtml1-transitional.dtd"> 
    
    <html xmlns=http://www.w3.org/1999/xhtml> 
      <head runat="server"> 
        <title></title> 
      </head> 
      <body> 
       <form id="form1" runat="server"> 
          <div> 
            <h1> 
              <%=this.MyPageExtensionMethod()%> 
            </h1> 
          </div> 
        </form> 
      </body> 
    </html>
    
  3. Remember to add the namespace (which contains your extension method) to your aspx
  4. Add a class library to your project and code the following class:
    namespace Berend.PageExtensions 
    { 
        public static class Class1 
        { 
            public static string MyPageExtensionMethod(this Page p) 
            { 
                return "Extension method executed!"; 
            } 
        } 
    } 
    
  5. This class Class1 contains the extension method (remember to make the class and the method static)
  6. Press F5 and your extension method gets executed.

When you want to use this technique with SharePoint 2007 you have to follow the steps in this post to run WSS under the .NET 3.5 framework!

Share

SQL Injection

In the Page_load of a ASP.NET page called inject.aspx:

SqlConnection con = 
   new SqlConnection(@"data source=(local)TEST;user id=sa;password=sa;database=Northwind");
con.Open();
string sqlstring = String.Format("INSERT INTO Categories (CategoryName, Description, Picture)  VALUES ('naam', '{0}', null)", 
Request.QueryString["desc"]);
Response.Write(sqlstring);
SqlCommand cmd = new SqlCommand(sqlstring, con);
cmd.ExecuteNonQuery();
con.Close();

Direct your browser to “……/…../inject.aspx?test=x’,null); drop table test; –” and your table Test is gone with the (North)wind.

See also this link for more information.

Share

Multiple host-headers and WCF services

When IIS is configured with multiple host-headers your WCF web.config has to be adjusted to use the correct prefix. Add the following sections to your system.serviceModel section:

<serviceHostingEnvironment>   
    <baseAddressPrefixFilters>   
        <add prefix="http://localhost:1122/"/>   
    </baseAddressPrefixFilters>   
</serviceHostingEnvironment>
Share