Monthly Archives: November 2010

MSBuild notes

To examine what types of values the well-known metadata returns, take a look at the example below:

<Project xmlns="http://schemas.microsoft.com/developer/msbuild/2003">
  <ItemGroup>
    <PrjFile Include="Helloworld.proj" />
  </ItemGroup>
  <Target Name="Well known metadata">
    <Message Text="%40(PrjFile->'%25(Fullpath)'):@(PrjFile->'%(Fullpath)')"/>
    <Message Text="%40(PrjFile->'%25(Rootdir)'):@(PrjFile->'%(Rootdir)')"/>
    <Message Text="%40(PrjFile->'%25(Filename)'):@(PrjFile->'%(Filename)')"/>
    <Message Text="%40(PrjFile->'%25(Extension)'):@(PrjFile->'%(Extension)')"/>
    <Message Text="%40(PrjFile->'%25(RelativeDir)'):@(PrjFile->'%(RelativeDir)')"/>
    <Message Text="%40(PrjFile->'%25(Directory)'):@(PrjFile->'%(Directory)')"/>
    <Message Text="%40(PrjFile->'%25(RecursiveDir)'):@(PrjFile->'%(RecursiveDir)')"/>
    <Message Text="%40(PrjFile->'%25(Identity)'):@(PrjFile->'%(Identity)')"/>
    <Message Text="%40(PrjFile->'%25(ModifiedTime)'):@(PrjFile->'%(ModifiedTime)')"/>
    <Message Text="%40(PrjFile->'%25(CreatedTime)'):@(PrjFile->'%(CreatedTime)')"/>
    <Message Text="%40(PrjFile->'%25(AccessedTime)'):@(PrjFile->'%(AccessedTime)')"/>
  </Target>
</Project>
Share

How to Retrieve image from Windows Live Album

namespace WindowsFormsApplication1
{
    using System;
    using System.ComponentModel;
    using System.Net;
    using System.Windows.Forms;

    public partial class Form1 : Form
    {
        public Form1()
        {
            InitializeComponent();
        }

        private void button1_Click(object sender, EventArgs e)
        {
            string url =  http://public.blu.livefilestore.com/xyz/012.jpg";
            WebClient client = new WebClient();
            client.Proxy.Credentials =  new NetworkCredential("uname", "upwd", "udomain");
            client.DownloadFileCompleted += 
               new AsyncCompletedEventHandler(client_DownloadFileCompleted);
            client.DownloadFile(new Uri(url), @"c:localfile.jpg");
        }

        void client_DownloadFileCompleted(object sender, AsyncCompletedEventArgs e)
        {
            MessageBox.Show("Download completed");
        }
    }
} 
Share

SSL and Certificates for IIS6.0

Installation of certificates in Windows 2003; you will be your own Certicate Authority.

Install the necessary software:

Internet Information Server
Certificate Services (for making your own certificates)
After installation a Default WebSite is created (check with inetmgr). This website contains a virtual directory called CertServ.

A CA can process certificate requests; browse to the URL http://ServerName/CertServ. On this site you can also retrieve the CA certificate.

Request a certicate
Start inetmgr
Create a new website e.g. SSLWebSite. Leave everything default

Share

TFS Commands Tips and Tricks part 1

Below are some TFS commands and tips that might be useful:

Delete a build:

tfsbuild.exe delete http://:8080 “” “” /noprompt

Delete a label:

tf label /server:http://:8080 @ /delete

Delete a TeamProject (be careful):

TfsDeleteProject.exe /q /server: /force

Tip: The reporting site is not properly deleted! Go to http://servername/Reports; click on “Show details”; check the teamproject and press delete.

Check your latest warehouse run:
In the database TfsWarehouse a table dbo._Warehouseconfigexists. Check the row with IDLastProcessTimeStamp

Stop a running build (TFS2005):
Go to your buildserver and navigate to the directory Program filesMicrosoft Visual Studio 8Common7IDE; start the command:

tfsbuild.exe stop “>teamproject>” “”

You can remove the build with

tfsbuild.exe delete “” “”

Deleting the TeamProject does not delete the Report or the WSS site (location on wss server is http://localhost/sites/[TEAMPROJECTNAME]. You can delete this components in their respective programs.

All sharepoint sites defined on the server can be retrieved from the SQL table: STS_Config_TFS.dbo.sites

Share

Team Foundation Server Single Server installation

This is a very basic Team Foundation install. It is a Single Server install; Application Tier and Database Tier all on a single machine.

  1. Install Windows 2003 SE including IIS / ASP.NET.
  2. Install SQL Server 2005 Enterprise Edition:
    1. On the Components to Install page, select the following components, and then click Advanced; select:
      SQL Server Database Services.
      Analysis Services.
      Reporting Services.
      Integration Services.
      Workstation components, Books Online, and development tools.
    2. On the Feature Selection page (after pressing Advanced), expand the following nodes and specify the following options.
    3. Under Database Services, click the icon for Replication and select Entire feature will be unavailable.
    4. On the Instance Name page, select Default instance, and then click Next.
    5. In “Start services at the end of setup”, select all services: SQL Server, SQL Server Agent, Analysis Services, Reporting Services, and SQL Browser,and then click Next.
    6. On the Authentication Mode page, select Windows Authentication Mode, and then click Next.
    7. On the Collation Settings page, select the appropriate collation for your language, and then click Next.
    8. On the Report Server Installation Options page, select Install the default configuration, and then click Next.
    9. On the Error and Usage Report Settings page, you can optionally select Automatically send Error reports for SQL Server 2005 to Microsoft or your corporate error reporting server and Automatically send Feature Usage data for SQL Server 2005 to Microsoft, and then click Next.
    10. On the Ready to Install page, you can review the list of components to be installed, and then click Install.
  3. Install the latest Service Pack for SQL Server.
  4. Install the SqlServerKB update located on the TFS cd in the root folder.
  5. Installing the Microsoft .NET Framework 2.0 Hotfix located on the TFS cd in the KB913393 folder.
  6. Installing Microsoft Windows SharePoint Services (http://go.microsoft.com/fwlink/?linkid=55087)
    CAUTION Install for Server Farm!
  7. Create users:
    ?TFSREPORTS
    ?TFSSERVICE
  8. Ensure IIS is installed on your server.
  9. Install Team Foundation Server itself.
  10. Install the Build component of TFS in the Build directory on the cd (use the TFSSERVICE account for the installation).
  11. Install the Team Explorer on your TFS/SQL machine.
  12. Start Visual Studio 2005.
  13. Choose Tools -> Connect to Team Foundation Server…
  14. Give the TFSSERVICE user access to the Team Foundation server:
  15. Right-click the servername in the Team explorer.
  16. Select “Team Foundation Server settings”.
  17. Select “Group Member Ship…”.
  18. Select the group “SERVERTeam Foundation Licensed Users”.
  19. Select Properties.
  20. Select in the Add member group “Windows user or group”.
  21. Add the TFSSERVICE user. (see also http://blogs.msdn.com/vstsue/articles/556043.aspx).
  22. Create a share on the buildserver e.g. BuildDrop.
  23. Create a build directory on the buildserver e.g. BuildDir.
  24. Create a team project with a solution in it. Create a team build type and build it.

That’s all

Share

Using MSMQ with C#

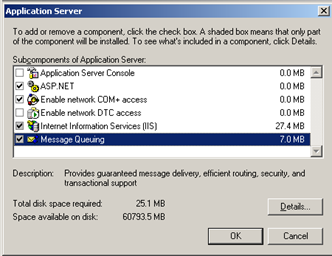
First add the MSMQ component to your windows installation. Go to Add Remove programs; Add Windows Components; Select Aplication Server; press Details and check Message Queuing

Press Ok; press Finish

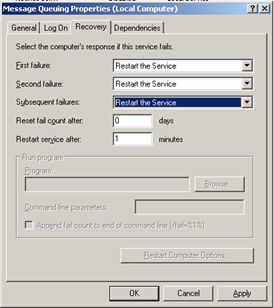
Configure the Message and Queing service to restart when errors occur.

  1. Go to “Start -> Administrative tools -> Computer Management”.
  2. Expand “Services and Applications”.
  3. Sselect “Services”.
  4. Select “Message Queuing”; right click and select “Properties”.
  5. Select the “Recovery tab”.
  6. Select “Restart the Service” for first, second and subsequent failures.


Create a new C# Forms project / solution with Visual Studio 2008. Add a reference to the System.Messaging .NET dll.

Add two Forms to the project. Place in the constructor of Form1 the following code:

//Q Creation 

if(MessageQueue.Exists(@".Private$MyQueue")) 
    mq = new System.Messaging.MessageQueue(@".Private$MyQueue"); 
else 
    mq = MessageQueue.Create(@".Private$MyQueue");
Queue2 q2 = new Queue2();
q2.Show(); 
Share