Category Archives: Handy

LetsEncrypt certificate renewal behind proxy

When deploying a .NET Core website on your domain, you likely utilize a reverse proxy to route traffic from ports 443 and 80 to your Kestrel web server. The configuration for this in Apache is as follows.

The line ProxyPass /.well-known/acme-challenge ! is included to ensure that Let’s Encrypt can successfully renew the certificate.

The other ProxyPass lines are for blazor to connect to the server.

ProxyRequests On
ProxyPreserveHost On
ProxyPass /.well-known/acme-challenge !
ProxyPassMatch ^/_blazor/(.*) http://0.0.0.0:5003/_blazor/$1
ProxyPass /_blazor ws://localhost:5003/_blazor
ProxyPass / http://0.0.0.0:5001/
ProxyPassReverse / http://0.0.0.0:5001/

Share

Ubuntu journalctl

If you want to view the log for a systemd service you can use the journalctl command. Basic Log Viewing: To view the logs for your prog-app service, you can use the following command:

sudo journalctl -u service-app

Tail Logs: If you want to follow the log in real-time, as new entries are added, use the -f flag:

sudo journalctl -fu service-app

Filter by Time: If you’re interested in logs from a specific time period, you can use --since and --until options. For example:

sudo journalctl -u service-app --since "2023-11-27" --until "2023-11-28"

Viewing the Most Recent Entries: To see the most recent entries, you can combine journalctl with other commands like tail. For example:

sudo journalctl -u service-app | tail -n 20
Share

VirtualMin error regarding can_use_gcloud_storage_creds 

After a fresh install of Ubuntu 22.04 and VirtualMin I tried to restore some WordPress sites to my new server. Created a backup on the old server. Next logged into the new server and in VirtualMin navigated to VirtualMin -> Backup and Restore -> Restore Virtual Servers. On this page I got the error as shown below.

HTTP/1.0 500 Perl execution failed Server: MiniServ/2.021 Date: Fri, 21 Apr 2023 07:11:21 GMT Content-type: text/html; Charset=utf-8 Connection: close

ERROR — PERL EXECUTION FAILED
Undefined subroutine &virtual_server::can_use_gcloud_storage_creds called at /usr/share/webmin/virtual-server/cloud-lib.pl line 304.

Not sure what causes this but it has something to do with the google cloud sdk not being installed on the server i suspect. I do not need this so I opend the cloud-lib.pl file in folder /usr/share/webmin/virtual-server/ and modified the perl code as a work around. Replace the function cloud_google_get_state with the definition below:

sub cloud_google_get_state
{
   return { 'ok' => 0 };
}

Next wait for a fix from VirtualMin.

Share

XAMPP: Installing and using it on Windows 2012 R2

What is XAMPP

XAMPP stands for Cross-Platform (X), Apache (A), MariaDB (M), PHP (P) and Perl (P). It is a simple, lightweight Apache distribution that makes it extremely easy for developers to create a local web server for testing and deployment purposes.

XAMPP Installation

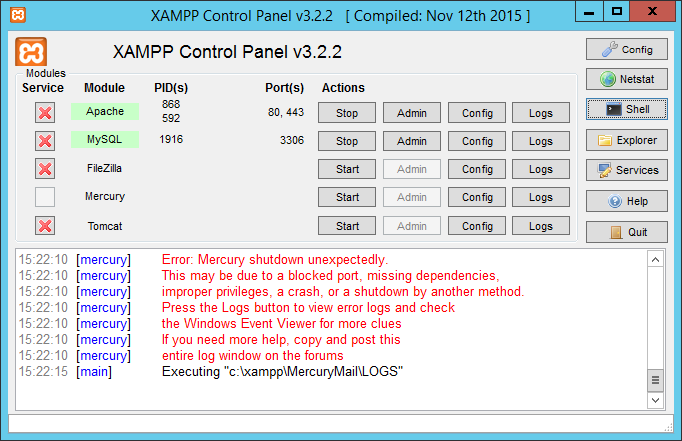
Download your XAMPP installation here. After installation start the XAMPP Control panel (right click on tray icon for XAMPP and choose show/hide).
XAMPP Control Panel

XAMPP Control Panel

Start the Apache and MySQL service. PID(s) and Port(s) should show a number now indicating the services are listening at the ports shown.

Apache

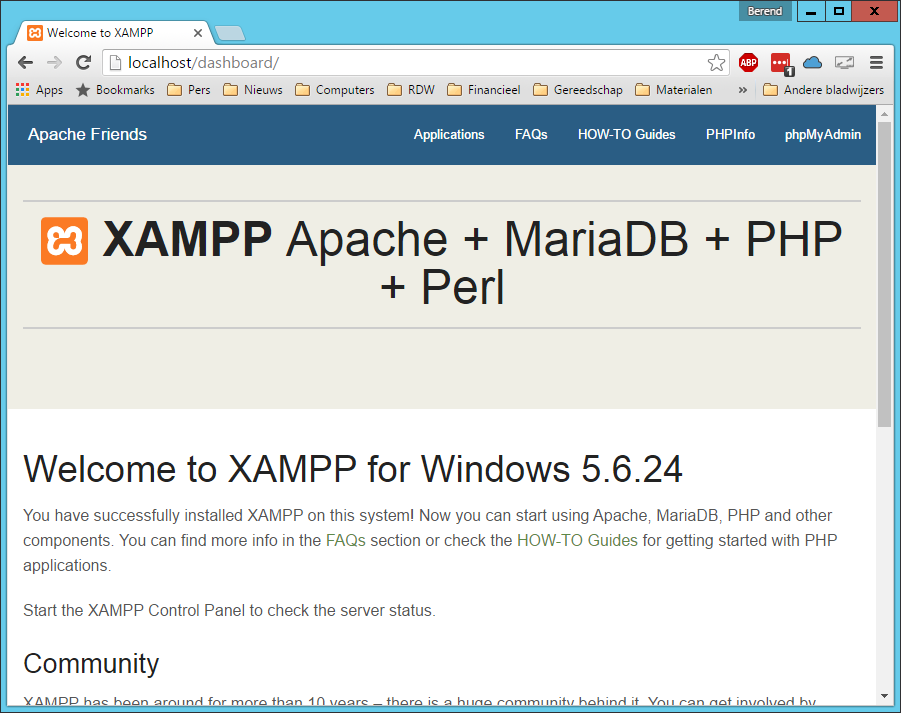
After installation navigate to http://localhost . If Apache is started the XAMPP dashboard is shown in your browser.
MySQL (MariaDB)

To check if MySQL is up and running choose the phpMyAdmin link on the dashboard; if everything is ok the phpMyAdmin dashboard shows up. First thing todo is change your root password for the MySQL instance. Change directory to c:\xampp\mysql\bin and execute the command:

mysqladmin.exe –user=root password “<newpwd>”

To change the MySQL password execute the command:

mysqladmin.exe –user=root –password=<oldpwd> password newpwd

Now phpMyAdmin will stop working because you just changed the root password. To solve this open the phpMyadmin configuration file at c:\xampp\phpMyAdmin\config.inc.php . Change the blowfish_secret to some random value not being xampp. Next set a value of “cookie” for auth_type. Next time you navigate to the phpMyadmin site phpMyAdmin will ask for a username and password.

Setup your first Apache web-site

If both Apache and MySQL are running you can go ahead and setup your first site. In XAMPP sites are stored at c:\xampp\htdocs . Create a directory called xamp.test.tld . Inside this directroy create a document index.php with the following contents:

<?php
phpinfo();

Ok; now on to the Apache configuration. Open the file c:\xampp\apache\conf\extra\httpd-vhosts.conf  and add the following text to the bottom of this file:

<VirtualHost *:80> 
DocumentRoot C:/xampp/htdocs/ 
ServerName localhost 
</VirtualHost> 

<VirtualHost *:80>
   DocumentRoot C:/xampp/htdocs/xampp.test.tld
   ServerName xampp.test.tld
   <Directory "C:/xampp/htdocs/xampp.test.tld">
      Require all granted
      AllowOverride All
   </Directory>
</VirtualHost>

The first virtualhost is the primary or default virtualhost. Hosts that have an unknown ServerName (ie there is no virtualhost definition with this ServerName attribute) are served from this virtual host. In out setup this is also localhost.

That’s all for the Apache configuration. One more thing left to configure and that is the windows host file at c:\windows\system32\drivers\etc\hosts . Add the following line to this file:

127.0.0.1   xampp.test.tld

Your configuration is now complete. Restart your apache server and send your browser to http://xamp.test.tld . The phpinfo page should appear.

Create SSL Website

Open SSL logo

Open SSL

For a site to use SSL we have to create a certificate first which has to be referenced in our Apache virtual host definition. To create your own certificates check this great tutorial. It will guide you step by step through creating a root CA, intermediate CA, certificates and revocation lists. For future reference a short transcript can be found here.

The root certificate you create has to be installed in the Trusted root user certificate store.

After you have create and installed the root CA you can start using the new certificates in your Apache configuration. Lets create a new SSL website for  xampp.test.tld . Open the file c:\xampp\apache\conf\extra\httpd-vhosts.conf  and add the following lines to the end of this file:

<VirtualHost *:443>
DocumentRoot C:/xampp/htdocs/xampp.test.tld
ServerName xampp.test.tld
SSLEngine on
SSLCertificateFile "conf/mycerts/ca/intermediate/certs/xampp.test.tld.cert.pem"
SSLCertificateKeyFile "conf/mycerts/ca/intermediate/private/xampp.test.tld.key.pem"
SSLCertificateChainFile "conf/mycerts/ca/intermediate/certs/ca-chain.cert.pem"
</VirtualHost>

This virtual host defines the SSL site. As you can see there are references to the certificates you created before with OpenSSL.

Now send your browser to https://xampp.test.tld  (mind the s in https) and you should see the PHP information page.

Share

Setup wget proxy on ubuntu

Setup wget to use proxy

When you are behind a proxy server you have to tell wget to use that proxy server. To do this create a .wgetrc  file in your home directory with the contents below (of course change username, password and proxy url).

use_proxy = on
http_proxy = http://username:password@proxy.location.tld:80/
https_proxy = http://username:password@proxy.location.tld:80/

If you want to disable certificate checking add the line below to your .wgetrc

check_certificate = off


Share

Sublime and SFTP

Sublime Text

Sublime

Ever wanted to directly edit your files on your remote server. This can be done with Sublime and the SFTP plugin. Follow the steps below to setup your SFTP client with Sublime.

First install Sublime, you can find it here. After installation startup sublime and install the package manager. Follow the instructions that you can find here.

Okay, now we have sublime and its package manager installed. Next install the SFTP sublime plugin. Start the package manager in Sublime; type Cmd + Shift + P. Type Install Package and then type SFTP.

Now we have to create an account on the remote server. Setting up an account on your FTP server is not part of this post.

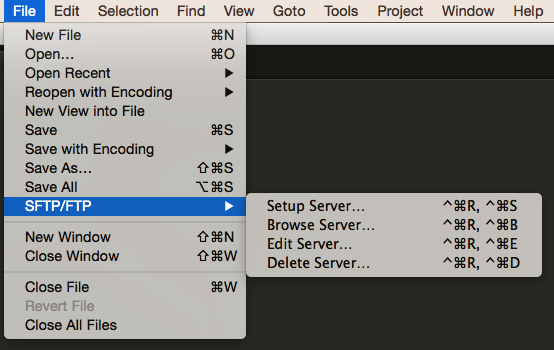
Create a new server setup by choosing File -> SFTP/FTP -> Setup server.

Change the correct items in the example shown and save this file

{
// The tab key will cycle through the settings when first created
// Visit http://wbond.net/sublime_packages/sftp/settings for help

// sftp, ftp or ftps
"type": "sftp",

"sync_down_on_open": true,
"sync_same_age": true,

"host": "example.com",
"user": "username",
//"password": "password",
//"port": "22",

"remote_path": "/example/path/",
//"file_permissions": "664",
//"dir_permissions": "775",

//"extra_list_connections": 0,

"connect_timeout": 30,
//"keepalive": 120,
//"ftp_passive_mode": true,
//"ftp_obey_passive_host": false,
//"ssh_key_file": "~/.ssh/id_rsa",
//"sftp_flags": ["-F", "/path/to/ssh_config"],

//"preserve_modification_times": false,
//"remote_time_offset_in_hours": 0,
//"remote_encoding": "utf-8",
//"remote_locale": "C",
//"allow_config_upload": false,
}

Now you can browse your server. Goto File -> SFTP/FTP -> Browse server. Choose the server you want to browse. If everything is correctly setup a list of files will appear. You can now edit these files as were they local files.

Share

OpenSSL encrypt and decrypt files

cryptoWith the help of OpenSSL you can easily encrypt and decrypt files. This method of encryption is of course  also compatible with the openssl binaries you can download for the Windows platform. Use base64 encoding for better multi-plaform exchange.

Encrypt

Encrypt files with (a password is asked for encrypting):

openssl enc -aes-256-cbc -base64 -in <file to encrypt> -out <encrypted file>

Decrypt

Decrypt files with (a password is asked for decrypting):

openssl enc -aes-256-cbc -base64 -d -in <encrypted file> -out <decrypted file>

The commands above use base64 encoding for storing the encrypted data.

Share

VIM Tips & Tricks

vim-logo-enVim is my favorite text editor on Linux, Mac OS X and even Windows. The vim editor is an enhanced version of vi. Vi works great over slow network ppp modem connections and on systems of limited resources. One can completely utilize vi without departing a single finger from the keyboard. In this post I describe some handy tricks and tips while using Vim.

Encrypt files with vim

With vim it is very easy to encrypt your files. Start vim with the -x command line parameter and the name of a (new) file. Vim will ask for your encryption key (twice). When you save the file it will be encrypted.

The default encryption method is “zip”. You better set the default encryption method to blowfish because this method delivers much strong encryption. Add a line to your .vimrc with the contents set cm=blowfish

:set cul Highlight the line the cursor is one
:set nu Show line numbers
:set nobackup Do not create backup files
:iab AlP ABCDEFGHIJKLMNOPQRSTUVWXYZ AlP expands after pressing <TAB>
ma Create mark with the name a
‘a Goto the mark with the name a
´a,´bw fname Write contents between mark a and mark b to a file with the name fname
%s/needle/haystack/gc Replace all occurences of needle with haystack in the current file asking for confirmation
echo expand(‘~’) Determine your HOME directory
1,$s/$/XXX/ For all lines in the file, append a tripple X (XXX). You could also use % instead of 1,$
%s/^\(.*\)\n\1$/\1/ Find and remove all duplicate lines
%s/ *$/ Remove trailing spaces on all lines in the buffer (%)
‘t,’b!sort Sort all lines between mark t and mark b

List of VIM plugins can be found here.

Useful regular expressions

:g/profile/d  Delete all lines containing “profile” (remove the /d to show the lines that the command will delete)
 :g/^\s*$/d Deleting all lines that are empty or that contain only whitespace
 :v/error\|warn\|fail/d Delete all lines except those that contain “error” or “warn” or “fail
Share

Mac OS X Yosemite hotkeys

Mac OS XSystem wide / general

Fn + ArrowDown / ArrowUp Page down and page up
Shift + Control + Eject Lock the system
Command + Shift + 3 Screenshot of entire screen, add Control key to save it to clipboard
Command + Shift + 4 Select part of screen to take screenshot from, add Control key to save it to clipboard

In Browser

Command + L Highlight location bar
Command + T Open new tab
Command +, – Zoom in and zoom out
Command + 1,2,…9 Change the current tab

In Finder

Command + Shift + A Goto applications folder
Command + Shift + D Goto desktop folder
Command + 1, 2, 3 or 4 Change finder view
Command + i Get file info
Command + C Place file in buffer
Command + V Copy the file
Command + Option V Move the file

Share

VirtualMin backup fails

virtualminHaving problems backing up your virtual hosts with virtualmin after the upgraded to 4.13 (available around january the seventh 2015)?

The source of the problem is that mysqldumps are now executed under the domain account (for security reasons). As is obvious this does not always work correct. For this moment there is a quick fix thanks to the great support folks at virtualmin.com.

Check here for the quickfix (the restart of the virtualmin server is mandatory :-)).

Share