In this blog post we are going to setup a basic invoice system. It uses the ASP.NET Core identity system. Every step for creating the app is described and at the end you should have a working Invoicing system (being it a bit simple one).
For convenience install the sqlitebrowser
sudo apt install sqlitebrowserIf you did not already installed the dotnet-aspnet-codegenerator already….
dotnet tool install --global dotnet-aspnet-codegeneratorAnd also install the libman Client Side library manage
dotnet tool install -g Microsoft.Web.LibraryManager.ClCreate the intial WebApp project
dotnet new webapp -o WebAppA folder, WebApp, with the new web application is created
cd WebAppAdd the required package for the aspnet-codegenerator tool
dotnet add package Microsoft.VisualStudio.Web.CodeGeneration.DesignOptional; add the package below manually so you use the newest version (not the one installed default by the aspnet-codegenerator)
dotnet add package Microsoft.EntityFrameworkCore.SqliteIn Visual Studio you can install the package as a nuget package through the Package Manager console with
PM> Install-Package Microsoft.EntityFrameworkCore.Sqlite -Version 2.2.6Scaffold the Identity pages you want to change later on, for now we are going to use a SqLite database and override the Register, Login and Logout pages.
dotnet aspnet-codegenerator identity --useSqLite -dc WebApp.Data.Identity.IdentityDbContext --files "Account.Register;Account.Login;Account.Logout"Before we are going to add the migrations we change the name (and location) of the database to dbs/identity.db (we will have separate databases for users and data).
Start Visual Code in the root of the WebApp directory.
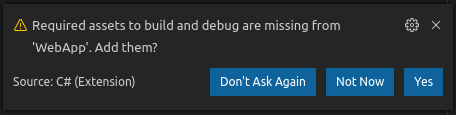
code .Wait a few seconds for the window below to appear and answer Yes. If the window below does not appear press F1 and type “.NET”, then select “.NET: Generate assets for build and debug”.
Open the file appsettings.json in the root of the project and change WebApp.db to dbs/identity.db. Also create the folder dbsin the root of WebApp.
Now we are going to create the Migrations for the initial Identity database and update the database with this migration.
Create the initial migration for the identity system
dotnet ef migrations add InitialCreateIdentity Create the database
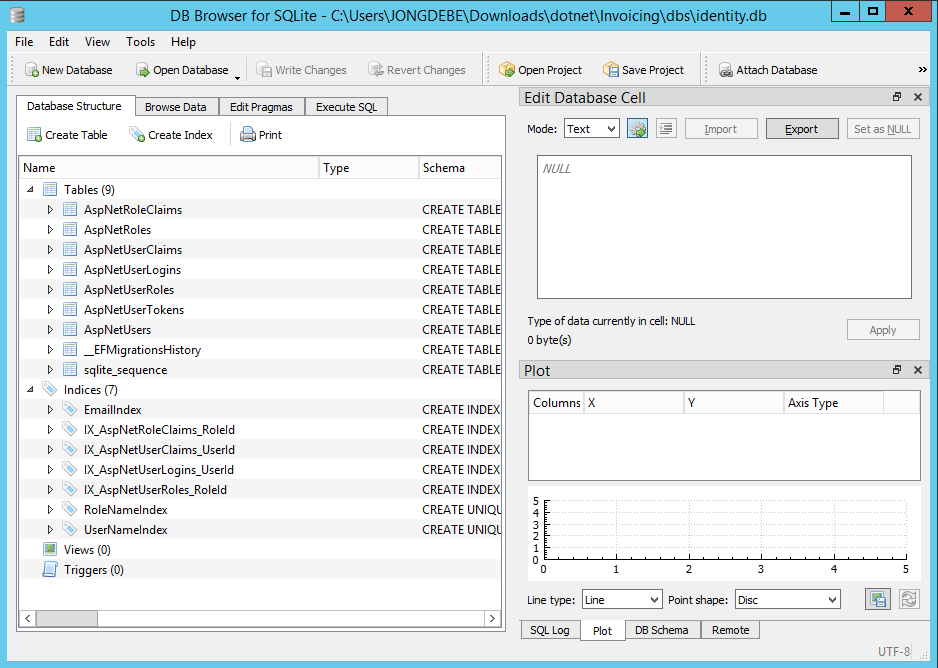
dotnet ef database updateCheck the databastructure with SQLite browser
Because we did not use the --auth parameter on initial create of the project our Startup.cs is not prepared to use authentication. Add the line below right after app.UseCookiePolicy
app.UseAuthentication();We also have to add the _LoginPartial to _Layout.cshtml because of this. Add the partial _LogingPartial to /Pages/Shared/_Layout.cshtml right before the ul which contains the Home link. Add the line below:
<partial name="_LoginPartial" />To test authorization place the [Authorize] attribute on the PrivacyModel class and add the using Microsoft.AspNetCore.Authorisation
using System;
using System.Collections.Generic;
using System.Linq;
using System.Threading.Tasks;
using Microsoft.AspNetCore.Mvc;
using Microsoft.AspNetCore.Mvc.RazorPages;
using Microsoft.AspnetCore.Authorisation;

namespace WebApp.Pages
{
    [Authorize]
    public class PrivacyModel : PageModel
    {
        public void OnGet()
        {
        }
    }
}
It is possible to configure password options in /Areas/Identity/IdentityHostingStartUp.cs. For example: do not require an uppercase character in the password:
services.Configure<IdentityOptions>(options =>
{
   options.Password.RequireUppercase = false;
});
Now we are going to add our first CRUD pages. We are going to store Invoices with our application. First create a directory Models and place a file Invoice.cs in it with the following code in it:
namespace WebApp.Models
{
    using System;
    using System.ComponentModel.DataAnnotations;
    using System.ComponentModel.DataAnnotations.Schema;

    public class Invoice
    {
        public int ID { get; set; }
        public string Product { get; set; }

        [DataType(DataType.Date)]
        public DateTime InvoiceDate { get; set; }
        [Column(TypeName = "decimal(18,2)")]
        public decimal DiscountPercentage { get; set; }
        [Column(TypeName = "decimal(18,2)")]
        public decimal Amount { get; set; }
    }
}
Scaffold model CRUD pages Execute the command below:
dotnet aspnet-codegenerator razorpage -m Invoice -dc InvoiceDbContext -udl -outDir Pages/Invoices --referenceScriptLibraries
The following files will be generated or adjusted:
In /Startup.cs the InvoiceDbContext is added to the services configuration
A directory /Pages/Invoice is created and all files in there are also generated
A directory /Data is created in which a file InvoiceDbContext.cs is stored with the data context for the invoices
The file appsettings.json is modified. A connection string is added for the InvoiceDbContext (we will change this below)
In case you are on Linux. Default the DbContext is using SqlServer, that is not supported on the Linux platform. Goto the file Startup.cs and replace SqlServer with SqLite for the InvoiceDbContext.
services.AddDbContext<InvoiceDbContext>(options =>
   options.UseSqlite(Configuration.GetConnectionString("InvoiceDbContext")));
Next edit the file appsettings.json and replace the connection string value with "DataSource=dbs/invoices.db"
Next create the initial migrations and update the invoice database for the InvoiceDbContext.
dotnet ef migrations add InitialCreateInvoices --context InvoiceDbContext
dotnet ef database update --context InvoiceDbContext
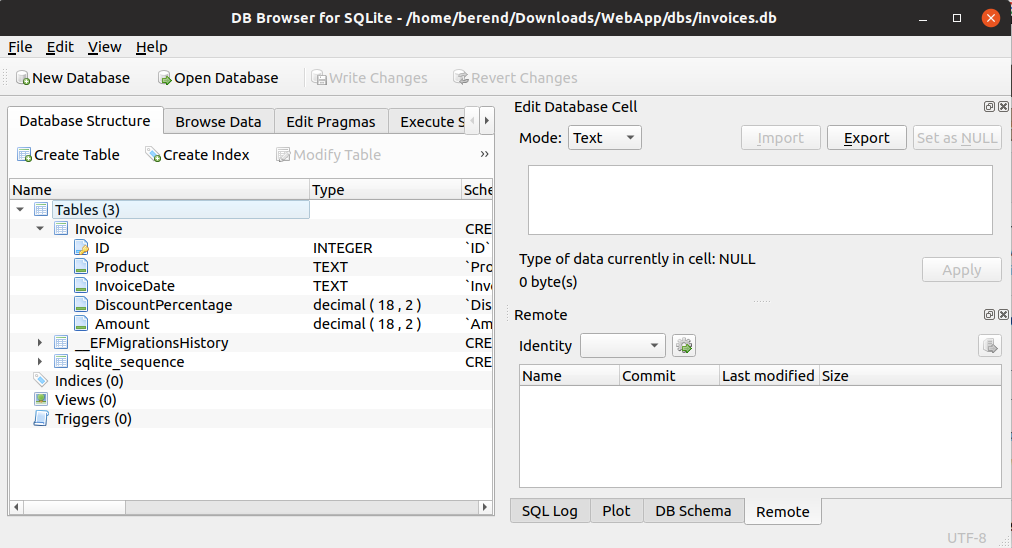
Start the sqlitebrowser to check the structure of your database (/WebApp/dbs/invoice.db)
Now to protect our Invoices folder for unauthorized access add the code below to your services configuration (ConfigureServices) in Startup.cs
services.AddMvc().AddRazorPagesOptions(options =>
            {
                options.Conventions.AuthorizePage("/Invoices");
            });
References and handy URL’s
This url was very helpfull
Aantekeningen nav ContosoUniversity tutorial
Some common errors
dotnet restore gives 401 error
Update your credentials for nuget, first download the nuget cli. Next execute the command:
nuget.exe sources update -name RDW -source [url] -username [user] -password [pwd]
Retrieve your name and url with the command:
nuget sources
When you get the error “Scheme already exists: Identity.Application” you probably generated the Identity pages with a different context then ApplicationDbContext.
Build the solution (Ctrl-Shift-B, Enter) en start debugging F5. Navigate to the Privacy page and verify that you have to login before you can continue to this page.
In case you get error “PlatformNotSupportedException: LocalDB is not supported on this platform.” you probably generated the Identity pages with a different context then ApplicationDbContext.
